Showing posts with label spotlight. Show all posts

Tuesday, October 20, 2015

Spotlight On...Cris G! Part Deux

spotlight-cris-g


We are so happy to have Cris G back with us for another sensational post with panache and elegance!  If you missed learning more about Cris and seeing her first post full of gorgeous black & white projects CLICK HERE!

Now, it's Cris's time to dazzle...  

Hello again!


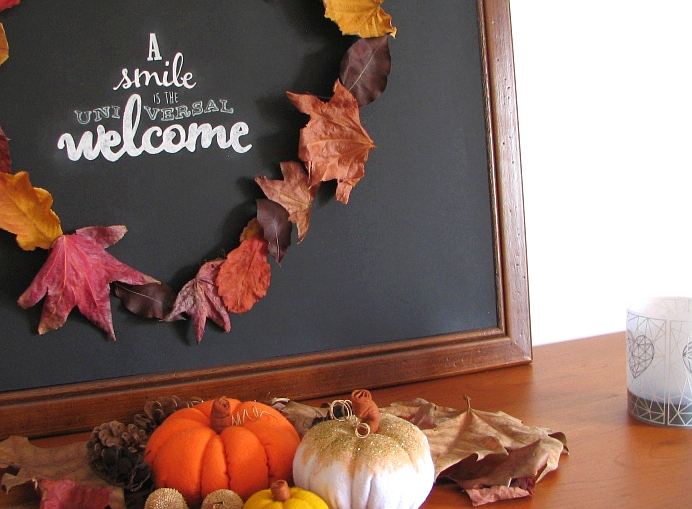
Here I am for my second post. Today I’m bringing something a little bit different - a Fall themed home décor. I kept the main palette in black and white, with just the right amount of gold and copper :)... you know, just to add some sparkle to these pesky days.

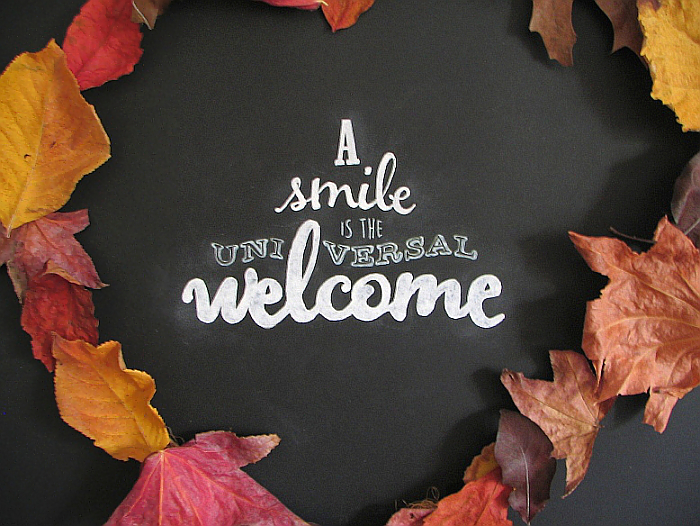
A SMILE
cris_g_A SMILE

... and a welcome are the best way to start, don’t you think?
  1. To make this framed greeting, I started by stamping the word “smile(s)” from Winnie & Walter The Big, the Bold and Friends stamp set and drawing the contour of the biggest word “welcome” from Winnie & Walter The Big, the Bold and Blessings Creative Screenings in a piece of scrap paper. The next step was scanning to my computer. After enlarging both words, I used three different free fonts to compose the greeting in a sheet of printer paper.
  2. Using a piece of yellow carbon paper, the one used for embroidery, trace the letters onto a sheet of black cardstock. Then draw/paint in white. I traced the smaller and the thinner lines using a Uniball white gel pen, and filled in the bigger words using a Uniball liquid chalk marker.
  3. I made an uneven heart shape around the words with some twigs, rope and leaves from last Fall :). Glue this kind of wreath to the cardstock with a glue gun, and then the leaves.
The free fonts I used, from top to bottom, were: Marlboro, Moon Flower Bold, and VintageOne.

LIGHTS OFF

cris_g_LIGHTS OFF

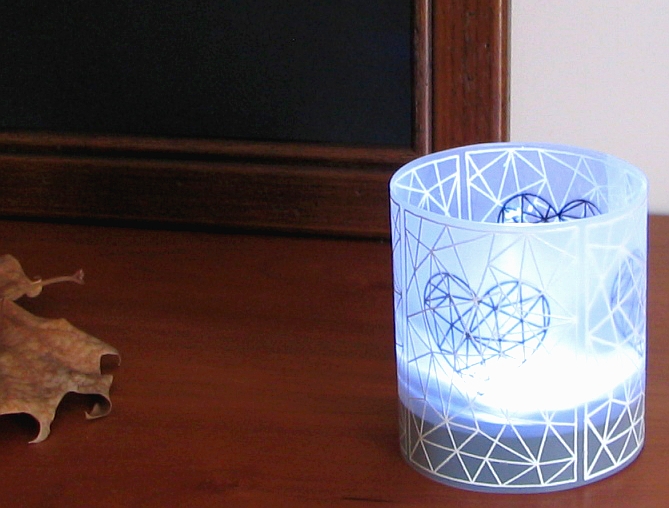
Make luminaries with stamps.
  1. Stamp the Winnie & Walter Mini Scenery: Multifaceted four times with VersaMark ink onto a sheet of vellum paper and heat emboss in white.
  2. Using the faceted heart shape from Winnie & Walter True stamp set, align with the previously stamped vellum doing almost the same procedure from step 1. The only difference is that you will be stamping on acetate and heat embossing in black.
  3. Glue a strip of black cardstock in the bottom of the acetate sheet, so the lamp won’t show much. I used a LED lamp, the ones used in closets, in two different colors... this is another reason to justify the black cardstock.
IN ACTION
cris_g_IN ACTION

TIP - Glue each layer separately, I used mini dots. This way you will have more combinations: use just the vellum, just the acetate, or both.

LEAVES
cris_g_LEAVES
  
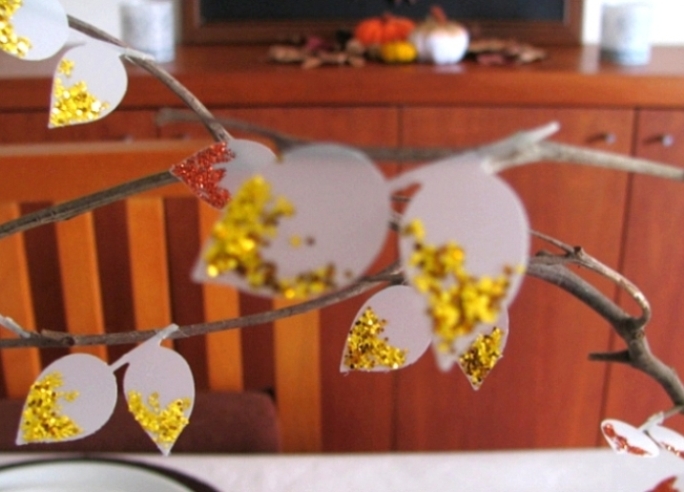
Use die cut leaves to decorate the table.
  1. Gather some twigs. Die cut vellum leaves from Winnie & Walter In Bloom: Maggie’s Roses Cutaways, partially coat them with Glossy Accents and glitter.
  2. Glue the leaves to twigs. This is the tricky bit... I tried with different types of glue, but vellum resisted to most of them, and it would have been unthinkable spend the evening gluing leaves with GA, for example, which I haven’t tried but might have worked. I haven’t used my glue gun as it would show much, so, I ended up using thin double sided tape, it was fast and worked just fine.
JUG VASE
cris_g_JUG VASE

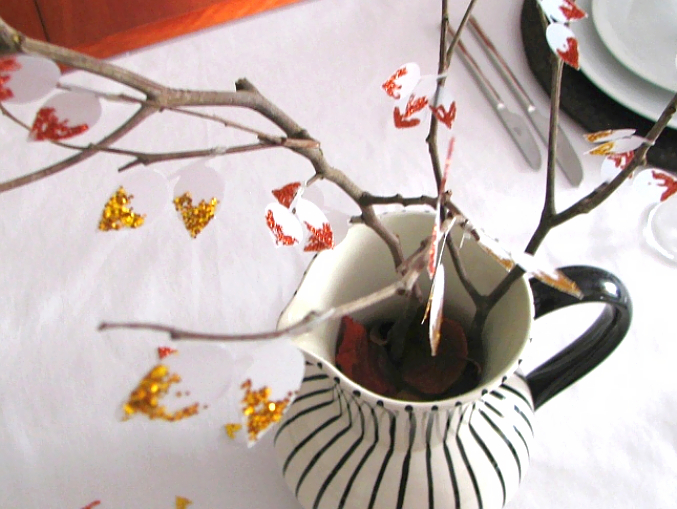
TIP - Scatter some of the vellum leaves on the table, it will add to the Fall look.
Using different containers instead of a regular vase brings some interest, I used this jug that I remember seeing at my parents since forever, and I absolutely love... besides, it has stripes and is black and white!

NAPKIN RING
cris_g_NAPKIN RING
  
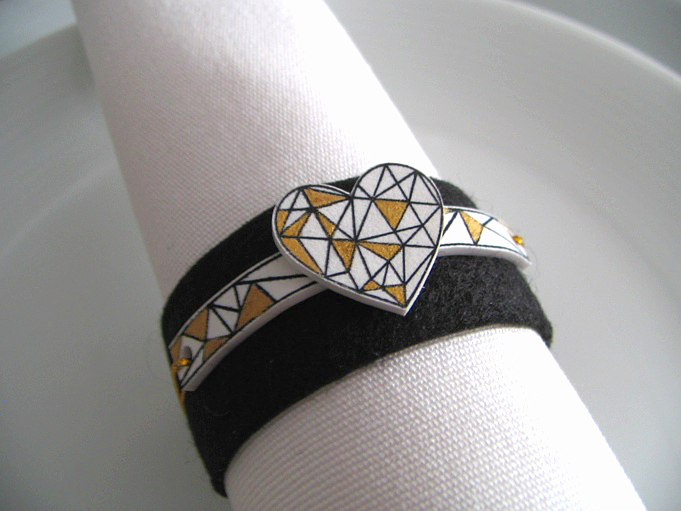
Napkin rings are a great addition to complete the whole décor for a special occasion.
  1. For these rings I started with a stripe of cardstock and another of black felt, first adhering both together, and then in a closed ring.
  2. To make the embellishments I used the Winnie & Walter True stamp set. Stamped the faceted stripe and the faceted heart in white shrink plastic and... voilà, the cutest ornaments for napkins! In fact there was one more step; grabbed my glasses and the tiniest brush I have and colored just a few triangles with gold craft paint.
TIP - If you wish to experiment with shrink plastic, if you haven’t already done so, know that you can bend any piece. You’ll have to find some glass or other non heating material with a rounded shape, or other shape, and carefully (it is hot!) but fast, roll the piece of plastic around the glass and let it cool.

If you want to paint some very small areas, like I did here, it is easier to do it before shrinking, but you will need permanent inks, and let dry thoroughly before shrinking. You will find very good tutorials and videos with great information about this on the net.

Thank you so much for stopping by, and a big thank you from the heart to Julie and Shay for inviting me to the Spotlight!

Thursday, October 15, 2015

Spotlight On...Cecilia Hsieh! Part Deux

spotlight-cecilia-hsieh

We are so happy to have Cecilia Hsieh back with us for another awesome post with an emphasis on black & white! If you missed learning more about Cecilia and seeing her first post showcasing an elegant and dramatic duo of cards CLICK HERE!

Now, it's Cecilia's time to sparkle and shine...  

It's Cecilia Hsieh from Cecilia's Cards back again at Winnie and Walter. I have two more cards to share for the Black and White theme. These two are masculine cards, so I have avoided too much bling on them, just some gems to add a bit of sparkle. For both of them, I have used Ranger Texture Paste on black card stock and Winnie and Walter Creative Screenings - Scenery: Big Bang Circle Creative Screenings and Scenery: Big Bang Classic Star Screenings for the background. The sentiments were embossed with Ranger Liquid Platinum with the first card being partially die cut. This is the first time I've tried this technique and I love how some of the sentiment is on the original card and the rest cut out. The sentiments are from The Big, theBold and Party and The Big, the Bold, and the Happy stamp sets. The sentiment strips were popped up on dimensional tape. Thank you Shay and Julie for allowing me this fantastic opportunity to be 'Spotlighted'!


Tuesday, October 13, 2015

Spotlight On...Cris G!

spotlight-cris-g


We are proud to bring you our next Spotlight On...Cris G!  Cris instantly caught our attention with her thoughtful and delightful deftness with design and composition.  For instance THIS CARD she created for The Gossip Column which is just gorgeous. 

Wait until you see what she's made today...you will see Cris shine!       

Hello creative and talented crafters!

My name is Cristina and I live and love with my husband in the sunny and peaceful Portugal. For the ones who already know me Cris G. is my usual signature, and for those who don’t have a clue of who I am, you can find my work in this Flickr gallery - https://www.flickr.com/photos/95118517@N03/. I would love if you stop by when you have some time, though I understand if you don’t, we all have busy periods in life... sometimes it is difficult for me to stop by my own Flickr home :).

I’ve been a crafty girl and an avid learner in different areas, mostly related to arts and crafts, for all my life. I started my paper crafting adventure two and a half years ago, after watching hundreds an undefined number of videos and tutorials. When I felt prepared I made my first card, and then many others... and hated all of them :). Now I feel more comfortable with my work, but I’m still not so pleased with some of my projects.


It was with surprise and a whole lot of happiness that I received the invitation from Shay and Julie, to be in the Spotlight for the month of October. Thank you so much for the privilege!

THE PROJECTS
October is the month of black and white at W&W, and so I went all b&w with little pops of color. Just a few spots of color will enhance the neutrals, causing a higher visual impact.

I chose the stretch your stash topic because I believe we can get so much more from our supplies than we usually do, myself included... and it can be so much fun as you discover new uses.

I found this quote the other day: “think outside the quadrilateral parallelogram” :). That’s it!

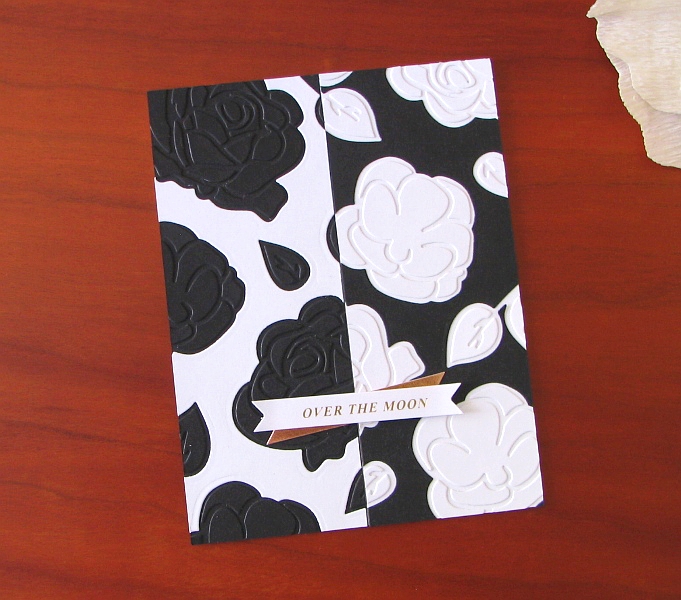
IN HALVES
cris_g_IN HALVES

  1.  I started by drawing a sketch with the die cut flower shapes from Winnie & Walter In Bloom: Maggie’s Roses Cutaways into some scrap paper, for a coherent composition.
  2. With two pieces of cardstock, black and white, slightly bigger than the usual 4.25” x 5.50”, die cut flowers using the solid flower dies and the previous sketch as a guide.*
  3. Cut both panels in half and inlay the black positive solid flowers in the white cardstock and vice versa, with the help of a thin piece of paper (like photocopy paper) glued to the back of both pieces. Trim off excess of flowers hanging in the centre of both panels.
  4.  Align both pieces of cardstock and adhere to a regular 4.25” x 5.50” white card base. Trim off the excess around.
  5. Pick the detailed Maggie’s Roses Cutaways dies, and use the outline flowers dies (positive) as a guide to adhere the negative pieces of each flower and leaf.
  6. Adhere two pre-made die cut labels.

* TIP - I could have done those inlaid pieces in a much easier way. Since only the centre where the two colors meet together had to be aligned, I could have aligned the two half pieces first and die cut just the centre and then all the other flowers separately. The truth is, usually, when I start a card, I have a blur image of the finished design... I adjust things all the way through the end.
For this card I started with two pieces of cardstock a little bigger than the size of a card so I could decide what to do after die cutting the flowers in both pieces in the exact same place. What I did was temporarily adhere the white and black cardstock together and run it through my Big Shot, embossing with the flowers dies. I ended up with an indentation that allowed me to know exactly where to die cut each piece afterwards, since the result of cutting through two pieces of heavy weight cardstock is never satisfactory. I hope my explanation won't be too confusing... If you have any questions, I will happily try to help.


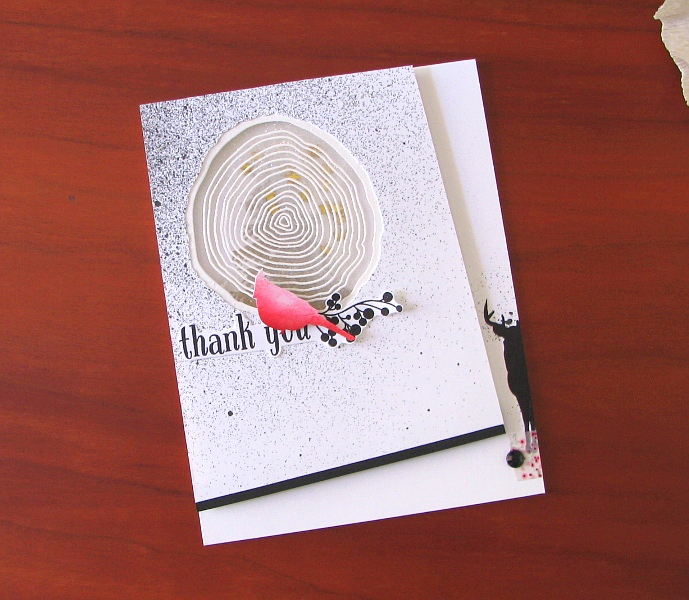
ODE TO WINTER WOODLAND
cris_g_ODE TO WINTER WOODLAND

  1. First spritz black marble Dylusions ink spray, concentrating in the top left corner of a white piece of cardstock. Then cut the piece at an angle and adhere a thin strip of black cardstock at the bottom.
  2. Using the wood growth rings stamp from Winnie & Walter Winter Woodland stamp set, stamp it in a piece of scrap paper and cut out. Do the same with the bird, this time using a craft knife, because you will need the negative image. Use it as a stencil to blend colors in, then cut out the finished bird. Save for later.
  3.  Stamp a partial image of the deer in black, from the same stamp set, near the bottom right corner of card base. Using a thin brush and an acrylic block, do just a few controlled spatters around the deer. Add a little piece of washi tape and a black gem.
  4. With a craft knife and the previously stamped image as a guide, cut out the wood shape from the spritzed panel. Draw a fine line on the card base with a pencil through that open area, and stamp the top portion of the tree from Winter Woodland with VersaMark ink. Heat emboss with enchanted gold powder. Using foam adhesive, create a zone for a shaker around that area and fill it with dry stickles and tiny gold stars.
  5. Stamp the wood growth rings with VersaMark ink onto a piece of heat resistant acetate and heat emboss with white powder. Adhere the acetate to the back of top panel and mount on card base with more foam tape.
  6. Stamp the sentiment and berries and fussy cut. Glue sentiment to top piece and adhere the bird from step 2 with foam tape.

TIP - Mix goodies and what they are intended to be; for example, use solid stamps as stencils to get a blended ombre effect.
Heat embossing on acetate is so much fun and gives so many possibilities... and it is very easy. You just have to be sure your acetate is good for photocopy or printing, and let your heat tool reach a high temperature first.

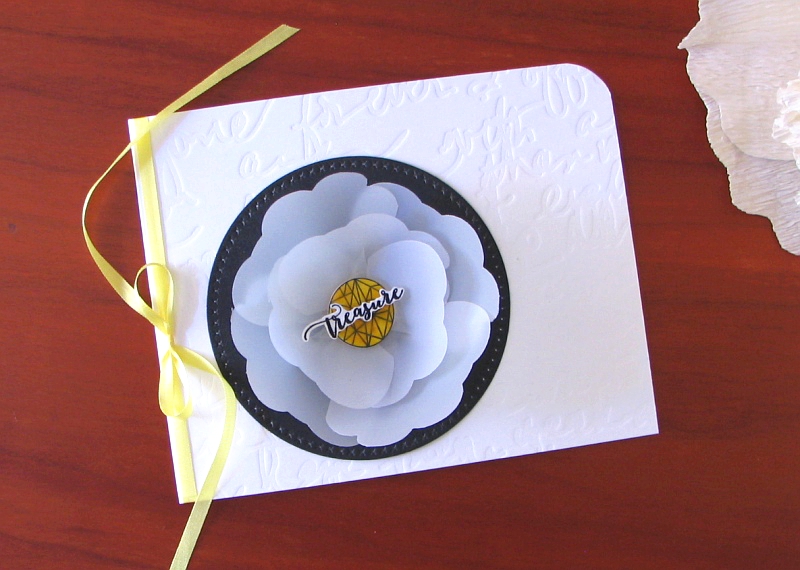
SMALLER, PLEASE
cris_g_SMALLER, PLEASE
  1. Cut a white card base and dry emboss the front using Winnie & Walter Scenery:Persuasion Script Creative Screenings. Glue a circle of black cardstock.
  2. Using a solid die flower from Winnie & Walter In Bloom: Maggie’s Roses Cutaways, die cut the bigger flower 7 times from vellum. Give the shape of petals to each die cut flower, making two layers: one with 4 petals and another one with 3. Adhere the resulting 3D flower to a small circle of white cardstock, and this one to the black circle.
  3. Stamp the faceted circle from Winnie & Walter True stamp set in a piece of white shrink plastic, using Archival ink or StazOn ink. Allow the ink to dry and then trim around or die cut. Repeat the procedure with the word Treasure. Now this is the fun part!!! I used my heat tool and the results are quite good, but if you prefer you can use your oven.
  4. After the two pieces are completely cool, color the circle with nail polish for some transparency, let dry and add a second coat with Glossy Accents. Leave the word Treasure as is. As an alternative, paint with other coloring medium of your preference, then coat with VersaMark ink and heat emboss with clear embossing powder (this option wasn’t experimented yet).
  5. To finish off the card, tie a bow in a piece of silk ribbon around the card front and crop the upper right corner.

TIP - Use your not-intended-for-3D-flowers dies to create beautiful 3D flowers.
Use shrink plastic to make unique personalized embellishments.
Explore the versatility of your supplies (I have to remember this one more often!) :).
Most of all have FUN!!!

This is all from me for now.
It was a pleasure working with these fantastic Winnie & Walter products!
See you soon!

Thursday, October 8, 2015

Spotlight On...Cecilia Hsieh!

spotlight-cecilia-hsieh

We are proud to bring you our next Spotlight On...Cecilia Hsieh!  Cecilia caught our attention with her lovely entries in our challenges like this pretty card from our last The Gossip Column challenge HERE.  Her clean and simple aesthetic allows the color and/or pattern she uses to really make a great impact.

Wait until you see the awesome projects she's made today...you will see Cecilia shine!       

About Me (Cecilia Hsieh)


Hi Everybody! First of all, thank you to Winnie and Walter for asking me to be part of their blogpost! 

My name is Cecilia from Cecilia's Cards and I’m from Melbourne, Australia. I’m a Scientist during the day and Crafter at night.  I’ve been blogging since March 2012 and have met a lot of virtual as well as real life crafting friends during this time. My crafting journey have started at a very young age and paper craft is something that I’ve always gone back to. I have knitted, painted on ceramics, painted, sewed and have even tried scrapbooking. A lot of the projects I have made are in the hands of my friends and relatives. My card making style has evolved over the years and I am really comfortable with what I make now. I have had a few cards published in three magazines and have won a several online crafting challenges. This is where Julie and Shay found me – submitting madly to some of W&W challenges! I love the W&W stamps, and love using them in a lot of my projects.

Projects – Black and White Challenge

My first card is made with my newly acquired Winnie and Walter In Bloom: Addie’s Garden. I love the versatility of the flowers in this set. I white embossed a flower on black cardstock and fussy cut the flower. The background is stamped with the various stamps from the set. The sentiment is from The Big, the Bold, and the Happy stamp set using the ‘In a Word: Happy’ Cutaway. The ‘Happy’ die is layered with 3 layers of black cardstock. The ‘birthday’ was stamped in red just to give it a hint of colour. The white embossed flower was mounted on dimensional foam. Lastly, some pearls were added to the card to finish it off.


My second card was made with the The Party and Scenery: The Party Hangover stamp sets. Again one image was white embossed on black cardstock and mounted on dimensional foam. The ‘happy’ diecut  was layered with just black cardstock with a bit of red behind the diecuts. I added some droplets to the card to finish it off.


Thank you Shay and Julie for the Spotlight. Pop back next week for two more black and white projects to share!

Tuesday, September 29, 2015

Spotlight on Lisa Lahiff...Part Deux!!

spotlight-lisa-lahiff

We are so happy to have Lisa Lahiff back with us for another stupendous post with an emphasis on the metallic!  If you missed learning more about Lisa and seeing her first post full of beautiful and innovative metallic projects CLICK HERE!


Now, it's Lisa's time to sparkle and shine...  


Hello!  It is Lisa back here with you today, and I am so thrilled to have one more day to share some metallic awesomeness with some amazing Winnie and Walter goodies!!!!  Let's dig in...


For this first card I had a lot of fun layering up various patterned papers by My Minds Eye for a bright and eclectic background.  I then went ahead and ran my In a Word Happy cutaway through my machine three times with three different foiled papers.  I love not only the thickness, but by stacking them up slightly to the side of each other, you are able to see all three colors.  I then diecutted the tag from the Essentials:Audrey Cutaways, and stamped the birthday sentiment from The Big the Bold and the Happy Stamp Set.  I finished my card off with some twine tied at the top of the tag, faux stitching down the side of the card and some sequins that came with my Winnie and Walter happy mail!


This next card was created using The Big, the Bold, and the Merry Creative Screenings. I wanted to create a metallic background for my sentiment to really pop in the shaker frame so I started by using reposition-able adhesive on the backs of the "merry" and "christmas" creative screens.  I then used a gold metallic ink and applied it to the entire background with a blending tool.  I carefully removed my screens and had a nice negative of my sentiment.  Next I used the  Essentials:Audrey Cutaways to create my frame with patterned paper, adding various sequins including 4 mm Metallic Gold Cupped Sequins, and 6 mm Sparkling Clear Sequins by Pretty Pink Posh which can be found in the Winnie and Walter Boutique to create my shaker element!  I added a sparkly paper bow to the corner as a finishing touch.


I am so excited to show you this last card as it has a lot of firsts for me on it!  For one the background was diecut with household aluminum foil, which was so fun to try! (Warning make sure you pull the die cut out gently as the foil is very fragile and thin to work with.)  Then I was trying to think of what else I could do with this cut, and how to add some color when embossing popped into my mind.  So that's what I did!  Using the In Bloom: Lola's Bouquet with Joni Andaya Stamp set and a watermark ink pad I embossed and double embossed various images for a fun floral design.  I then stamped and embossing my "hello" sentiment from The Big the Bold and the Happy Stamp Set.  Finally, I propped it up with foam adhesive onto a panel of vellum with foil before adding it to my cardbase.  I wish you could see the beauty of this card in person, the shine of the aluminum and the layers of embossing are just gorgeous!  Anywho, I hope I was able to capture just a little of its beauty for you to envision the real look of it!

I want to end my post with a warm and most sincere thank you to both Shay and Julie for shining the spotlight on me.  I have had an amazing time just playing and having fun with lots of Winnie and Walter products, and I know I will continue to do so for a long time to come.  You both are so welcoming, warm, and encouraging that you make the crafting community a better place.  Many hugs for you both!  I must also thank Winnie and Walter for letting me come on this blog to play!  And finally a heartfelt thank you to you for stopping by and visiting my work, your kind words have been so motivating and appreciated.

Happy Crafting!
Lisa

Thursday, September 10, 2015

Spotlight On...Penny Ward! Part Deux

spotlight-penny-ward 

We are thrilled to have Penny Ward back with us for another incredible post that will inspire you with her inventiveness and creativity!  If you missed learning more about Penny and seeing her first post that will stun you with their loveliness CLICK HERE.

Now, it's Penny's time to sparkle and shine...      

I'm backkkkkkk...Penny here again today with more Metallic fun using Winnie & Walter goodness.

Fall is in the air....somewhere. Living in Florida, we only have one season and that is the Hot season. Isn't it wonderful though that we card makers can achieve Fall through our art?

This card is a fun way to maximize your stamps. 
You just thought those were leaves in that stamp set, but there are so many ways to use them.


Let's get started

  • Start with a piece of Authentique Durable pattern paper trimmed to 4.25 x 5.50 inches. Stamp and heat emboss the "hugs" sentiment from The Big, the Bold and Friends set as shown using WaterMark ink and Stampendous Bark embossing powder.
  • On White cardstock, draw a 3 inch circle (Ok, so I traced around a 3 inch circle die). Stamp leaves from the In Bloom: Lola's Bouquet with Joni Andaya stamp set around the circle using Memento inks Olive Grove, Rich Cocoa, Peanut Brittle and Rhubarb Stalk. Stamp over these same leaves again using Encore Metallic Green, Bronze, Copper inks as well as Delicata Golden Glitz.
  • Trim panel into a 4 inch square. Notch corners with a circle punch, stamp top portion of sentiment and adhere to pattern paper with foam adhesive.
  • Stamp "fern" using VersaFine Onyx Black, then ink with Encore Metallic Green, trim and adhere to side of wreath.
  • Ink up a few strips of light weight cardstock with the Encore inks. Trim very closely (about 1/8 inch) so the cardstock curls. Add a few sprigs of these curls over the "fern".
  • Tie a bow from jute, add to card front along with sequins as desired.
  • Cut White cardstock to 4.25 x 11 inches, fold in half for a base card. Adhere card front to base card.

I just couldn't let my time here as a Guest Designer end without doing something with watercolors.


Shaker cards are still very popular and so fun to make as well as receive.
Look closely at my shaker filler...yep, it is tiny die cuts from the Essentials: Audrey Cutaways.
Too stinkin' cute!


  • Cut watercolor paper 4.25 x 5.50 inches. Stamp and heat emboss Mini Scenery: Multifaceted with WaterMark ink and White embossing powder. Watercolor in the triangles with Blue and Aqua watercolors. Use the same colors for the rest of the panel.
  • Die cut the small scalloped rectangle from Essentials: Audrey Cutaways with Aqua cardstock. Trim inside this panel leaving approximately a half inch all the way around (or die cut with a rectangle die, if you have one). Adhere acrylic sheet to backside of opening. Die cut the same scalloped rectangle from white fun foam, trim center. Adhere to Aqua frame on the backside.
  • Fill "shaker" area with sequins and the adorable tiny die cuts from the Audrey Cutaways. Adhere Aqua panel over the shaker filler. Let dry.
  • Cut a piece of Vellum 1 x 4 inches. Using the Audrey Cutaways large scalloped rectangle die, run through your die cutting machine at an angle as shown. Adhere to card front at the bottom right.
  • Die cut "hugs" from The Big, the Bold and Friends Cutaways die set, paint with All Purpose Ink Frost White and adhere over Vellum.
  • Cut White cardstock 4.25 x 11 inches, fold in half to make base card. Adhere card front to base card and add sequins as desired.


Saving a new to me technique for last hoping you love it as much as I do.


Metallic shine?  Yes, please!
Super simple, easy peasy Mr. Sneezy!!!
Run into the kitchen and grab the aluminum foil....go on, I will wait.

  • Cut White cardstock 4.25 x 11 inches, fold in half for a base card.
  • Die cut Bright Pink cardstock with the large scalloped Essentials: Audrey Cutaways die. Adhere to base card.
  • Die cut a small scalloped rectangle from the Audrey Cutaways using Purple cardstock. 
  • Take a piece of aluminum foil about 8 x 6 inches. Crinkle it pretty good, then smooth it out with a brayer. Using 2 drops each of alcohol inks Wild Plum, Stream and Sunshine Yellow, swirl it around a bit with a paintbrush. Let dry.
  • Adhere foil to White cardstock measuring 5 x 4 inches. Die cut with small scalloped rectangle. Trim a small section of the center away. Adhere to Purple scalloped panel. Wrap sheer ribbon around panel, tie bow and adhere to card front.
  • Die cut "friends" from The Big, the Bold and Friends Cutaways set 3 times, stack and adhere together. Ink top half with Memento Rose Bud ink and bottom half with Memento Angel Pink ink. Adhere to card front along open section.
I am so hoping you found inspiration today for making your own Metallic cards. 

I want to thank Julie and Shay for inviting me to be a part of their family for this short time. It was such fun creating with their wonderful products.
 Hoping YOU have a wonderful crafty day.
Many hugs,  :)

Tuesday, September 8, 2015

Spotlight On...Lisa Lahiff!

spotlight-lisa-lahiff

We are proud to bring you our next Spotlight On...Lisa Lahiff!  Lisa caught our attention with her submissions to The Gossip Column Challenge and Rerun Challenge in which she creates delightful, cheerful, colorful and well balanced cards like this gorgeous CARD that she entered into our first The Gossip Column Challenge. 

Wait until you see what she's made today...you will see Lisa shine!       

>>>ABOUT LISA<<<

Hello beautiful people!!!!  I am so excited to be here with you today!  When I first saw an email to be in the spotlight I literally "eeekkked!", you can ask my husband as I scared the pants off of him, hehehe!  Now onto a little about me... I am a Mommy of two little monkeys, and I am married to my college sweetheart going on 9 years this November!  I have lived in Ohio my whole life, and while the weather may be a bit crazy I love it.  I was introduced to scrapbooking in 2005, right before I became engaged.  After my oldest was born in 2008, I discovered card making and blogging which got me hooked on all things papercrafting!  I have had the honor of seeing several of my works published online and in print, and I feel so blessed to be a part of this community.  I would love for you to stop by my blog, Lisa's Creative Niche, sometime and leave a little hello, I'll be sure to say hi back!

Now onto the projects...

>>>LISA's PROJECTS<<<

With the theme being metallics I decided to share various types of metallics as well as uses for metallics on the following cards...


For my first card I used metallic cardstock in various colors to heat emboss my floral images from the In Bloom: Lola's Bouquet with Joni Andaya Stamp Set.  I then fussy cut around the images and layered them on the left lower corner of my card.  On my background panel you will also see a strip of hearts I die cut with the Essentials: Audrey Cutaways.  The sentiment was stamped last in a coordinating blue from The Big the Bold, and the Happy stamp set.


Next I am sharing a fun way of using textured metallic paper and die cuts.  I started by die cutting the edge of my background panel with the long side of the larger frame cutaway found in the Essentials: Audrey Cutaways.  Once this was adhered to the front of my card, I die cut several butterflies from the same cutaway set and adhered them in a staggered pattern creating the appearance of motion on my card.  The sentiment was stamped from The Big, the Bold, and the Happy stamp set.


This last card was created as a happy accident, and I just love it!!!!  I was able to create my own metallic background by spritzing my cardstock with various gold and silver mists.  I left it to dry for a little, when I realized my original intent for my project was not working I grabbed a baby wipe and began wiping back and forth just to see what would happen.  The results is that lovely shiny and marbled metallic background.  For the second layer of this card I used the same results, but this time I crumbled the paper and opened it up to give it an "older" look.  I then ran it through my die cut machine with the smaller frame die from the Essentials: Audrey Cutaways.  Next I stamped my flowers and leaves from the In Blooms: Lola's Bouquet with Joni Andaya and the banner and sentiment from The Big, the Bold, and Extras Stamp Set onto watercolored paper.  I then used distress markers to watercolor in my images, and fussy cut each one out.  Finally I layered my flowers and leaves and popped my banner up with foam adhesive.

So to sum things up, metallics are great for stamping on, die cutting with, and creating beautiful backgrounds.  I hope I've inspired you to try something new with metallics today!  Thanks so much for stopping by and seeing my projects!  I have the honor to stop back later this month, and I can't wait to see you then!

Lisa

Thursday, September 3, 2015

Spotlight On...Penny Ward!

spotlight-penny-ward 

We are proud to bring you our next Spotlight On...Penny Ward!  Penny really caught our attention by entering our The Gossip Column challenge and Rerun challenges with projects that showcase her clean, bold style and clever touch as seen in this amazing card HERE.

Wait until you see the awesome projects she's made today...you will see Penny shine!    

>>>ABOUT PENNY<<<


Hello crafty friends.... 
I am a daughter, sister, wife, mother, Nana and one year Breast Cancer Survivor.
I married my high school sweetheart back in the stone ages. We have two grown sons, a beautiful Daughter in Love and two adorable grandsons. My shadow is my small white dog Snowy.
I am retired from a Fortune 500 company after 20 years of helping others achieve their dreams. Before my grandson was born, some really great friends had a First-time Grandma shower for me (how cool is that?), and I wanted to make some personalized thank you cards. I walked into my local craft store, saw all the pretty papers and tools, and I was hooked.
Many watched videos later, I have been published in magazines more than 100 times. I am currently on the Imagine Crafts Design Team, and designed for Penny Black and others.
I was beyond thrilled to be contacted by Julie and Shay about being in the Spotlight for September. What an honor! I do believe a happy dance was involved.
I would love for you to visit my blog Penny Ward Ink, take a look around, maybe be inspired by something you see there. Questions and comments are encouraged!

>>>PENNY's PROJECTS<<<

Let's make some cards.....


This month we are featuring Metallics on our projects, though beautiful to look at, they are not very easy to photograph. Just imagine the sheen on each of these cards! :)

Let's start with Metallic cardstock.
Easy Peasy Mr. Sneezy

  •  Cut White Metallic cardstock 4.25 x 5.50 inches. Run the top half through embossing machine using a We R Memories Geometric folder.
  • Wrap Offray ribbon around card front.
  • Die cut Winnie & Walter In a Word: Hugs Cutaway two times from same cardstock. Stack and adhere together. Adhere to card front as shown, placing a small amount of Gold Metallic thread behind it.
  • Adhere this panel to a card base of white cardstock cut to 4.25 x 11 inches, folded in half.


Now let's try something a little more challenging:


This one is a little more complicated, yet still easy enough to accomplish in a short time...ok, don't count drying time...I hate that, don't you?

  • Cut Teal cardstock to 4.0 x 5.50 inches. Lay this panel on a craft mat and lay the Winnie & Walter V for CheVron stencil on top. Using a palette knife, spread Metallic Blue Creative Medium over stencil. (HINT: I spray the backside of stencil with Temporary adhesive to keep it in place). Let dry.
  • Stamp and heat emboss large Smiles sentiment from the Winnie & Walter Big, Bold & Friends stamp set using WaterMark ink and White embossing powder.
  • On a scrap of Black cardstock, heat and emboss the small sentiment from the same stamp set. Trim and adhere to card front with foam adhesive.
  • Attach the card front to a base card of Black cardstock cut to 4.25 x 11 inches and folded.
  • Make a couple of small banners from trimmed Washi tape, adhere to top of card. Die cut the small button from the Winnie & Walter Audrey Cutaway. Adhere to card front and coat with irRESISTible Pico Shimmer. Add Pretty Pink Posh Sparkling Clear sequins as shown.


 Foil is all the rage right now, and it is so perfect for Holiday cards:


This is fairly simple to make. You will need to download the Winnie & Walter The Big, Bold and the Merry cut file. 

I then took this file into my Silhouette software, deleted the "s" from the word Holidays, made a thick black border at 4.0 x 5.25 inches, positioned the word "holiday" where I wanted it and sent it to my laser printer. I then cut the panel to 4.25 x 5.5 inches, adhered the foil and ran it through the laminating machine.
  • Die cut In a Word: Hugs Cutaway from Blue cardstock, stamp it with Winnie & Walter Mini Scenery: Multifaceted using WaterMark ink and Silver embossing powder.
  • Paint some of the angles with All Purpose Platinum ink. Randomly add irRESISTible Pico Shimmer to some of the angles. Let dry. Adhere this embellishment just below the word "holiday".
  • Die cut a heart from the Winnie & Walter Audrey Cutaway, adhere thin Metallic Silver cord to back and adhere to card front as shown. Coat heart with Pico Shimmer and add bow.
  • Adhere card front to a base card cut from White cardstock measuring 4.25 x 11 inches folded in half. Run the edges along a Delicata Shimmery Silver ink pad.
Well, that is going to do it for today. I had so much fun playing with all my new Winnie & Walter stamps, dies and digitals. It's your turn. What Metallic creations are you going to come up with?
Until next time...hugs!!!!   :)

Tuesday, August 25, 2015

Spotlight On...Michele Ferguson! Part Deux

spotlight-michele-ferguson

We are thrilled to have Michele Ferguson back with us for another incredible post that will inspire you to make beautiful projects for your friends!  If you missed learning more about Michele and seeing her first post that will stun you with their loveliness CLICK HERE.


Now, it's Michele's time to sparkle and shine...      

Hello again!  I'm back this week for a few more of my favorite ways to use Winnie & Walter products ... so many ways, one day just wouldn't do! 

I seem to design "in the round"!  Does that make sense to any of you?  In other words, when an idea strikes, I set about putting it to paper ... sometimes, while creating the first, another design will come about - like with the positive and negative idea from last week. 

This week [besides those carrots] I've latched onto a few favorite colors, or color combos, and just let my Winnie & Walter products shine - with a bit of my own favorite touches thrown in - like texture*, and humor ... does anyone appreciate my sense of humor?  =|

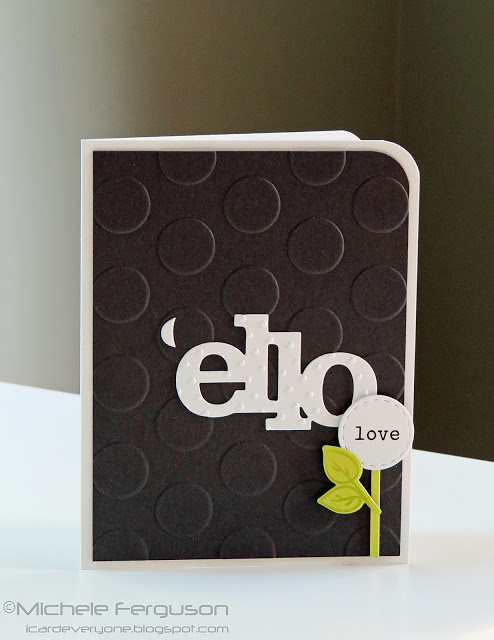
Enter exhibit #1: Yes, black IS one of my favorite colors!

michele_2image001
Hello Cutaway - adapted by simply turning

the die around, and partial die-cutting!

Pretty little leaves from Maggie's Roses... and a snippet for

the perfect placement of the perfect word - found
in the "Big, Bold and Happy" set.

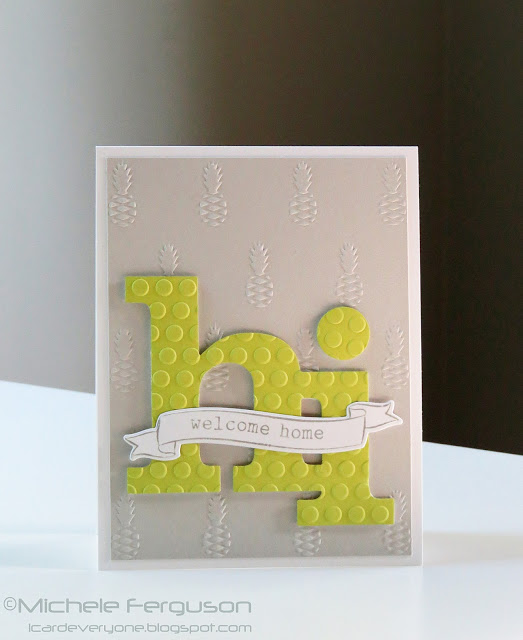
Card #2:  Putting the accent on the happy green with another way to say hello:

michele_2image002

Hi Cutaway - this time the positive cut, and perfect
words from The Big, the Bold and Seasons - welcome;
and The Big, the Bold and Extras - home, and the beautiful banner.

You had to know I planned ahead while cutting that hi - right?

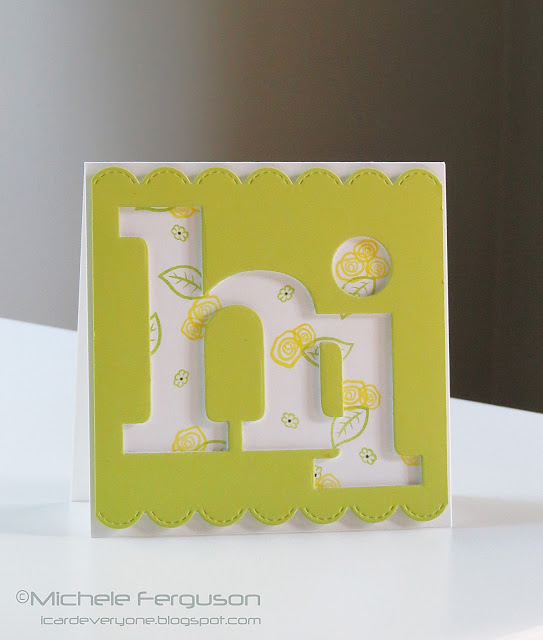
Enter card #3:

michele_2image003

In Bloom: Lola's Bouquet has a very, very special place in my heart.
Darling yellow roses - My Mom's favorite, and mine -
strategically placed, they do indeed 'dot the i.'

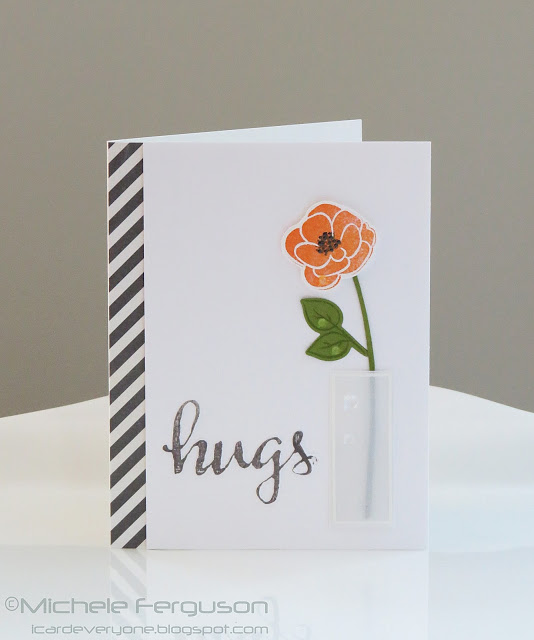
My final card is my way to say 'thank you' to Winnie & Walter for inviting me to share my creations using their fabulous products.   Also for their generous hearts, and continued support of all of us, and our love of paper-crafting.  I am pretty new to this blogging world, so I can't help but feel ever so special to be among those of you Winnie and Walter have shone their ever-lovin' spot-light on!

For you, Shay & Julie:

michele_2image004

Another one of Lola's Blooms - this time in orange - another favorite color, and a remake of this card - I couldn't wait to make that cool square vase!
Hugs provided by The Big, the Bold and Friends Cutaways and Stamps.
LOve that brilliant hand-written font!

Thanks for hanging out with me today, and thanks always for all the love and sweet comments from you, my card-loving, card-making, fabulous friends!

=]  Michele


*Embossing folders, patterned paper, and embellishments are from my stash and not W&W products.