Showing posts with label jessica frost-ballas. Show all posts

Wednesday, February 21, 2018

w&w 4th Birthday Bash | Special Guest Star Jessica Frost-Ballas

jessicafrost-ballas

Our 4th Birthday Bash continues going strong with our next special guest star, Jessica Frost-Ballas!  Jess has been a friend of w&w for quite some time and she was our Leading Lady back in November 2016 where she dazzled each month which is no surprise as she is exceptionally gifted at crafting and such a lovely person.  I love to invite her as a guest whenever possible. :-)  Please give Jessica a big w&w welcome!

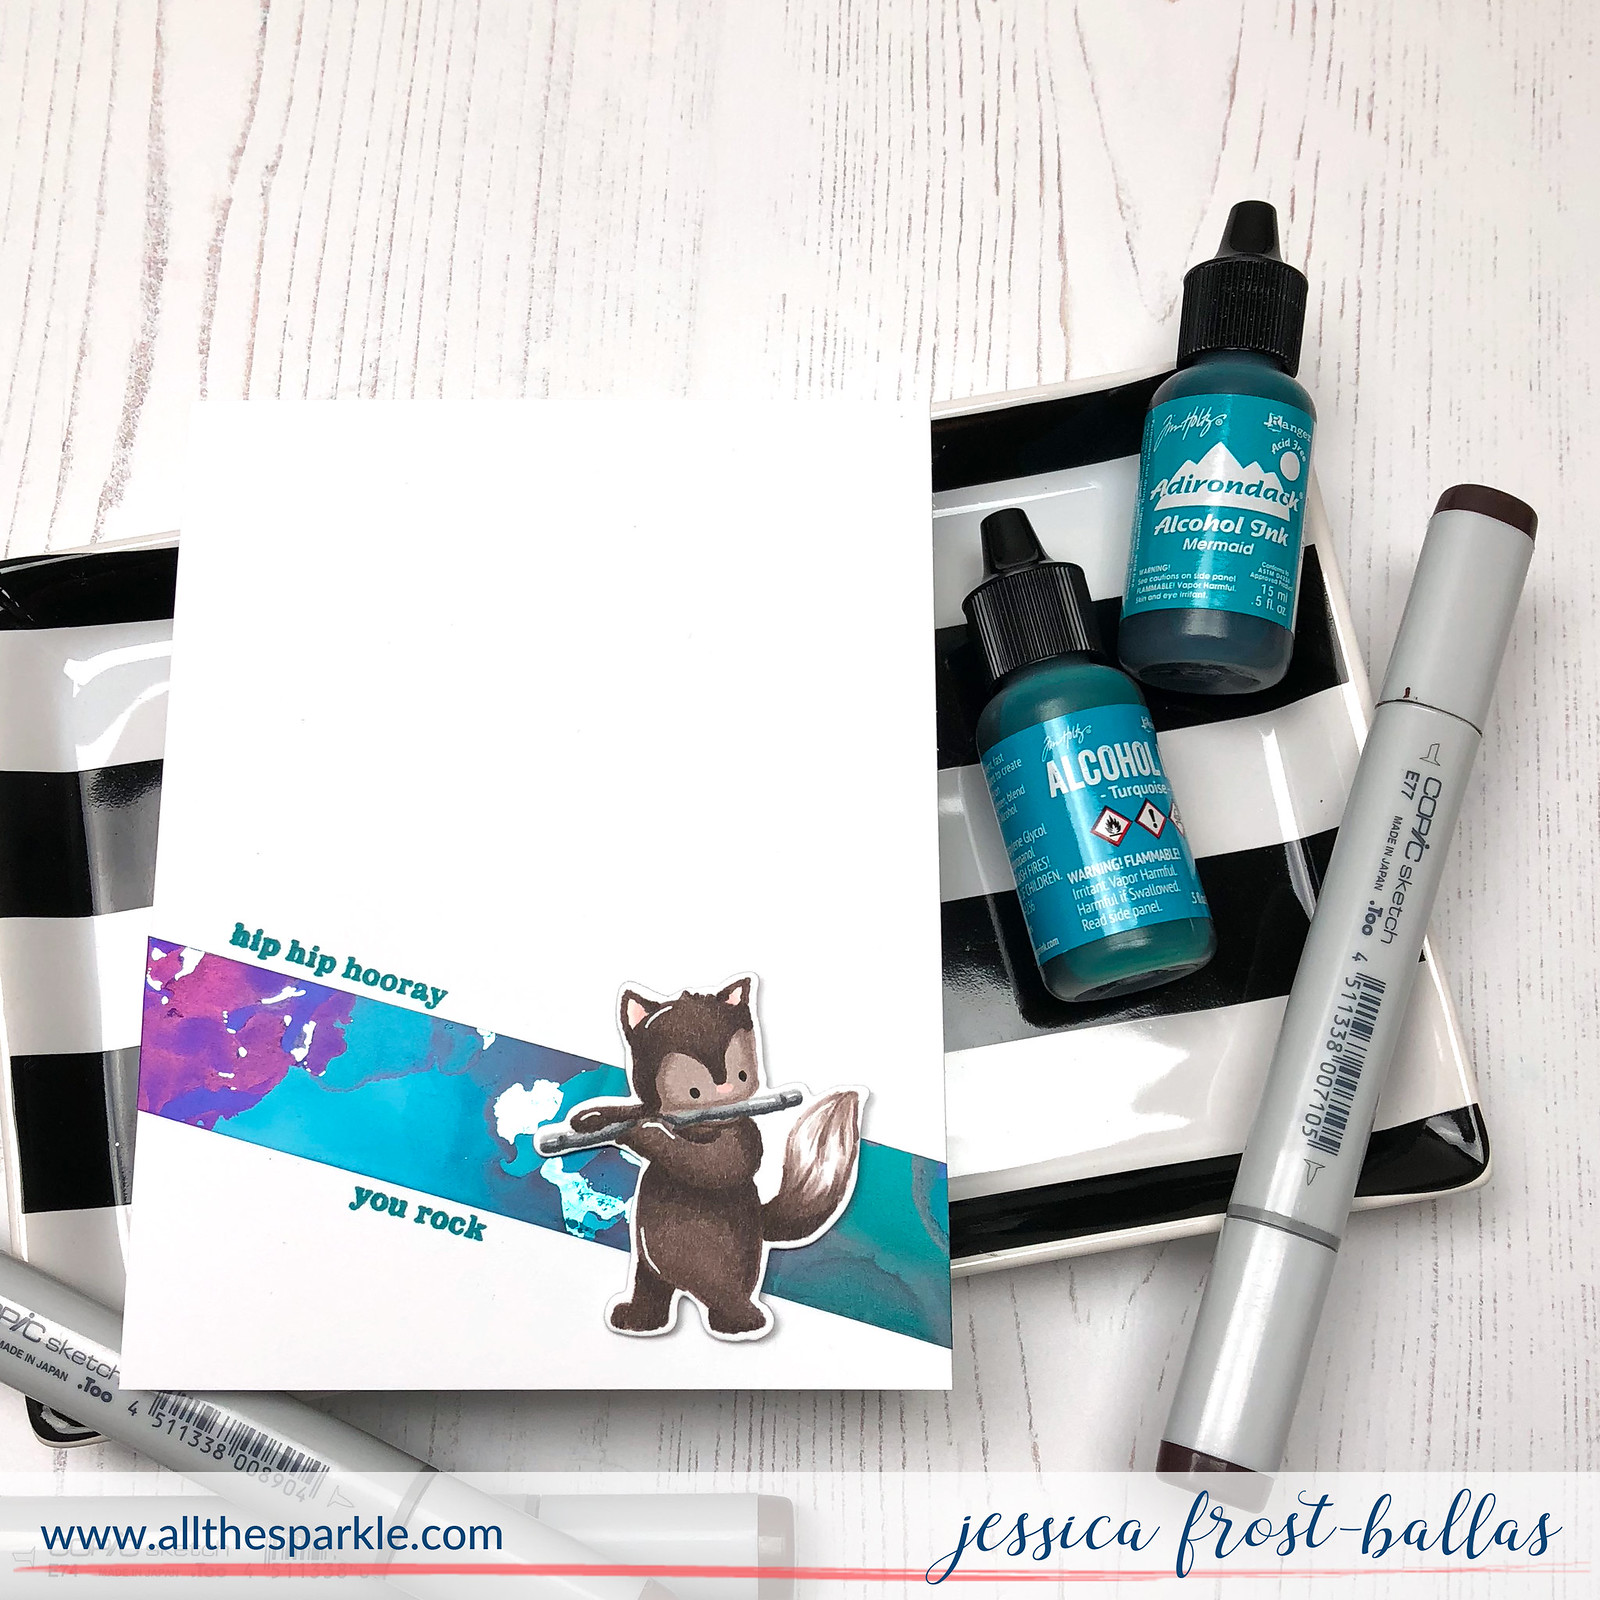
Hello!  Jess here from All the Sparkle and I’m thrilled to be here guesting for Winnie & Walter’s 4th Birthday Bash!!   Today I’m playing along with Kelly’s Use Your Scraps challenge!  I almost feel like I’m doubling up on the scraps since I’m using a leftover alcohol inked background scrap plus an adorable fox I colored during the recent coloring challenge! 

jessica_W&W1

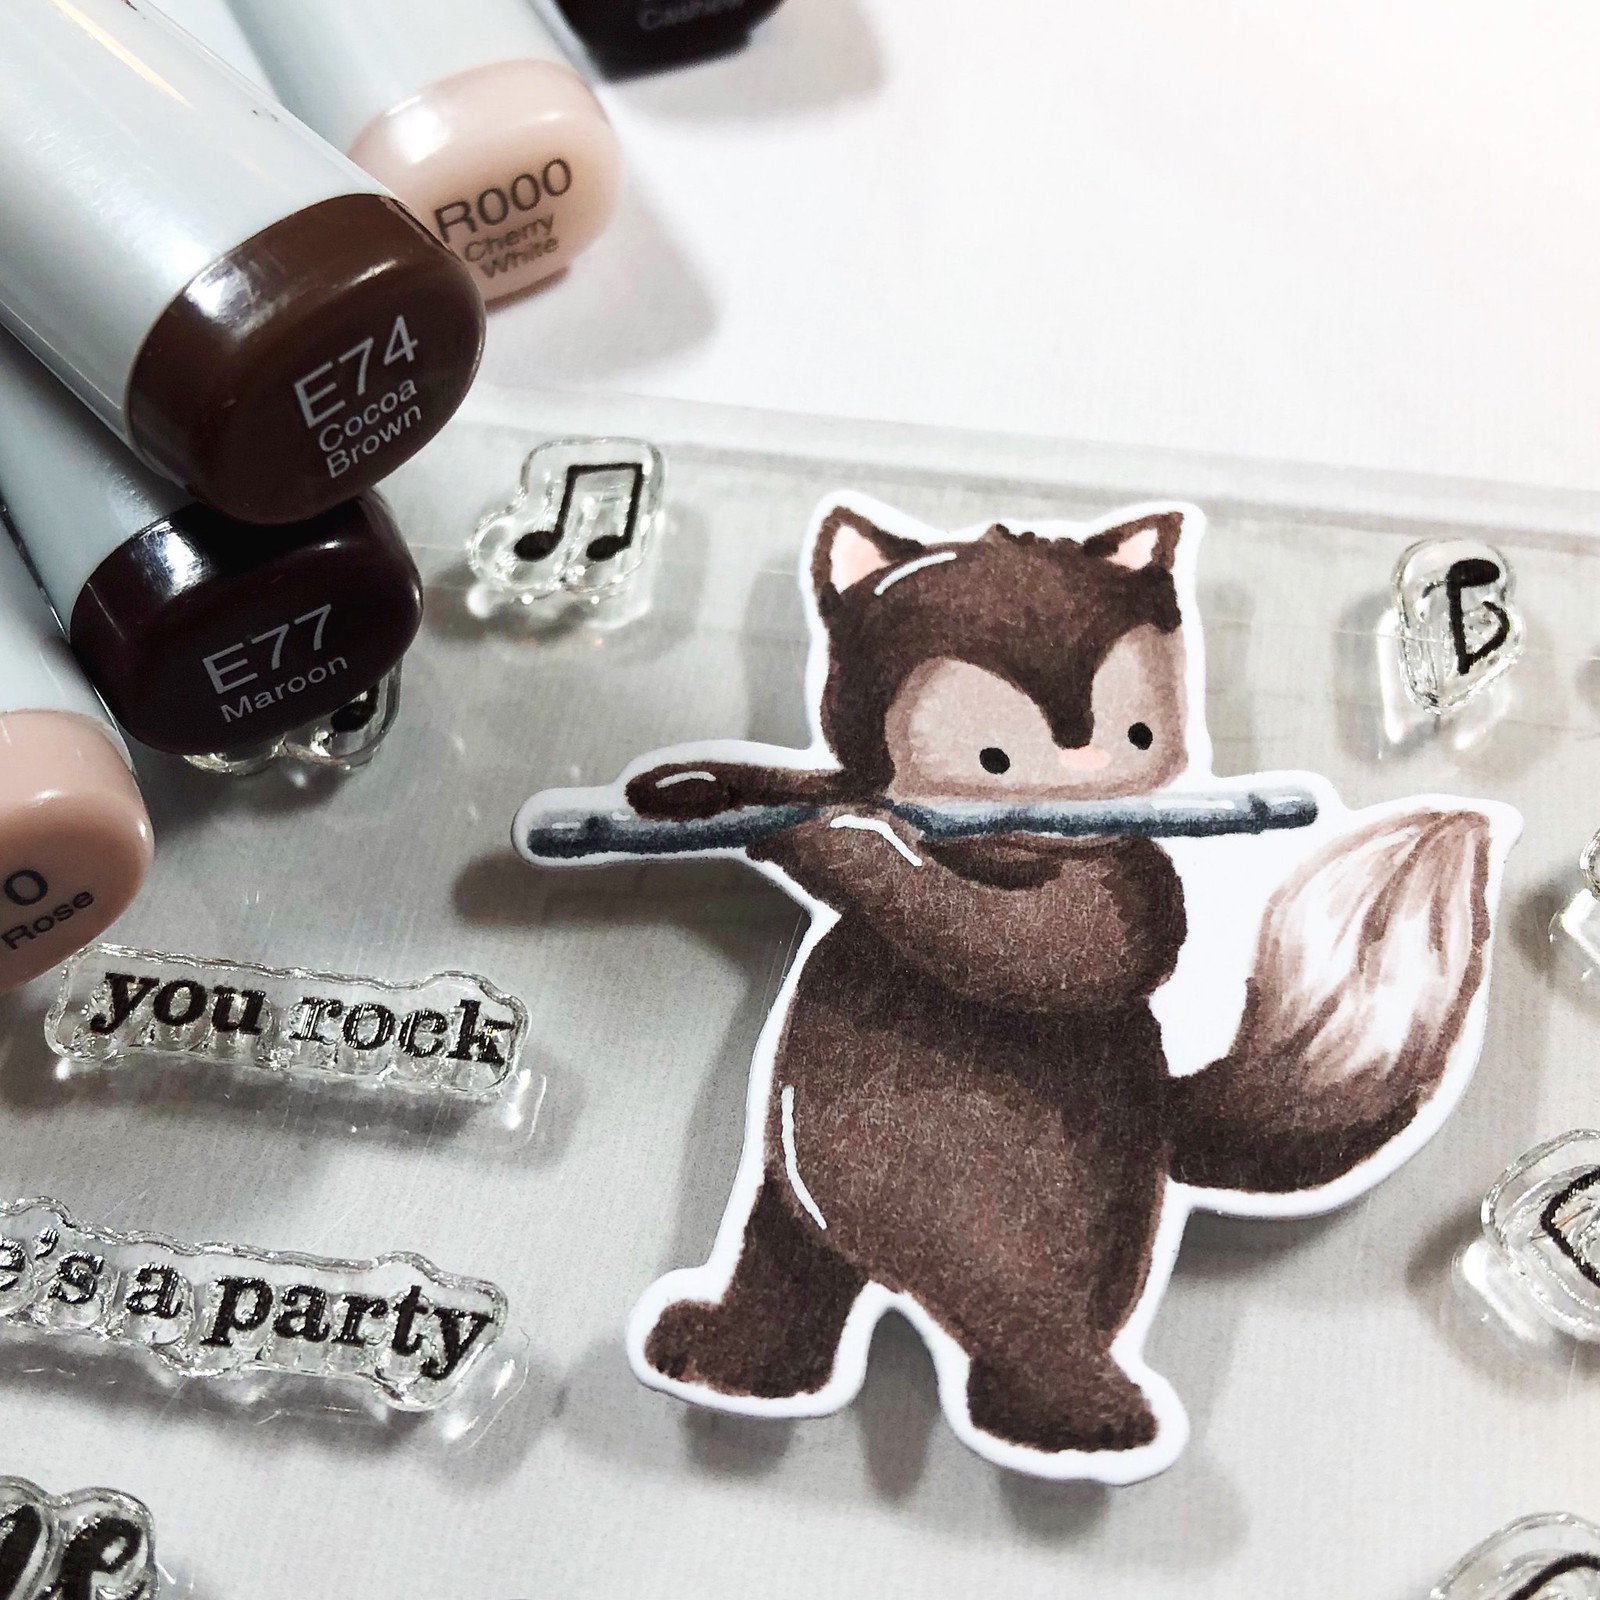
The technique that terrifies me most in crafting is no-line anything-ing.  Watercoloring, copic coloring, colored pencil coloring.  No me gusta.  But I’m trying to challenge myself to try new things so I decided to try no-line coloring this flute-playing cutie from Party On with Evelin T Designs using copic markers.  I stuck to the E70s for warmer grey brown fur and added accents with a white gel pen.

jessica_W&W 2

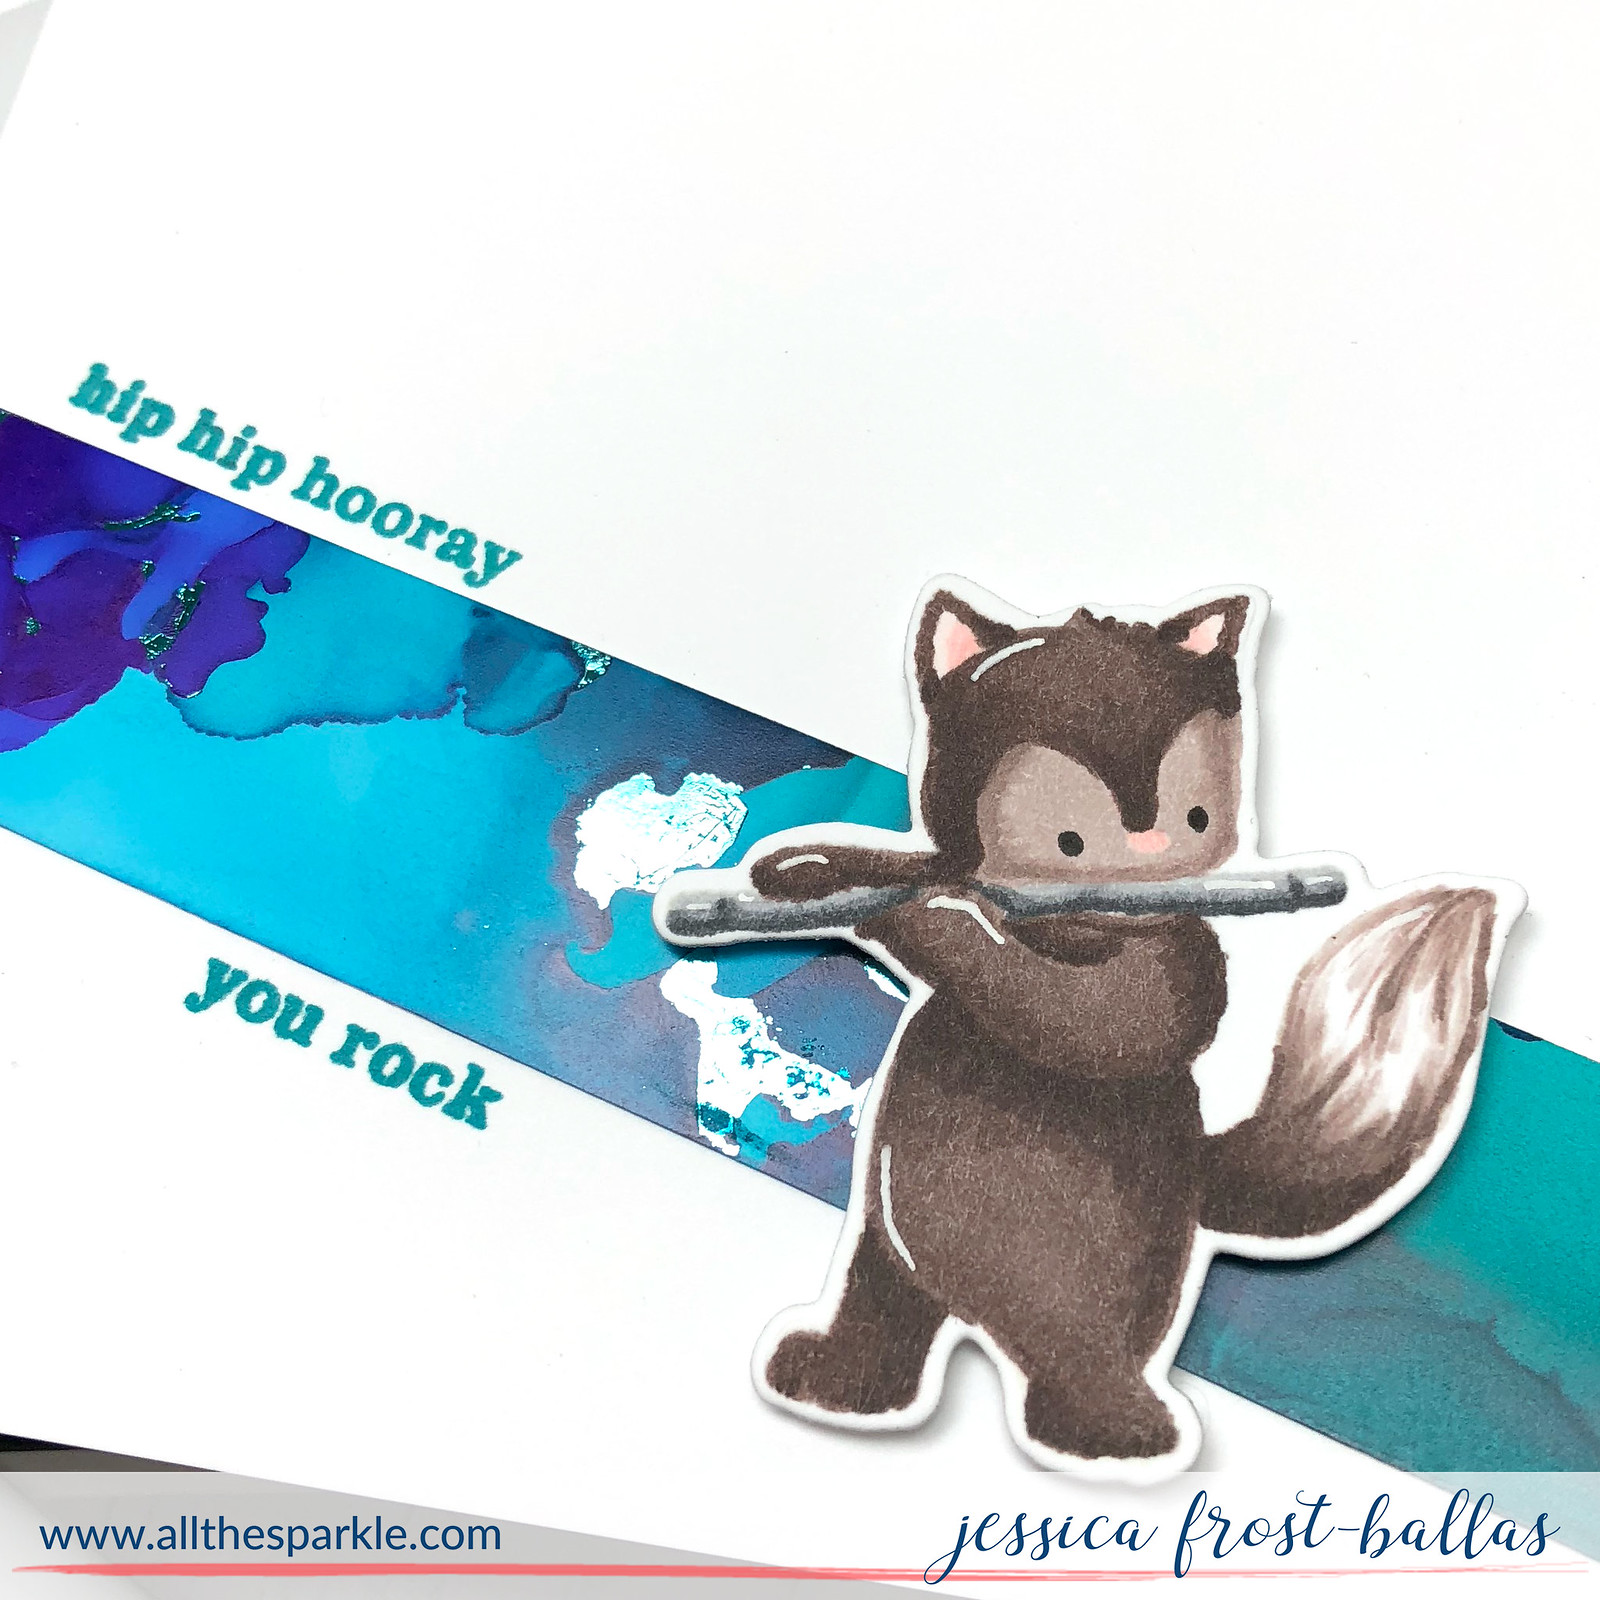
I die-cut my fox with the coordinating dies and set him aside while I worked on the background.  I wanted to add a pop of color but also keep the background fairly simple to focus on my critter.  I had a scrap of alcohol inked background leftover from another project so I trimmed that down to a strip and adhered it to a white card base.  Then I stamped the sentiments from Party On around the strip using a teal ink that matched the alcohol ink.  Finally I popped up the fox with foam mounting tape and adhered him to the card.

jessica_W&W3

Thanks so much to Shay and Winnie & Walter for inviting me to join them in their birthday festivities this month and here's to many, many more birthday bashes to come!! :)  Have a fantastic day!!


w&w-supplies

Thursday, March 2, 2017

w&w 3rd Birthday Bash | Special Guest Star Jessica Frost-Ballas

birthdaybashspecialgueststar-jessica

Today's special guest star is a very talented, sweet and delightful designer who dazzled us with her work as our November Leading Lady.  I of course mean our friend, Jessica Frost-Ballas!  Please CLICK HERE to see her past work on the w&w blog.  I am so thrilled to have her on the w&w blog once again to share in our birthday celebrations.  

Now it's Jessica's turn to take over the w&w blog....

Good morning! Jess here from All the Sparkle and I am so excited to be a guest for Winnie & Walter's Birthday Bash! I decided to combine a few of the fun birthday challenges for my card! I'm playing along with Gayatri's Cute Critter challenge, Kate's Sequin challenge, and Vanessa's Ink Blending challenge! You would think that combining that many challenges would result in a pretty busy card but surprisingly it's very CAS! ;)

Sending Big Hugs by Jessica Frost-Ballas for Winnie and Walter  

I apologize for the photos...It was tricky to take a photo with different sparkly components and I ended up having to take it outside which is why there are really dark shadows! I adore the Big Hugs with Evelin T Designs stamp set and thought it would be perfect for a shaker card! So I started by prepping a piece of heat-resistant acetate with my powder tool and then used my MISTI to stamp the elephant duo onto the acetate with versamark. I heat-embossed the elephants with silver sparkle embossing powder. Two hints when working with acetate: handle it as little as possible (especially in the winter or in dry climates) so you cut down on static electricity which will mess with your embossing powder and make sure your heat gun is really warmed up before you bring it to the acetate. You want the powder to melt instantly to reduce the likelihood of the acetate warping. Aren't those ellies adorable?! I love the interlocking trunks!

Sending Big Hugs by Jessica Frost-Ballas for Winnie and Walter

Next I used the coordinating dies to die-cut the elephants from a white cardstock panel. I also stamped the sentiment from Big Hugs with versamark and heat-embossed it with silver embossing powder. Then I blended spun sugar, milled lavender, and dusty concord distress ink onto a piece of watercolor paper to create a soft ombre wash behind the shaker. I adhered the acetate to the back of my die-cut panel and added a double layer of foam tape around my elephants and on the back of the white cardstock. I recently discovered these iridescent clear sequins that have a soft lavender and pink shimmer and thought they'd be perfect inside the shaker! I really overfilled the shaker because I wanted the elephants to be totally "made" of sequins! Finally I adhered the distress ink blended background to seal off the shaker and then added a few more sequins to the front of the card. I used the same iridescent sequins along with a couple metallic silver sequins!

Sending Big Hugs by Jessica Frost-Ballas for Winnie and Walter

Thanks so much to Shay and Winnie & Walter for inviting me to guest-design this month and here's to many, many more birthday bashes to come!! :)

-Jess


w&w-supplies

Saturday, November 26, 2016

November Leading Lady Jessica Frost-Ballas | Take Four

Jessica_Ballas-Frost_november2016

Sadly November is coming to a close so we must bid adieu to our positively radiant November Leading Lady, Jessica Frost-Ballas.  The last four weeks with Jess have been full of brilliant color, and design.  Each project and post has been a delight.  I feel so blessed Jessica shared her talents with us this month!  

If you missed her smashing debut you must see it...CLICK HERE or her sensational second performance where she made us swoon over her stunning cards in an elegant and dramatic color scheme...CLICK HERE!  For today's performance Jessica takes us through an gorgeous journey through the seasons. or her triumphant third performance featuring a gorgeous journey through the seasons CLICK HERE.

Lucky for us all we have her final command performance today. 

Good morning! Jessica here for my final Leading Lady post. :( I can't believe how fast November has flown by! I have greatly enjoyed my time on the Winnie & Walter blog and thanks so much to Shay (and Winnie!) for having me! :) For my last post I decided to focus on something else I love: interactive cards!


 I have always loved sequins and beads (pretty much anything sparkly) and you just can't help but smile when you shake around a card and watch all those pretty metallic bits shimmer and sparkle as they bounce around! As I mentioned last week I fell head over heels for the adorable critters in the last release and wanted to focus on them! I stamped the owl pair from Happy Owlidays with Evelin T Designs onto white cardstock with copic-friendly ink and then colored them with copic markers. I went with non-traditional holiday colors of teal and peach! I used the coordinating dies to cut them out and set them aside while I worked on the rest of the card.


 I stamped the scalloped banner from Framed with Evelin T Designs onto vellum with versafine and heat-embossed it with clear embossing powder. I also stamped and heat-embossed my sentiment from Happy Owlidays with Evelin T Designs. Next I fussy cut the banner and cut off the stakes to create a freestanding hanging banner. I used the Essentials: Carly Cutaways circle die to die-cut a white A2 panel for my shaker frame. Then I added a layer of acetate behind the frame and built up the back of the panel with foam mounting tape. I filled my shaker with a mix of peach, pink, gold, and clear sequins and tiny teal beads. At the last second I decided to make my shaker background colorful so I painted a piece of watercolor paper with scattered straw, wild honey, and worn lipstick distress ink and once it was dry I heat-embossed it with holographic embossing powder. I sealed my shaker with the watercolored background to create a frosty sunrise. Finally I adhered my banner and my owls to the front of the shaker with liquid adhesive.


 My last card appears to be a normal scene card but there's a little surprise that I'll share later! ;) I stamped the igloo and penguin from Season's Tweetings with Evelin T Designs onto white cardstock with copic-friendly ink and colored them with copic markers before die-cutting them with the coordinating cutaways. Next I worked on my wintery background. I smooshed evergreen bough, chipped sapphire, dusty concord, and black soot distress ink onto a craft mat and spritzed it with water before pressing a piece of watercolor paper into the ink. I repeated the process several times drying the ink with my heat gun between repetitions. When the ink covered the entire background panel I dried it for the last time. Then I flicked it with water droplets and let them sit on the panel for 30 or 60 seconds before blotting the excess water off to create the faded white splotches. I also used a toothbrush to flick white acrylic paint onto the background to create brighter "snow." While the acrylic paint was drying I die-cut the In a Word: Noel cutaway with silver glitter paper and white cardstock and adhered them together to create a rigid sentiment. I adhered that to my background with liquid adhesive. Next I tore strips of white cardstock to create a snowy ground for my scene. I adhered those to the background and then added my penguin and igloo. I punched a few holes through some of the Christmas lights on my igloo and made sure they went all the way through the background panel....


 ...so I could create a LED circuit underneath my card to light up a few of my Christmas lights! I also used a twinkle effects sticker so that my lights would blink on and off when you press the penguin's belly. In the above photo I used a paperclip to squeeze together the circuit so you could get the effect without my finger in the way! You can also see areas where I didn't have a layer of foam mounting tape on the back of the watercolor panel so it appears lighter in some spots...I think it kinda looks like the Northern Lights which was totally unintentional but I love it! I used white LED stickers but colored them with copic markers to create the colored lights. It's a fun surprise to see the lights light up!

 And that's curtains for me!! Don't forget to comment on any or all of my previous Leading Lady posts for a chance to win a $30 gift certificate to Winnie & Walter! Thanks so much for visiting each weekend and I hope I inspired you to break out those Winnie & Walter stamps and get crafty! Have a wonderful holiday weekend!


w&w-supplies

Saturday, November 19, 2016

November Leading Lady Jessica Frost-Ballas | Take Three

Jessica_Ballas-Frost_november2016

Our November Leading Lady, Jessica Frost-Ballas, is back for her triumphant performance!  If you missed her smashing debut you must see it CLICK HERE or her sensational second performance where she made us swoon over her stunning cards in an elegant and dramatic color scheme...CLICK HERE!  For today's performance Jessica takes us through an gorgeous journey through the seasons.

And don't forget to return at noon CST today for our November 2016 Release Tour of the Stars including our incandescent leading lady.

Without further ado, Jessica....

Good morning! Jess here with a study in seasonal florals using the beautiful floral sets from Winnie and Walter and sentiment sets from the new November release! Let's start with my favorite season, autumn!


For this card I stamped and masked florals from In Bloom: Anna's Florals and In Bloom: Renee's Leaves with versamark and then heat-embossed them with gold tinsel embossing powder. Next I colored them with zig clean color real brush markers and blended them out with a damp paintbrush. I added a soft brown wash around the florals and then stamped the sentiment from Sending You with Evelin T Designs (limited time free with qualifying purchase stamp set) and heat-embossed it with the same gold tinsel embossing powder.


Then I went icy and cold for winter with distress inks and iridescent medium!


 I used masking to stamp poinsettias from In Bloom: Elsa's Florals around the border of my card with versamark before heat-embossing them with silver embossing powder. Then I filled in some of the open areas with foliage and berries. I smooshed stormy sky, chipped sapphire, tumbled glass, and blueprint sketch distress inks onto a craft mat and mixed them with iridescent medium to create a shimmery watercolor. After painting the flowers with distress inks I flicked them with water and let the paper dry naturally. I die-cut the large word from In a Word: Wishes Cutaway with silver glitter paper and then heat-embossed the rest of the sentiment from The Big, the Bold, and Greetings on white cardstock and trimmed it down to a label. I adhered the label with foam mounting tape and then added a sprinkling of sparkling clear sequins to finish the card.


 Next I went a little CAS with copic markers for spring!


 I'm always working to improve my copic coloring and the flowers from Winnie and Walter are PERFECT for coloring! I stamped the flowers and leaves from In Bloom: Addie's Garden with versafine and heat-embossed them with clear embossing powder before coloring them with copic markers. I stamped the sentiment from Happiest of Holidays with Evelin T Designs with versafine and heat-embossed it with the same clear embossing powder. Finally I added a little spectrum noir clear sparkle to the tulips.


 Finally I went with loose watercoloring and bright colors for summer!


I stamped the flowers and greenery from In Bloom: Anna's Flora and In Bloom: Addie's Garden with versamark and heat-embossed them with white embossing powder before watercoloring them with Mission Gold watercolors. I used a lot of pigment inside the petals and leaves and then a much more watered down paint around the flowers. I let it dry overnight and then stamped half of the sentiment from Wishing You with Evelin T Designs with pink dye ink using my MISTI. Then I immediately stamped the sentiment again with versamark and heat-embossed it with clear embossing powder. I stamped the rest of the sentiment wishing the recipient 'a bright sunshiny day' inside the card and then added sparkling clear sequins.


I hope my cards inspire you to celebrate different seasons with your papercrafting!
And I'm thrilled that Shay has generously given me a $30 gift certificate to Winnie and Walter to gift to one lucky commenter! Leave a comment on any of my Leading Lady posts for a chance to win. Leaving a comment on multiple posts will give you additional chances to win so be sure to check back each Saturday!

Thanks so much for visiting and have a fantastic weekend! I'll see you back next week for my final post!

Saturday, November 12, 2016

November Leading Lady Jessica Frost-Ballas | Take Two

Jessica_Ballas-Frost_november2016

Our November Leading Lady, Jessica Frost-Ballas, is back for her sensational second performance!  If you missed her smashing debut you must see it...CLICK HERE.  Jessica's play on an elegant and dramatic color scheme will have you itching to try your hand at it too!

Ladies and gentlemen, Jessica....

Hi friends! I am thrilled to be back for my second week as the November Leading Lady for Winnie & Walter! You can find my first post here! This week I wanted to challenge myself to make cards using a pink/red and grey color scheme with a little extra sparkle!


My first card uses one of my most favorite craft products: hologram clear sparkle embossing glitter. To start I stamped the birch trees from Scenery: Into the Woods onto watercolor paper with hickory smoke distress ink. I used my MISTI to align the stamp to get a repeated pattern. Once it was dry I pressed a versamark pad over the entire background and heat-embossed it with the hologram clear sparkle embossing glitter. It practically glows!


Next I stamped the sentiment from Merry and Bright with Evelin T Designs onto a piece of vellum and heat-embossed it with silver sparkle embossing glitter. I trimmed it to a long, skinny panel and adhered it to the background by folding it over the top and bottom of the background panel and adhering it to the back of the panel. This way, you don't see any adhesive under the vellum. Finally I stamped my cardinal from Happiest of with Evelin T Designs in versafine, heat-embossed it with clear embossing powder, and watercolored him with distress inks. I fussy cut him and adhered him over the vellum panel so it looks like he's perching on the 't' of the word bright! It's a different look for a Christmas card but I really like the sparkle and shimmer with the pop of red!


 My next card uses a fun distress ink technique that anyone can "master" because there is no wrong or right way to do it! I smooshed hickory smoke and black soot distress ink onto my craft mat, spritzed it with water, and pressed my watercolor paper onto the craft mat. I usually hold the paper into the ink for a few seconds to allow the ink to soak in. I dried it with a heat gun and then repeated the process until I was happy with the coverage. I repeated the process with another piece of watercolor paper using abandoned coral, festive berries, and candied apple distress ink.


 Once it was dry I die-cut it with the In Bloom: Maggie's Roses Cutaways. I also die-cut the leaves from the same set with black cardstock. I adhered the roses and leaves onto my watercolored panel with liquid adhesive. Next I stamped the sentiment from Scenery: Bigger Bang Confetti (Hint: want to win one of your own of this limited edition stamp set?  Read the Editor's Note at the end of this post.) and The Big, The Bold, and The Happy onto black cardstock and heat-embossed it with white embossing powder. I trimmed it to a label and popped it up over the dies with foam mounting tape. I brushed spectrum noir clear sparkle over the label and added a few sparkling clear sequins to finish the card.


My final card is also a Christmas card but it's a little more subtle. I stamped the foliage from In Bloom: Elsa's Flora and the sentiment from Merry and Bright with Evelin T Designs onto white cardstock and colored them with cool grey copic markers for a monochromatic look. Then I stamped the poinsettia from In Bloom: Elsa's Flora onto watercolor paper with versafine and heat-embossed it with clear embossing powder. I used zig clean color real brush markers to watercolor the flower with shades of pink and red. I fussy cut the flower, curled the edges, and popped it over my foliage with foam mounting tape. Finally I added a few metallic silver sequins for a little sparkle!


I hope this trio inspires you to play with shades of greys and a pop of color and, of course, a little extra sparkle!

I'm super excited that Shay has generously given me a $30 gift certificate to Winnie and Walter to gift to one lucky commenter! Leave a comment on any of my Leading Lady posts for a chance to win. Leaving a comment on multiple posts will give you additional chances to win so be sure to check back each Saturday!

Thanks so much for visiting and have a wonderful weekend!

 -Jess


EDITOR'S NOTE: In honor of Jessica using our limited edition Scenery: Bigger Bang Confetti we will be giving 1 away to a randomly chosen commenter.  Please comment including your email address on this post by November 30, 2016 at 11:59 p.m. CST for a chance to win.


w&w-supplies

Saturday, November 5, 2016

November Leading Lady Jessica Frost-Ballas | Take One

Jessica_Ballas-Frost_november2016

Today I am excited to introduce our November Leading Lady, Jessica Frost-Ballas. Jessica is a powerhouse of inspiration and talent and her contributions to our challenges to celebrate our Share the Love Week featuring Essentials by Ellen really blew me away! 


Over the next few Saturdays in November Jessica will be leading us on a journey of her own design and imagining. Make sure to visit her blog, All the Sparkle, to see more from her and for a chance to win a giveaway! 


Give Jessica a big round of applause to welcome her as she steps onto the stage for her first performance as our November Leading Lady! 


Good morning! I am so excited to be the November Leading Lady for Winnie & Walter and I am looking forward to sharing creations with you every Saturday this month!


For those who may not know me, my name is Jessica and I blog over at All the Sparkle! I live in the Shenandoah Valley of Virginia with my incredibly supportive husband, two senior shelties, a crazy tortoiseshell cat, and a senior dutch bunny. I am a professional musician by day and a papercrafter by night (or really early morning)! I enjoy creating cards for my friends and family and I can often be found coloring a couple images or embossing a sentiment in-between lessons and gigs! I love experimenting with new techniques and mediums and I usually can’t resist adding a little extra sparkle to all of my cards and projects! I'm really excited to share my projects with you this month and many many thanks to Shay for the invitation!! For my first post I wanted to focus on the many gemstone and jewel die and stamp sets that Winnie and Walter carries and use a bright jewel-toned palette. Here's what I came up with!

ww4

For my first card I stamped several heart shaped gemstones from My Precious onto watercolor paper with versafine and then heat-embossed them with clear embossing powder. Next I wet each heart and loosely watercolored them with Kuretake Gansai Tambi watercolors. I set them aside to dry while I worked on the rest of the card. Next I watercolored another piece of paper using the same palette. I let it dry and then die-cut it using the Flawless Heart Cutaway. I die-cut the gem outline with black cardstock and adhered it over the watercolored heart. Then I pressed a versamark pad over the heart and heat-embossed it with ultra high embossing powder to create a shiny, raised gem.


Once my background panel was dry I splattered black paint across the panel and then adhered my larger heart over the background. I stamped the sentiment from True onto black cardstock and heat-embossed it with white embossing powder. I adhered it to my background panel with foam mounting panel and added a sprinkling of black and clear sequins!


For my next card I wanted to continue with my loose watercoloring! I stamped the diamonds and sentiment from My Precious onto watercolor paper and heat-embossed them with metallic silver sparkle embossing powder. I watercolored them with shades of blue to turn my diamonds into sapphires! :) Once it was dry I splattered blue and silver paint across my panel and added a sprinkling of silver and clear sequins. Finally I trimmed my panel down and added strips of silver glitter paper to the top and bottom of the card.


Last but not least I wanted to go all out with gems and watercolors! ;)


I stamped the gems from My Precious across a piece of watercolor paper with versamark and heat-embossed them with white embossing powder. I didn't worry too much about lining up my gems exactly....I think the casual arrangement works better with loose watercoloring! I watercolored the entire panel with my Kuretake Gansai Tambi watercolors and allowed it to dry. Next I stamped the sentiment from Wishing You with Evelin T Designs onto black cardstock and heat-embossed it with white embossing powder. I added a layer of spectrum noir clear sparkle to the black cardstock so it would really shimmer. Then I stamped the beginning of the sentiment onto vellum and heat-embossed it with silver embossing powder. I trimmed it down and adhered them over a bundle of silver metallic thread. Finally I finished the card with silver and clear sequins and then added spectrum noir clear sparkle to some of my diamond facets!


I hope my trio of cards will inspire you to add some sparkle and shimmer to your projects!


And I'm super excited to share that Shay has generously given me a $30 gift certificate to Winnie and Walter to gift to one lucky commenter! Leave a comment on any of my Leading Lady posts for a chance to win. Leaving a comment on multiple posts will give you additional chances to win so be sure to check back each Saturday!

Thanks so much for visiting and have a wonderful weekend!

-Jess


w&w-supplies