Showing posts with label stampets: penguin. Show all posts

Friday, December 14, 2018

Rerun No. 37 | Stampets: Penguin (Challenge + Giveaway + Sale!) + Winners of Rerun No. 36

w&w_rerun_logo
Hello lovelies!  Welcome to our monthly Rerun post!  First, we are going to announce winners from last month's Rerun No. 36 | In Bloom: Frenchy's Festive Florals with Angelica Suarez.

We had such lovely entries and as a special holiday surprise I am gifting everyone who participated in Rerun No. 36 with a gift certificate--a big thank you to you all!
So treebug, Janis, snazzyjj, laury55, Maryam, Novel ideas, Greta and Deepti you all win!

Thank you for all your kind comments as well!  The winner of the In Bloom: Frenchy's Festive Florals with Angelica Suarez stamp set is:


No. 3 | Anila Dk

Congrats everyone!   Please email us at info {at} winniewalter {dot} com.  Anila, I will additionally need your mailing address.

Now on to this month's Rerun!

Each Rerun will provide plenty of inspiration focusing upon a featured product, a month-long sale on the featured product and a challenge (with a prize!) and giveaway.  You will not want to miss out!


For our thirty-seventh Rerun we are concentrating on Stampets: Penguin. This set has a cute and round little penguin with some gloves, earmuff and scarf to customize your penguin as you like along with some other sweet images and sentiments.  There is quite a bit in this little set!

Now on to the cards!

Shay 

Happy December!  How about some sweet penguin cards and projects?

I created a sweet and easy card with this stamp set by stamping the penguin in black Versafine and coloring it in with colored pencils and then cutting out the little guy.  I cut out a mound of snow from white cardstock and went a little crazy with a new Wink of Stella pen so I covered up an entirely too shimmery hill of snow with some white acrylic paint until there were only hints of shimmer (not something you can see in the pictures lol).  Using a smaller decorative rectangle from Essentials: Tilda Cutaways I cut a rectangle from white cardstock and stamped the sentiment and adhered the snow bank and penguin to the panel.  I attached the penguin panel to a patterned paper panel cut using the larger plain rectangle from Essentials: Tilda Cutaways and another panel cut from patterned paper using the large decorative rectangle from Essentials: Tilda Cutaways.  I attached all the panels to a white A2 card base.


That's it from me...wait until you see what Crystal, Gayatri, Heather and Kelly did with Stampets: Penguin ...so amazing!

>>>THE TALENT<<<


CLICK HERE to see more from Gayatri.


 CLICK HERE to see more from Heather.


 CLICK HERE to see more from Kelly.

>>>CHALLENGE<<<

Now it's your turn to play along with Rerun!
  1. Create a new project using Stampets: Penguin).  An alternative to using Stampets: Penguin is to create a new project using one of the projects featured in this post (or any Rerun post throughout November by The Talent) as your inspiration.  Make sure you use at least one (1) w&w product (this can include a freebie found in the w&w shop) in your project.  If you choose the alternative to using Stampets: Penguin, please include in your post or project description which project inspired you and how.
  2. Link up your project here by 11:55 p.m. CST on January 10, 2019.  
  3. Enter as many times as you want before the deadline.
  4. This Rerun Challenge may be combined with other challenges found here on the w&w blog or elsewhere.
One project will be randomly chosen to win $25.00 credit to the w&w shop!  The winner will be announced on the w&w blog in January. 


>>>GIVEAWAY<<<

Please comment on this post (make sure to include your email address in your comment--if you have to add your email address to your comment please do so by replying to your original comment) by 11:59 p.m. CST on January 10, 2019 for a chance to win your very own Stampets: Penguin stamp set!

Monday, August 24, 2015

Friendship | Hello Friend with Vanessa

Hello everyone! It's Vanessa here and I am happy to share with you a cute card for the August Monthly Theme: Friendship today. 

I wanted to combine a lot of different, yummy Winnie & Walter products on my card and used stamps, cutaways and creative screenings.


This penguin is so cute and I thought he would look great on a non-winter card as well. So, I started my card with a panel of white cardstock and temporarily adhered the Scenery: Classic Diagonal Creative Screenings over it. Then I inked the stripes softly with light blue Distress Ink. After I had removed the mask, I added drops of the same ink to the background. Now I stamped the penguin onto another piece of cardstock, colored it with Copics and cut it out. I lay it onto my panel to see where to stamp my string for the balloon and stamped it. Then I adhered the panel to the card and adhered the penguin. Now I colored a piece of white cardstock with Copics to create a gradient effect and die-cut the word from In a Word: Friend Cutaway. I adhered it to the card with foam tape. Next, I stamped the balloon from The Party and colored it with Copics. I cut it out and adhered it to the card with more foam tape. Finally, I stamped and heat-embossed the hello from The Big, the Bold and the Happy onto a strip of black cardstock and adhered it to the penguin. 

Here comes a closer look at the card:


I hope to have inspired you today! Thank you so much for stopping by!


w&w-supplies


Thursday, January 1, 2015

w&w 1st Birthday Bash | In Rotation Technique Challenge with Kelly

birthday-bash--challenge-blog-banner

I'm guessing if you're like me, you love getting more than one use out of your stamps. Sometimes it's a justification for adding more goodies to your collection, and other times the process (or challenge) of figuring out how to alter an image adds to our creative pleasure. This challenge expands on that theme. We'd like you to chose one Winnie & Walter image and rotate that image multiple times on your project.


A typical outcome of stamping an image in a circle is to create a flower, like on this card. Can you tell what stamp is used to create this flower?

It's the scarf from Stampets: Penguin! The two ends of the scarf make the sides of the petals, and the neck of the scarf makes the orange center. Once you have the outline stamped, it's fun to pick which colors to fill the different sections.


You can also rotate a word to make a background. In this case, the word "happy" is also part of the card's sentiment. Knowing that this particular word has a long tail on the end of it, you may envision ahead of time how that would create a segmented circle with a filled center. The long tail also helps space the words out so that they are pretty readable.


 Here's a tip for this technique. It's helpful to pick a benchmark so that each time you rotate the stamp it's a consistent distance from the last stamped image. In this case, each time I turned the "happy" stamp, I lined the top of the "y" to be slightly higher than the top of the previously stamped "y's" loop.


We'd love to see what you can make from rotating a single Winnie & Walter stamp (or die!)

>>>GIVEAWAY<<<

w&w_50giftcard

Link up your take on this challenge for a chance to win a $50.00 gift card (gift code) to the w&w shop.  One random winner will be chosen.

For more information on how to enter to become our Guest Star for the April Release CLICK HERE

Wednesday, December 17, 2014

Winter Wonderland | Winter Blessings with Joni

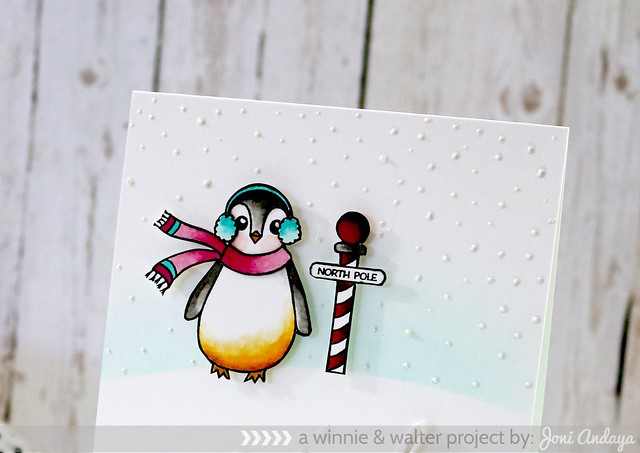
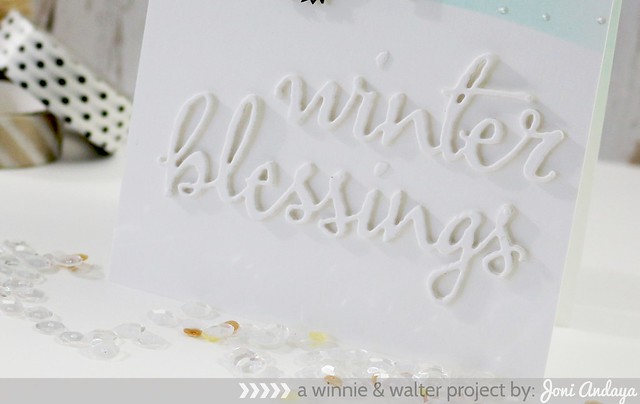
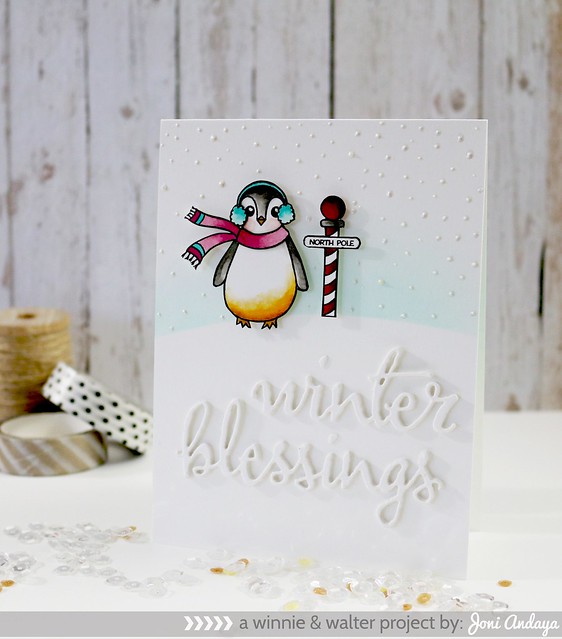
Hello Everyone, Joni here. I just want to share this card I made using the new release Winnie & Walter Stampets: Penguin, The Big, the Bold and Seasons Cutaways, and The Big, the Bold and Blessings Cutaways.

To begin my card I first masked the card base with a curved post-it that I cut and distress it with ink blending tool using Peacock Feather ink. Next, I stamped the penguin images on a separate cardstock then color and cut the image. Next, I adhered the image on the card base with foam tape. Then I added some dots of white opal Liquid Pearl for the snow scene.

joni_winterblessings1ww

Next, I die-cut the winter and blessings cutaways four times each and glued on top of the other die-cuts to get that dimension.

joni_winterblessings2ww

Here is the full image of the card.

joni_winterblessings3ww

I hope you guys enjoyed!

Thank you so much for stopping by!


w&w supplies:


Saturday, December 6, 2014

December Leading Lady Laurel Beard | Take One

laurel_beard_dec2014

Today, we have the pleasure and honor of introducing our December Leading Lady, Laurel Beard!  She's full of infectious energy, vibrancy, enthusiasm, joy and talent and we are so delighted to have her dazzle and inspire us Saturdays in December!  We know she will give a big creative boost!  Now it's time for Laurel's big debut...

Hello there!!!! Laurel Beard here and I am thrilled, I mean THRILLED, to be Winnie and Walter's December Leading Lady! What does that mean? It means I'll be guesting with them every Saturday in December showcasing products from their newest release! And this release? It is awesome! Not only is there fantabulous stamps, but they've introduced new products too! We've got stencils (creative screenings) and dies (cutaways).... Oh yea!!!! Today I thought I would take a close look at their StamPETS line. Isn't the name just cute? Love it! They've released three STAMPETS sets: Penguin, Turkey and The Gift.... And some of them, I've paired them along with some other fun new products from the release! So let's get started, shall we??? First up, TURKEY! Here in the States, we just finished up celebrating Thanksgiving! This turkey is too cute to eat. Plus, a little secret, I don't care for the taste of turkey! I'm a ham girl myself...

DSC_0112

How cute is this turkey! Seriously! I colored him in with Copic Markers and added a clear coating of Wink of Stella over the feathers.... :) See the speech bubble? That's a new product, Bubble Talk Creative Screenings! What's especially cool about this stencil is you get the 6x6 stencil PLUS the solid speech bubble masks PLUS the outline speech bubble masks.... Dude, seriously! So I started with the 6x6 stencil and colored in the speech bubble with one shade of distress ink and then took the outline mask, lined it up and added a darker color of distress ink... Oh, and the background? See it? Yup, another creative screening called Rectangle... It almost looks like a nice bricked background doesn't it... I very lightly added some distress inks to the stencil to create the soft background against the bold, colorful turkey! I have named him Hank! Here's a closer look of him:

DSC_0114 copy


Now let's move on to the Penguin. This little guy is simply adorable!!!! I've paired him up with the Big Bang Circle creative screening to create a wintery scene. I stamped all of the images from The Penguin stamp set onto some watercolored card stock and added some color using my Gansai Watercolors.. I arched the sentiment (another thing I LOVE about clear stamps).. Yup, you can reshape your sentiments on your acrylic blocks.... I love the icicles in the set! So fun.. I filled those in with some ICE stickles. I love that all the accessories for the penguin that come on this set. I shall name him Frosty.

DSC_0128


After I finished all that up, it was time to add the snow... I grabbed the Big Bang Creative Screening and applied a smooth layer of embossing paste over the top, taking care not to go over my penguin or North Pole light.... I also created a snow bank using the same embossing paste and a palette knife....

DSC_0135


And finally, let's check out The Gift. This set is full of adorable pet images! Two dogs, a cat, a bear! And lots of fun accessories and even things to stuff them into if you wish! I've paired the adorbable dog image with two other products from their recent release... The Big, the Bold and the Merry Cutaways and the Grand Diagonal Creative Screening.... I once again stamped the images onto some watercolor card stock and heat embossed. I did some creative masking so it would appear as if the dog was sitting behind the present. I stamped the bone and fussy cut it out and stuffed it into the gift box and did some quick watercoloring! For the creative screening, I turned it on its side to get the diagonals going in the direction I wanted them to and then gently inked it up with some distress ink.

DSC_0097

I ran the "merry" thru my die cutting machine and adhered it down to the card panel and of course, added some wink of stella in clear to give it some sparkle! I'll tell you. Those dies? Are fantastic! Great quality! And I love the font! LOVE LOVE LOVE! I inked up the word "christmas" from the Big, The Bold and the Merry stamp set and stamped it onto vellum and heat set in white. I love adding touches of vellum here and there to projects... This stamp set? The Big, The Bold and The Merry is a great addition to their Big and Bold line, let me just tell you!!!! Oh, and of course, I've got to name this pup! His name is Melvin... HAHAHA! :)

DSC_0107

So that's it for today! I'll be back next week for some more Winnie and Walter fun! Until then, I've got a giveaway!!! Simply head on over to my blog and leave comments on all of my Leading Lady posts, and you could win a $30 gift card to Winnie and Walter!!! I will choose a winner at the end of the month from all of the Leading Lady posts, so you've got lots of opportunities to get your name in the hat!

w&w_30giftcard

Goodies used:


<!-- inlinkz code end —>