Showing posts with label in bloom: maggie's roses cutaways. Show all posts

Friday, March 30, 2018

March Documentarian Flóra Mónika Farkas | Take Two

It is time for the second and final project post by our very first Documentarian, Flóra Mónika Farkas.  

Don't miss out on her introduction HERE or her (impossibly) adorably layered layout HERE.  

It has been such an honor to have Flóra kick off this feature and she has done such an exceptional job showing her range and depth of skill with her two dynamic and eye-catching layouts.  I hope you have been as inspired by Flóra as I have! Perhaps you (and I) will try some of her techniques on your memory keeping projects or even on other crafting projects.   

Today's layout is not only gorgeous, but very cleverly executed!  

Once again, Flóra....


Hi dear Ladies! I am back with the second post as Winnie & Walter March Documentarian. If you missed my first post you can check it here. Again, I made a 12x12 scrapbook page, but for this layout I used tons of flowers. If you know me, not a surprise I love the make different wreaths on my layouts, just like this one.


First, I grabbed a regular smooth white cardstock and draw a huge circle in the middle. Then, I stamped many many gourgeous flowers, leaves and branches with green, pink, orange and blue inks. I loved to play with In Bloom: Ashlee's Rosie Posies with Lydia Evans and In Bloom: Lola's Bouquet with Joni Andaya Stamp Sets. This took few hours to finish it, but I enjoyed so much the process. Once the stamping was done I cut out the circle and backed the layout with a same white cardstock.


I choose a pink thread and machine stitched around the circle. It gives extra texture but also fix the two papers together. After this I pull out my black ink and stampend pretty and menaningful sentiments from Sentimental: Endearments Stamp Set around the circle.


Next, I cut out gorgeous flowers and leaves with In Bloom: Maggie's Roses Cutaways. What a gorgeous product! To be honest I didn't have matching papers, so I covered white papers with the same inks I used for the wreath and I got customized cardstocks.


In the end I stamped my title using In Bloom: Ashlee's Rosie Posies with Lydia Evans Stamp Set and Die Cut. I highlighted with foam tape. Something was still missing so I stamped tiny black dots around the wreath.

It was so fun and big honor to be the Winnie & Walter March Documentarian. Thanks for the guest designing opportunity! I hope you find inspirational my projects and you got new ideas how to use your Winnie & Walter Stamps and Cutaways on future scrapbook layouts. 

Flóra

w&w-supplies

Tuesday, October 20, 2015

Spotlight On...Cris G! Part Deux

spotlight-cris-g


We are so happy to have Cris G back with us for another sensational post with panache and elegance!  If you missed learning more about Cris and seeing her first post full of gorgeous black & white projects CLICK HERE!

Now, it's Cris's time to dazzle...  

Hello again!


Here I am for my second post. Today I’m bringing something a little bit different - a Fall themed home décor. I kept the main palette in black and white, with just the right amount of gold and copper :)... you know, just to add some sparkle to these pesky days.

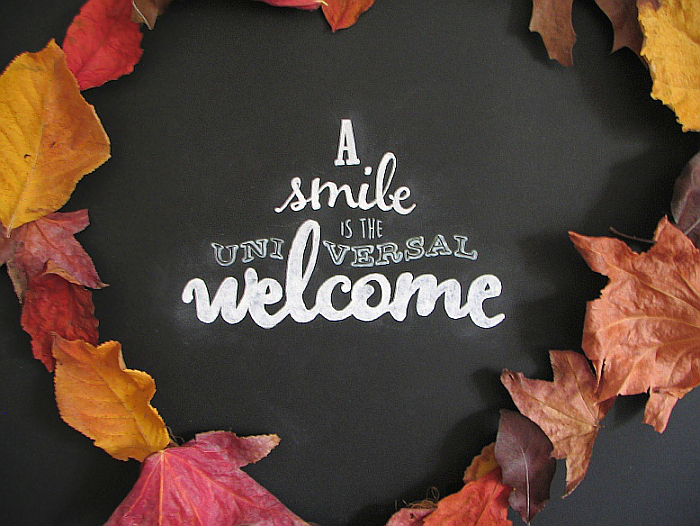
A SMILE

cris_g_A SMILE

... and a welcome are the best way to start, don’t you think?
  1. To make this framed greeting, I started by stamping the word “smile(s)” from Winnie & Walter The Big, the Bold and Friends stamp set and drawing the contour of the biggest word “welcome” from Winnie & Walter The Big, the Bold and Blessings Creative Screenings in a piece of scrap paper. The next step was scanning to my computer. After enlarging both words, I used three different free fonts to compose the greeting in a sheet of printer paper.
  2. Using a piece of yellow carbon paper, the one used for embroidery, trace the letters onto a sheet of black cardstock. Then draw/paint in white. I traced the smaller and the thinner lines using a Uniball white gel pen, and filled in the bigger words using a Uniball liquid chalk marker.
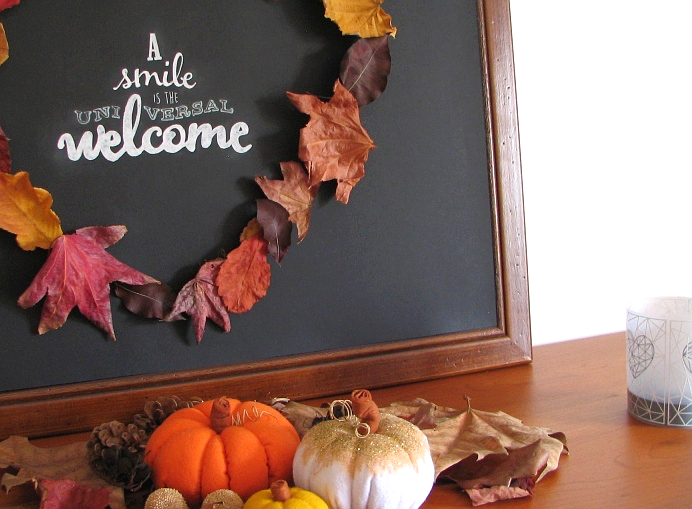
  3. I made an uneven heart shape around the words with some twigs, rope and leaves from last Fall :). Glue this kind of wreath to the cardstock with a glue gun, and then the leaves.
The free fonts I used, from top to bottom, were: Marlboro, Moon Flower Bold, and VintageOne.

LIGHTS OFF

cris_g_LIGHTS OFF

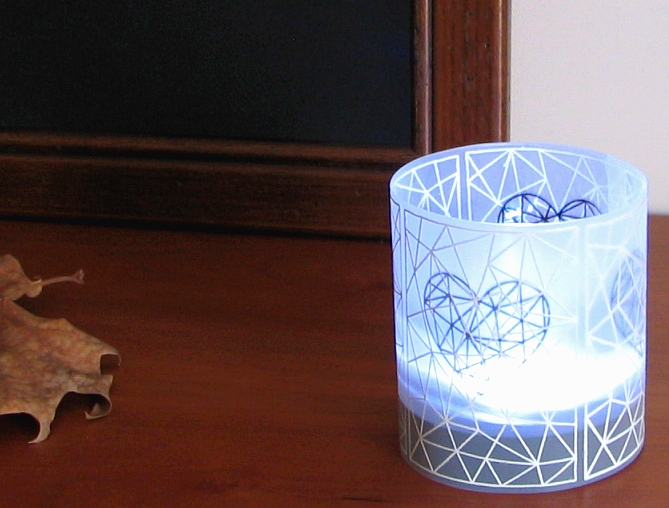
Make luminaries with stamps.
  1. Stamp the Winnie & Walter Mini Scenery: Multifaceted four times with VersaMark ink onto a sheet of vellum paper and heat emboss in white.
  2. Using the faceted heart shape from Winnie & Walter True stamp set, align with the previously stamped vellum doing almost the same procedure from step 1. The only difference is that you will be stamping on acetate and heat embossing in black.
  3. Glue a strip of black cardstock in the bottom of the acetate sheet, so the lamp won’t show much. I used a LED lamp, the ones used in closets, in two different colors... this is another reason to justify the black cardstock.
IN ACTION

cris_g_IN ACTION

TIP - Glue each layer separately, I used mini dots. This way you will have more combinations: use just the vellum, just the acetate, or both.

LEAVES

cris_g_LEAVES
  
Use die cut leaves to decorate the table.
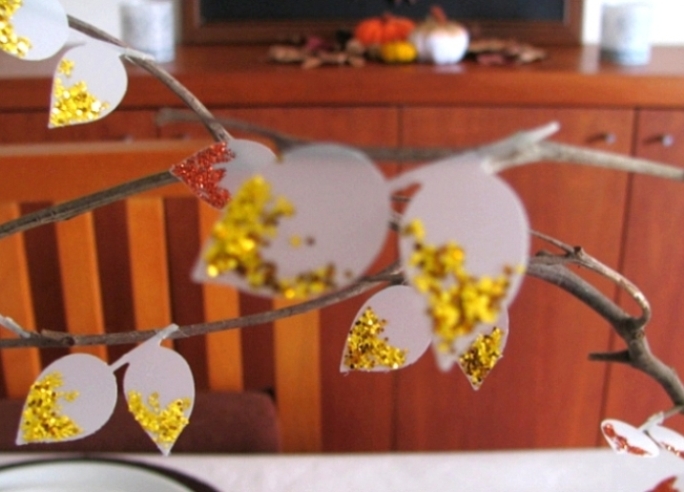
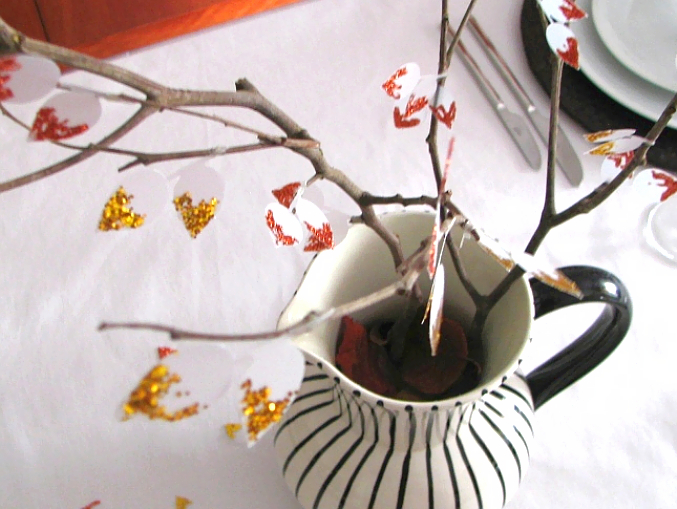
  1. Gather some twigs. Die cut vellum leaves from Winnie & Walter In Bloom: Maggie’s Roses Cutaways, partially coat them with Glossy Accents and glitter.
  2. Glue the leaves to twigs. This is the tricky bit... I tried with different types of glue, but vellum resisted to most of them, and it would have been unthinkable spend the evening gluing leaves with GA, for example, which I haven’t tried but might have worked. I haven’t used my glue gun as it would show much, so, I ended up using thin double sided tape, it was fast and worked just fine.
JUG VASE

cris_g_JUG VASE

TIP - Scatter some of the vellum leaves on the table, it will add to the Fall look.
Using different containers instead of a regular vase brings some interest, I used this jug that I remember seeing at my parents since forever, and I absolutely love... besides, it has stripes and is black and white!

NAPKIN RING

cris_g_NAPKIN RING
  
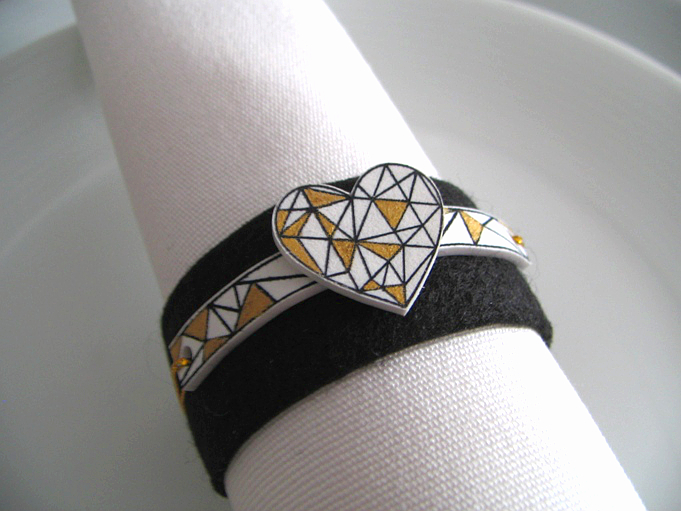
Napkin rings are a great addition to complete the whole décor for a special occasion.
  1. For these rings I started with a stripe of cardstock and another of black felt, first adhering both together, and then in a closed ring.
  2. To make the embellishments I used the Winnie & Walter True stamp set. Stamped the faceted stripe and the faceted heart in white shrink plastic and... voilà, the cutest ornaments for napkins! In fact there was one more step; grabbed my glasses and the tiniest brush I have and colored just a few triangles with gold craft paint.
TIP - If you wish to experiment with shrink plastic, if you haven’t already done so, know that you can bend any piece. You’ll have to find some glass or other non heating material with a rounded shape, or other shape, and carefully (it is hot!) but fast, roll the piece of plastic around the glass and let it cool.

If you want to paint some very small areas, like I did here, it is easier to do it before shrinking, but you will need permanent inks, and let dry thoroughly before shrinking. You will find very good tutorials and videos with great information about this on the net.

Thank you so much for stopping by, and a big thank you from the heart to Julie and Shay for inviting me to the Spotlight!

Friday, October 16, 2015

Black & White | Hello Gorgeous with Lydia Evans

DSC06352n

Hello again, can you believe that it's the middle of October already? This year is flying by way too quick for my liking hehe.

This months theme being 'Black & White' I really wanted to create something simple and striking with the 'wow' factor.... and it hit me black watercolour! I really love the look of watercolour backgrounds and they can be so classy when done in black.....

  DSC06352

I took a piece of watercolour card and created the ombre effect by using black watercolour on the top edge, then adding some water to my brush and brushing the colour out a little, then adding more water to my brush, brushing the colour out a little more, and repeating until I had the ombre look I was after. Here is a video on how I created the card... 


The video can also be viewed on Youtube here:


For the sentiment I have used In A Word: Hello Cutaway and the 'gorgeous' from The Big, The Bold and You heat embossed in white onto some black cardstock.

  DSC06353

To embellish I cut the full rose and three of the stemmed leaves from In Bloom:Maggie's Roses Cutaways and attached them behind the 'hello' die-cut.

To finish I added a few clear sequins for a little sparkle.

  DSC06355

I really hope you like my card and enjoyed the video, I would love to know what you thought. 

See you again soon. 

Hugs, Lydia x


w&wDT_lydiaevans_blog-sig


w&w-supplies


Tuesday, October 13, 2015

Spotlight On...Cris G!

spotlight-cris-g


We are proud to bring you our next Spotlight On...Cris G!  Cris instantly caught our attention with her thoughtful and delightful deftness with design and composition.  For instance THIS CARD she created for The Gossip Column which is just gorgeous. 

Wait until you see what she's made today...you will see Cris shine!       

Hello creative and talented crafters!

My name is Cristina and I live and love with my husband in the sunny and peaceful Portugal. For the ones who already know me Cris G. is my usual signature, and for those who don’t have a clue of who I am, you can find my work in this Flickr gallery - https://www.flickr.com/photos/95118517@N03/. I would love if you stop by when you have some time, though I understand if you don’t, we all have busy periods in life... sometimes it is difficult for me to stop by my own Flickr home :).

I’ve been a crafty girl and an avid learner in different areas, mostly related to arts and crafts, for all my life. I started my paper crafting adventure two and a half years ago, after watching hundreds an undefined number of videos and tutorials. When I felt prepared I made my first card, and then many others... and hated all of them :). Now I feel more comfortable with my work, but I’m still not so pleased with some of my projects.


It was with surprise and a whole lot of happiness that I received the invitation from Shay and Julie, to be in the Spotlight for the month of October. Thank you so much for the privilege!

THE PROJECTS
October is the month of black and white at W&W, and so I went all b&w with little pops of color. Just a few spots of color will enhance the neutrals, causing a higher visual impact.

I chose the stretch your stash topic because I believe we can get so much more from our supplies than we usually do, myself included... and it can be so much fun as you discover new uses.

I found this quote the other day: “think outside the quadrilateral parallelogram” :). That’s it!

IN HALVES
cris_g_IN HALVES

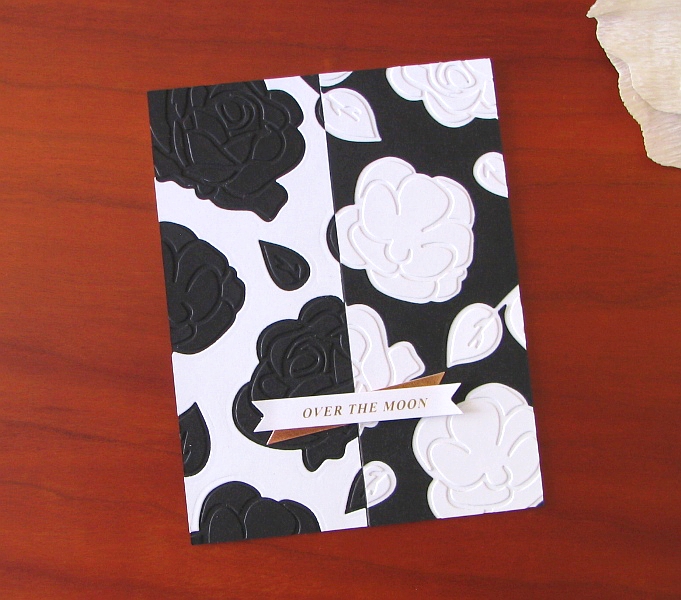
  1.  I started by drawing a sketch with the die cut flower shapes from Winnie & Walter In Bloom: Maggie’s Roses Cutaways into some scrap paper, for a coherent composition.
  2. With two pieces of cardstock, black and white, slightly bigger than the usual 4.25” x 5.50”, die cut flowers using the solid flower dies and the previous sketch as a guide.*
  3. Cut both panels in half and inlay the black positive solid flowers in the white cardstock and vice versa, with the help of a thin piece of paper (like photocopy paper) glued to the back of both pieces. Trim off excess of flowers hanging in the centre of both panels.
  4.  Align both pieces of cardstock and adhere to a regular 4.25” x 5.50” white card base. Trim off the excess around.
  5. Pick the detailed Maggie’s Roses Cutaways dies, and use the outline flowers dies (positive) as a guide to adhere the negative pieces of each flower and leaf.
  6. Adhere two pre-made die cut labels.

* TIP - I could have done those inlaid pieces in a much easier way. Since only the centre where the two colors meet together had to be aligned, I could have aligned the two half pieces first and die cut just the centre and then all the other flowers separately. The truth is, usually, when I start a card, I have a blur image of the finished design... I adjust things all the way through the end.
For this card I started with two pieces of cardstock a little bigger than the size of a card so I could decide what to do after die cutting the flowers in both pieces in the exact same place. What I did was temporarily adhere the white and black cardstock together and run it through my Big Shot, embossing with the flowers dies. I ended up with an indentation that allowed me to know exactly where to die cut each piece afterwards, since the result of cutting through two pieces of heavy weight cardstock is never satisfactory. I hope my explanation won't be too confusing... If you have any questions, I will happily try to help.


ODE TO WINTER WOODLAND
cris_g_ODE TO WINTER WOODLAND

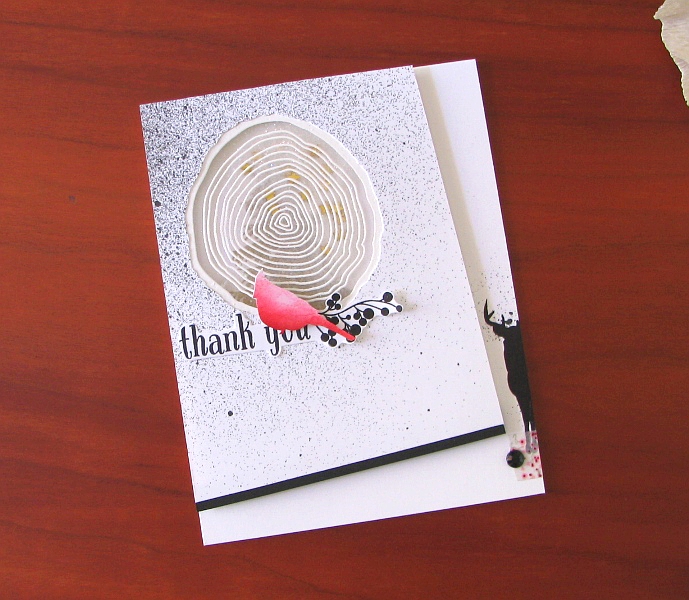
  1. First spritz black marble Dylusions ink spray, concentrating in the top left corner of a white piece of cardstock. Then cut the piece at an angle and adhere a thin strip of black cardstock at the bottom.
  2. Using the wood growth rings stamp from Winnie & Walter Winter Woodland stamp set, stamp it in a piece of scrap paper and cut out. Do the same with the bird, this time using a craft knife, because you will need the negative image. Use it as a stencil to blend colors in, then cut out the finished bird. Save for later.
  3.  Stamp a partial image of the deer in black, from the same stamp set, near the bottom right corner of card base. Using a thin brush and an acrylic block, do just a few controlled spatters around the deer. Add a little piece of washi tape and a black gem.
  4. With a craft knife and the previously stamped image as a guide, cut out the wood shape from the spritzed panel. Draw a fine line on the card base with a pencil through that open area, and stamp the top portion of the tree from Winter Woodland with VersaMark ink. Heat emboss with enchanted gold powder. Using foam adhesive, create a zone for a shaker around that area and fill it with dry stickles and tiny gold stars.
  5. Stamp the wood growth rings with VersaMark ink onto a piece of heat resistant acetate and heat emboss with white powder. Adhere the acetate to the back of top panel and mount on card base with more foam tape.
  6. Stamp the sentiment and berries and fussy cut. Glue sentiment to top piece and adhere the bird from step 2 with foam tape.

TIP - Mix goodies and what they are intended to be; for example, use solid stamps as stencils to get a blended ombre effect.
Heat embossing on acetate is so much fun and gives so many possibilities... and it is very easy. You just have to be sure your acetate is good for photocopy or printing, and let your heat tool reach a high temperature first.

SMALLER, PLEASE
cris_g_SMALLER, PLEASE
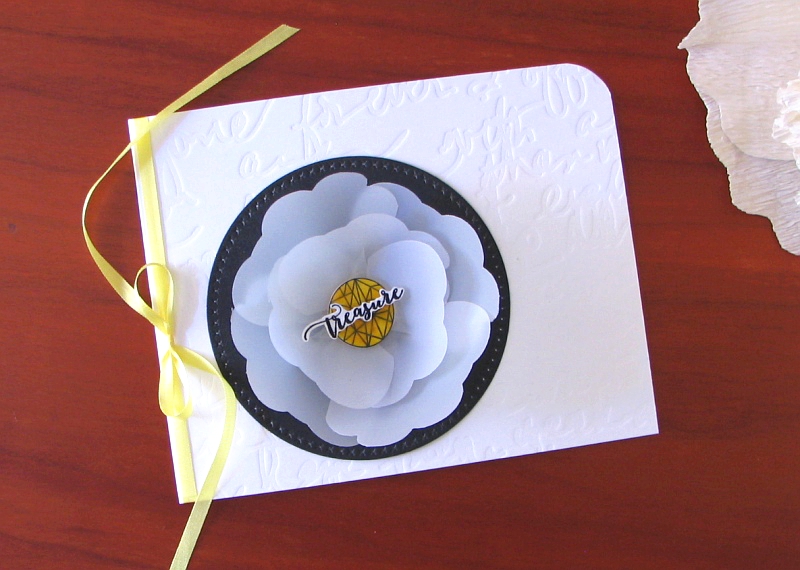
  1. Cut a white card base and dry emboss the front using Winnie & Walter Scenery:Persuasion Script Creative Screenings. Glue a circle of black cardstock.
  2. Using a solid die flower from Winnie & Walter In Bloom: Maggie’s Roses Cutaways, die cut the bigger flower 7 times from vellum. Give the shape of petals to each die cut flower, making two layers: one with 4 petals and another one with 3. Adhere the resulting 3D flower to a small circle of white cardstock, and this one to the black circle.
  3. Stamp the faceted circle from Winnie & Walter True stamp set in a piece of white shrink plastic, using Archival ink or StazOn ink. Allow the ink to dry and then trim around or die cut. Repeat the procedure with the word Treasure. Now this is the fun part!!! I used my heat tool and the results are quite good, but if you prefer you can use your oven.
  4. After the two pieces are completely cool, color the circle with nail polish for some transparency, let dry and add a second coat with Glossy Accents. Leave the word Treasure as is. As an alternative, paint with other coloring medium of your preference, then coat with VersaMark ink and heat emboss with clear embossing powder (this option wasn’t experimented yet).
  5. To finish off the card, tie a bow in a piece of silk ribbon around the card front and crop the upper right corner.

TIP - Use your not-intended-for-3D-flowers dies to create beautiful 3D flowers.
Use shrink plastic to make unique personalized embellishments.
Explore the versatility of your supplies (I have to remember this one more often!) :).
Most of all have FUN!!!

This is all from me for now.
It was a pleasure working with these fantastic Winnie & Walter products!
See you soon!

Saturday, October 3, 2015

WCMD 2015 | Watercolor with Vanessa

To get all the information about w&w WCMD 2015 CLICK HERE. 

WCMDblogbanner2014

Hello everybody! Vanessa here with a fun challenge for World Card Making Day. 

For my challenge, I chose one of my favorite techniques: WATERCOLORS. It's a popular trend right now and I am sure there are many watercolor fans out there! I love that I can create a watercolor card using so many different mediums, like Distress Inks, Gelatos, Watercolor Pencils or real watercolors. It's fun to experiment and most of the time you can not be sure how it turns out :)
Sometimes you think it'll turn out ugly, but once it's dry, you might love it! Ha, or vice versa. 

I created two samples for today. Look closely, you might get a peek of the upcoming release!


Here I used Derwent Inktense Pencils to color the gorgeous chrysanthemum (new release!!). I started with a panel of watercolor paper and stamped/heat-embossed the images. Then I applied water to the panel and, using a water tank brush, picked up color from the pencils to color the flower, the leaves and the background. For more fun, I flicked a bit of the color onto the background. After it was dried, I stamped and heat-embossed the sentiment using silver embossing powder. I adhered the panel to the card and finished it off with sequins.


The second card is a sample of playing with watercolors without knowing how it'll turn out. And I have to admit, I love how it turned out. For this background, I used Distress Inks. I pressed my ink pad onto a large acrylic block, spritzed the ink with water and dipped one corner of the watercolor paper panel into it. Then I cleaned the acrylic block and applied a new color. After spritzing it, I dipped the next part of the panel into it and so on. I repeated this with the whole panel until I was satisfied. Then I adhered the dried piece to my card base. I die-cut the rose and leaves from vellum and white card stock, layered them and adhered them to the card. Then I die-cut the "hugs" from card stock and fun foam and adhered it, too. Finally I added sequins.

Now it is your turn! Can't wait to see your take on my watercolor challenge, the possibilities are endless!

Vanessa


Prize: One randomly chosen project that is linked up will win $50.00 gift credit to the w&w shop.

>>>LINK UP<<


w&wDT_vanessamenhorn_blog-sig

Saturday, September 19, 2015

September Leading Lady Lindsay Amrhein | Take Three

Our September Leading Lady, Lindsay Amrhein is back for her triumphant third performance!  If you missed her smashing debut you must see it...CLICK HERE or her second performance which showcases her wonderful watercoloring CLICK HERE.  Lindsay's proves her skill with an duet of inktastic projects today!

Without further ado, Lindsay....

Hello Winnie & Walter fans!
It is Lindsay back again with you today, to share my third performance with you! It is hard to believe that we are well into the month of September already! For today, I am bringing you cards using ink blending. This technique is so versatile, and fun! You can add color to just about anything with an ink pad, and a foam applicator.
For my first card, I die cut the Essentials: Audrey Cutaways out of white cardstock, and using a round foam applicator, applied Tumbled Glass Distress Ink to just the bottom. I then moved on to my flowers. Taking the In Bloom: Maggie's Roses dies, I die cut two of them, and applied a heavy layer of ink to each. I also did that to the leaves. To complete them, I added the line layer, and adhered them to the panel with both foam, and regular adhesive.
I stamped the sentiment from The Big, the Bold and Comfort in Onyx Black ink, and adhered the panel to a white cardbase, finishing it off with a few sequins.
For this card, I wanted to blend in a rainbow of colors, over top of an embossed image. So, to begin, I repeatedly stamped the border image from the True stamp set in Onyx Black ink, and applied clear embossing powder over it. Once I heat set it, I applied my Distress Inks in rainbow order, making sure to overlap the colors.
After I trimmed the panel down, and adhered it to a white card base with foam I began working on my sentiment. I die cut the In a Word: Hello Cutaway multiple times from black cardstock, and adhered them together. I then adhered that to my card, along with the word "friend," which I stamped from the True stamp set. To finish it off, I adhered a few white enamel dots. Thank you so much for visiting today! I hope you were inspired to try a bit of ink blending on your next project! Have a great day!


w&w-supplies


Friday, September 18, 2015

Metallic | Strength with Kelly Griglione

Hi all! Are you excited about all the metallic inspiration this month at Winnie & Walter? Want to get your metallic on, but don't have any metallic sheets? No problem! Look no further than your recycling bin. I'm happy to share a new-to-me technique of die cutting pop cans (soda cans, Coke cans, you know what you call them in your area of the world!) I know this has been tried before, but I never took the time to experiment until w&w's metallic theme got me going. Let's take a look!


All you really need is a pop can and scissors. I have heavy-duty wire-cutting scissors here, but you can also use ordinary kitchen shears. I'd just avoid using your good paper cutting scissors : )


Cut through the drink hole and start cutting around the can. It's much easier to cut a straight line if you cut counter-clockwise (with the long end of the can on your right, if you're right-handed).
 
 
 Cut down the seam of the can.
 

Cut the bottom off. Again, keep the long end of the can on the right if you're right-handed.


Now you're all set to die cut as usual. For cans with patterns and writing on them you'll want to think about what sections to cut for each cutaway. In this case I wanted the base of the flower to be blue, the outline silver, and the center red.


Don't forget you can use the inside of the can too, which is how I got the silver outline. Here you can see my not-so-glamorous die-cutting plate with a crack running through it. Nice, Kelly. 


And here it is! The flower is from In Bloom: Maggie's Roses Cutaways. The red center I used a hole punch for. The aluminum is a little tricky to adhere together, especially since I can't find my glossy accents from our move this summer (ugh). So I used a Tiny Attacher in two places along the metal outline. It's hidden pretty well I think. The leaves I cut so "Pepsi-Cola" and "150 calories" would be visible. After all that work you want the recipient to know what it is!


Surprisingly, you can also heat emboss on aluminum. I chose the "strength" sentiment from The Big, The Bold and Comfort. Not sure if you noticed, but the two waves on the base of the card also mimic the Pepsi logo. I love details! 

Thanks so much for looking!
- Kelly

w&wDT_kellygriglione_blog-sig


w&w-supplies