Saturday, May 30, 2015

May Leading Lady Anita in France | Take Five


With the end of May comes a sad time for us as this is the last Saturday with our remarkable May Leading Lady, Anita in France.  Our five fabulous weeks with Anita have been too short and we want to express our heartfelt gratitude to you Anita for bringing an incredible energy and level of excellence to each of your performances.  It has been a joy to have you as our leading lady.  

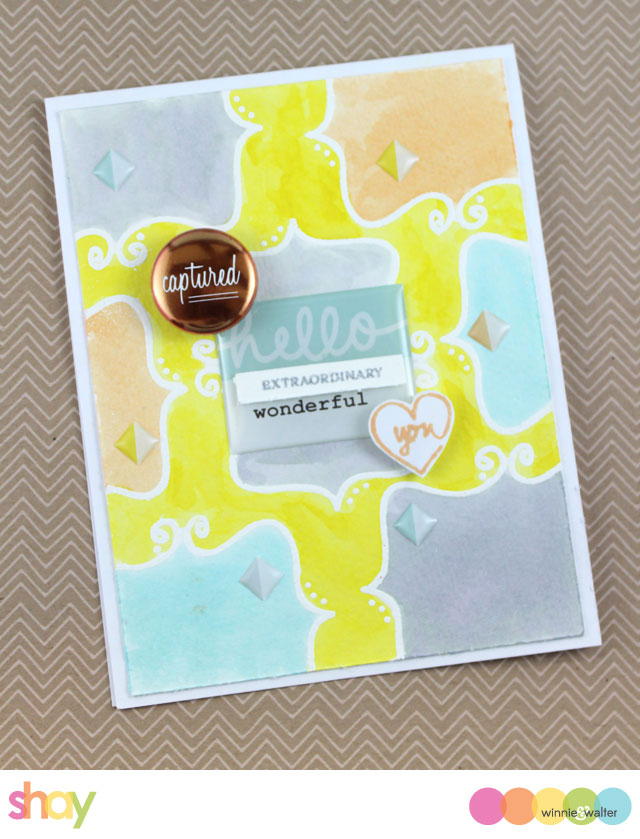
If you missed Anita's smashing debut you must see it...CLICK HERE or second performance showing her softer, floral side CLICK HERE or third performance showing her range and versatility with one product CLICK HERE or her fourth performance in which she multiplied her talent times 3 CLICK HERE.

Lucky for us all we have her final shimmering performance today.  
Winnie & Walter Leading Lady


My excitement at appearing on the Winnie & Walter stage today is tinged with just a touch of sadness that this is my last performance as Leading Lady.  It’s been a wonderful experience working with Shay and Julie, who are just the loveliest people … thanks so much, ladies, for the opportunity to showcase your awesome product range … it’s been an honour and a privilege!  Thanks also to all of you … readers, visitors, commenters and friends … your support and encouragement has been truly fantastic … you’ve touched my heart!  So … on with the finale … a little feature I’ve called ‘Accentuating The Negative … With Shimmer’!

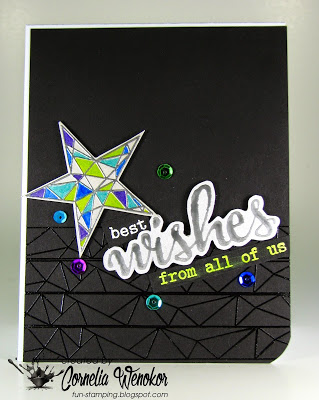
Scene 1 … Starry Starry Night (such a good song to be going round your head for the day!) …


W&W Leading Lady Week 5 Starry Night


Here I used emboss resist to create this shimmery look.  I sponged Versamark through the Scenery: Big Bang Classic Star Creative Screenings (stencil) onto a white card panel and embossed the panel in silver.  It was sponged over with Distress Inks (Tumbled Glass, Peacock Feathers, Chipped Sapphire), blended to create a starry ombré night sky and Perfect Pearl mixture was used to create some gentle splattering.  The panel was split (to create the negative space) and trimmed to size, I embossed the sentiment (from My Precious) onto the base card and popped the two portions of the panel up on foam tape over it.     

Here’s a closer look of all that sparkle and shine …
W&W Leading Lady Week 5 Starry Night Close Up


The emboss resist technique isn’t limited to using stencils … it works beautifully with so many of the Winnie & Walter stamps … I’m thinking backgrounds made up with Scenery: Big Bang Bling,  Confetti, Flurries … and a whole bunch of the graphic stamps!

Scene 2 … ‘Stella’ sparkly Hugs and Kisses …


W&W Leading Lady Week 5 Hugs and Kisses


Don’t you just love all those little hugs and kisses?  They were cut repeatedly into a white panel with a single line border from Essentials: Audrey Cutaways (dies) … and the sentiment (from You’ve Got Love Mail) was stamped in Versafine Black.  I used the panel as a guide for marking stripes on the base card, masked and sponged Distress Inks (Mustard Seed, Spiced Marmalade, Picked Raspberry, Peacock Feathers, Mowed Lawn) on each line and covered all the colours in a hefty coat of Wink of Stella.  I adhered the panel flat onto the card base … a test run using foam tape didn’t show the colours as clearly, so I went flat!  Would you like to see the shimmer under those negative space hugs and kisses … yummy huh?
W&W Leading Lady Week 5 Hugs and Kisses Close Up


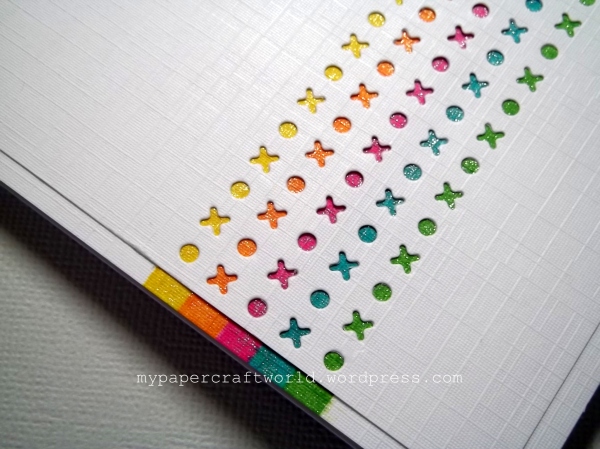
It’s very sparkly IRL!  This was a really quick, CAS card … another of those ‘that’d be good in a set’ ones as it’s so easy to replicate … it’d be even quicker if washi tape was used instead of Distress Ink!

Scene 3 … Brilliant Birthday Balloons …
W&W Leading Lady Week 5 Birthday Balloons


There are two sets of shimmery negative space here … the ‘happy’ … and two of the four sides.  I cut the In A Word: Happy into a white card panel and used the ombré stamping technique and masking for the balloons (from The Party).  Each colour was stamped three times … first in full, next with about half the ink wiped off the stamp and the third with about three quarters wiped off … the ombré colour creates a real sense of dimension, even though the balloons are flat.    If I had a MISTI, I’d have used it to get easy precision placement … I haven’t (yet!), so used my trusty stamp positioner to make sure each impression landed in just the right spot.  I stamped over all three balloons with Versamark, embossed them with clear holographic EP and trimmed the panel to size, cutting round the balloons off the edge of the panel.  To get the matching shimmer on the grey base, I tapped Versamark over it and embossed it in the same clear holographic EP as I used for the balloons.  The white panel was popped up on foam tape over the grey, I added the letter pieces inside the word and scattered a star sequin or three and some gems across it.  Here’s a much better view of all that shiny shimmer … 


W&W Leading Lady Week 5 Birthday Balloons Close Up

Using the same embossing powder (in any finish or colour) is a great way to get matching elements in a card!

Scene 4 … Shake That Shimmer …
W&W Leading Lady Week 5 Shake That Shimmer


What a brilliant Cutaway this In A Word:Hi is … it takes up a full card … and is just perfect for a shimmery shaker!  The front panel was easy … I just cut the ‘hi’ into it, added a panel of acetate to the back, adhered just a smidge (!) of foam tape and poured in a ton of sequins for shakeablility!  The card base was sponged and blended with Distress Inks (Squeezed Lemonade, Mowed Lawn, Tumbled Glass) so they would show through the word … and I spritzed it all with a light dusting of shimmer spray.   Then it was just a matter of taking the backing paper off the foam tape and adhering the base onto the back of the front panel.  A cascade of sequins and gems later (to match the Distress Inks) and I was done!  Here it is in all it’s negative spaced, shimmery, shakery glory …


W&W Leading Lady Week 5 Shake That Shimmer Close Up


There are so many ways to play with this Cutaway … stacked, camoflaged, partially die cut, popped up, with or without DP and/or layers … you’ll have your own favourite!

This last scene brings me to the end of my Leading Lady performances … and I’ve loved it!  Again, thanks so much to Shay and Julie … and to all of you for cheering me on through each one!  It’s now time for me to bow out and to bring the curtain down for the final time.   I do hope you’ve enjoyed these Saturday matinées … I’ve certainly had a ball playing with fantastic goodies, stretching my creative muscles and reading your always welcome reviews!

Don’t forget that Julie and Shay have generously given me a $30 gift card to Winnie & Walter to give away this month … if you’d like to be in with a chance of winning it (you could make that wish list into a happy package!), leave a comment on each of my Leading Lady posts over on my blog (My Papercraft World) every week … five posts during May, five chances to win!  I’ll do a random draw from all the comments and will announce the winner on Sunday 7 June!


For the final time, thanks so much for coming by, your visits and comments are always a joy!  Anita :)


w&w-supplies


Friday, May 29, 2015

Pinkfresh Studio May Embellishment Kit Inspiration + Giveaway!

pinkfreshstudio_may2015kit

Isn't the Pinkfresh Studio May Embellishment Kit a beauty?  The colors (love that copper!) and designs work well with all sorts of crafting and with other items you have in your stash.  We had the privilege and delight of working with Kinnari of Pinkfresh Studio to bring you the 3x4 stamp set!

We  (Julie & Shay) + The Talent had the chance to play with the kit and we wanted to show you what we came up with:

Julie

jmog_pinkfreshkit_hellohappygirl1

My Hello Happy Girl card was so fun to make and I love the playfulness of all of the pieces working together.  I started off in a completely different direction, and had embossing problems.  That is when I had to cut the Heidi Swapp washi tape panel off of the original grey card base and see if I could still use it here.  I opted to work it in at the diagonal and cut the In a Word: Happy Cutaway using some pink “Live & Love” paper from Pinkfresh Studio’s Up in the Clouds Collection.  I glued just the bottom section of the letters to the polka panel so the letters could be popped up without all the extra foam tape.  It is only under the polka!  I tucked the cute wood grain girl under the curve of the “ppy” and stamped GIRL from Sugar Rush in Warm Violet chalk ink.  The little hello rectangle from the new 3x4 stamp set is stamped in Lime Pastel and the arrow in Tangerine chalk inks too, and these images were fussy cut, popped up on foam tape, and covered in glossy accents to create my own embellishments.  Last but not least, some of these petite heart sequins (sequinettes??? LOL) were added in the little space to the right of the girl.

jmog_pinkfreshkit_hellohappygirl2

*sigh*  This card really makes me HAPPY!  I love this kit from Pinkfresh, and Shay and I were so happy to get a chance to work with Kinnari on this project.  Thanks so much, Kinnari! Sending you big *hugs*

Shay

I have a couple of cards for you today...I used only the embellishment kit + some items from Up in the Clouds collection from Pinkfresh Studio.  Even doing so I have only scratched the surface of this kit as it has so much to play with!

Card No. 1

IMG_3651
For this card I used the die (it can be used with or without the coordinating frame stamp), stamp set and papers from Up in the Clouds along with one of the journaling cards from Up in the Clouds to create this bright and happy card.

I cut the frame out of the same patterned paper twice and nested two of the frames inside on of the pieces of patterned paper I used to cut the frame out of.  The sentiment and arrows were stamped on a panel of white cardstock and placed under the patterned paper.  I accented the card base with the heart stamps and some of the adorable iridescent yellow heart confetti from the kit.  The inks are Tim Holtz Distress Ink in mustard seed, broken china and spun sugar.

Card No. 2

IMG_3648
My second card is all about the frame stamp which was heat embossed in white on watercolor paper repeatedly and then I painted in the background using a waterbrush and Distress Ink in mustard seed, weather wood, dried marigold and tumbled glass.  I chose those colors as they are the colors in the kit.

I altered the epoxy sticker to add a strip stamped with "extraordinary" also from the stamp set.  I added the you heart stamp, awesome copper flair and the epoxy diamonds to finish off the card.

Next up are the awesome projects from the Talent!

The Talent

gayatri_Pink Fresh Kit card 1
CLICK HERE to see more from Gayatri. (may be slightly delayed)

PinkFresh Collab - Heather P
CLICK HERE to see more from Heather P.

joni_Live
CLICK HERE to see more from Joni.

kelly_Wedding Shower Recipe Scrapbook 3
CLICK HERE to see more from Kelly.

WW_PFSCOLLAB_MAYURI_RGB_2151
CLICK HERE to see more from Mayuri.

vanessa_pfsmaykit
CLICK HERE to see more from Vanessa.

heather_hoffman_Cards-5-20-15-028
CLICK HERE to see more from Heather Hoffman.

laura_IMG_4949
CLICK HERE to see more from Laura.

>>>GIVEAWAY<<<

Now that you have seen all this glorious eye candy, how would you like a chance to win a kit of your own?  Pinkfresh Studio has generously donate this kit!  Thank you so much Pinkfresh Studio.

Simply comment on this post by next Thursday, June 4, 2015 at 11:59 p.m CST for a chance to win.  Winners will be announced on our brand new Giveaway Winners Page HERE.

UPDATE: Winner has been announced on our brand new Giveaway Winners Page HERE!

The Gossip Column with Taheerah Atchia No. 2 | Hot Gossips + Gossip Queen Announced

Welcome back, fellow Gossipers! We've been so thrilled with the response to the latest issue of The Gossip Column! We continue to be ever thankful all for your kind words, comments, shares, and your enthusiasm for this exciting new feature on the w&w blog!

We were bowled over by the number of entries - and the standard of the entries as completely blew us away too! It seems that whether geometry was something you shied from or specialised in, you totally threw yourselves into creating some absolutely stunning entries - and consequently making life very hard for us when it came to picking our winners!!

Just to recap, for this challenge we really wanted to see you use a geometric element or elements as the main focus of your project, with stunning execution - and original and innovative use of the elements would also gain extra credit for you daring to step outside of normal boundaries and create something 'brave' and different. I do like to keep you challenged, and many of you rose to the challenge in every possible way!

We thought long and hard, and finally arrived at our decision for this column's Hot Gossips (runner-ups) and Gossip Queen (winner)!!

Drumroll please... 

cornelia_IMG_3349w

Cornelia (Fun Stamping) entries were both of a high standard, but this stunner just caught my eye immediately - and held my attention too! Her quirky use of geometric elements (from True), and brilliant composition meant that she created a design that was bold, brave but without being overpowering! And those colours sure pack a punch too! Cornelia this card is definitely Hot Gossip!!

cris_g_17896339120_ca5c494026_z

Cris G.'s breathtaking, stained glass-like creation was just ethereally beautiful!! Cris used one of our free digital elements and showed that with a wonderful combination of colour, execution and subtle layering you really can take a basic element and elevate it to new heights! Cris this beauty rightfully makes you Hot Gossip!!

And that brings us to our geometric-tastic Gossip Queen... 

bhavana_17686654329_5db969122a_h

Bhavana... her card featured some really clever masking of the large diamond image from My Precious to create a terrific triangle pattern! With some strategic colouring and addition of sequins to generate movement, perfect execution and just great vision meant that I couldn't help but name her Gossip Queen!!

Cornelia and Cris you both win a $15 credit to the w&w store, and Bhavana you walk away with a $30 credit! Congratulations!! Please contact info@winniewalter.com to claim your prizes!!

Please join us in congratulating these fantastic ladies and their amazing creations!! Everyone's entries were of such a high standard and you all deserve the plaudits too!! Please do take some time to browse the gallery to see everyone's work - you can find them at the bottom of the last The Gossip Column here.

For all you Gossipers who are keen to get the latest scoop, issue 3 of The Gossip Column will be hot off the press on Friday 5th June! We'll see you back here to get the exclusive on the latest gossip then!!

'Til then - keep on gossiping!

Taheerah

Thursday, May 28, 2015

Winners of the Be Inspired Cards Class Giveaway

We have the random winners of the giveaway of the Be Inspired Cards Class by Nicole Picadura of Scraps & Stamps focusing upon our April/May 2015 Release.

Drum roll...

april-may2015_beinspiredcar

Janet + Marlene please email us at info@winniewalter.com in the next 48 hours to claim your spot in the class!

Remember you can still sign up for the "interactive" portion of the class which begins on May 29th (tomorrow) and runs through June 7th.  During that time there will be an exclusive coupon code for shopping and giveaways. With a total of ten (10) lessons including video tutorials you will be sure to learn a lot and want to get crafty!  Of course you can sign up for the class anytime after the "interactive" period of the class.

For more details please CLICK HERE.

Thank you to everyone for providing us with your opinions!  It helps us mightily.

Spotlight On...Bhavana Kesarkar! Part Deux


We are so lucky to have Bhavana Kesarkar back with us for another bright, vibrant and pretty post!  If you missed learning more about Bhavana and seeing her first fabulous In Bloom projects CLICK HERE!

Now, it's Bhavana's time to sparkle and shine...

I am back with my second post here at Winnie & Walter. 

My first card is a bright floral card. I used In Bloom: Addie's Garden and The Big, the Bold, and the Happy stamps sets. I white embossed the blooms on watercolor cardstock. Did watercoloring on the entire front panel and die cut the frame from Essentials: Audrey Cutaways  also cut some white hearts and added wink of stella glitter. Stamped the sentiment with black ink.

IMG_8662

Second card I made using the tulips from the In Bloom: Addie's Garden stamp set. Used seedless preserved and mawed lawn distress ink for coloring. Stamped the sentiment in black ink. Used The Big, the Bold, and the Happy stamps sets for the sentiment. 

IMG_8707

The third card is a card inspired by In focus with gayatri style 1 - inlaid die cutting technique. I used In a Word: Friend Cutaway and In Bloom: Addie's Garden stamp set, also used picked raspberry, mustard seed, peacock feathers distress ink and did the stamping with black ink. Used some enamel dots to finish the card.

IMG_8670

Thank you again and I really enjoyed making these cards and would love to see your comments.

Happy crafting!!

Wednesday, May 27, 2015

Special Guest Star, May Flaum!

special-guest-star_mayflaum

We are so thrilled to bring you our Special Guest Star, May Flaum today!  You may know her from her appearances on Paperclipping Roundtable, took a class or two from her, read her book or know her from her grand artistic adventures with Simon Says Stamp.  Shay has been following her work ever since she was on the design team of Scarlet Lime oh a few years ago. :-)  Having met this truly lovely lady in person, her intelligence, thoughtfulness, humor and talent shines bright and true.

May is such a genuine person who is concerned about the realities of the everyday crafter and someone who cares about crafting.  Of interest to Walter and Winnie is she has two darling dogs named Scrappy (check out Scrappy with a card using one of our stamp sets HERE and it doesn't hurt that she looks a bit like Winnie's little sister Violet) and Ranger (to see a bit more of these two cuties CLICK HERE)!

Wait until you see her gorgeous projects!

>>>ABOUT MAY<<<

mayf_pic

Her website: www.craftwithmay.com 

When I’m not camping or traveling with my family you can usually find me tucked away in my studio creating up a storm! From mixed media canvases to art journaling, scrapbooking to thank-you card making I love all things crafty! This summer I’ve got an all new on-line class coming to my website (www.craftwithmay.com) featuring everything from cards to layouts to techniques! For more information on Camp Scrap or any of my other classes, or to see more videos and projects be sure to check out my site or my YouTube channel.

>>>MAY's PROJECTS<<<

  may_flaum_DSC_1419 copy

When it comes to stamps like this, I’m all about coloring! So far, my favorite is to color with a variety of watercolor mediums. You can use any medium you happen to have – as long as it blends with other colors! This is such fun to play with, and if you are going to use white embossing as I do, bold colors work best. Today I’m happy to share a video tutorial with you, sharing how I made these cards. 


And some closeup beauty shots:

may_flaum_DSC_1424
may_flaum_DSC_1422
may_flaum_DSC_1427
may_flaum_DSC_1431

We want to thank May for creating such beautiful art with our products and sharing how she made it with us all!  Please be sure to visit May and leave her some love! :-)


w&w-supplies

Tuesday, May 26, 2015

Spotlight On...Bhavana Kesarkar!


We are so pleased to bring you our next Spotlight On...Bhavana Kesarkar!  Bhavana's projects are eye-catching, clever with a lovely clean and simple aesthetic.  Her work is dramatic, striking and fresh with just the right feeling of space.  Just look at THESE CARDS and THESE CARDS she made for our 1st Birthday Bash Challenges!


Wait until you see what she's made today...you will see Bhavana shine!       

<<<ABOUT BHAVANA<<<

Hello Everyone, I am so very thrilled and happy to be here at Winnie & Walter Blog for the Shine the Spotlight On feature. Thank you Shay and Julie for giving this opportunity to show my love for Winnie & Walter products.


So over to me I am Bhavana, I stay in California with my wonderful and very supportive husband. I enjoy card making and it makes me happy. You can visit my blog Blending Art and Craft. When I first came across Winnie & Walter products especially their Bold sentiments and sequence stamps I fell in love them and had to use them.  I hope you all like how I used their products on my cards. 

>>>BHAVANA's PROJECTS<<<

This month's theme is "In Bloom" and for my first I used In Bloom: Addie's Garden and The Big, the Bold, and the Happy stamps sets. I white embossed the blooms on a white cardstock and applied distress ink. I used mustard seed, picked raspberry, barn door, seedless preserve, mowed lawn and peacock feathers distress inks. I later fussy cut the flowers and leaves and arranged it on the kraft cardstock which I die cut using Essentials: Audrey Cutaways  couple of flowers and leaves are using the foam tape. The sentiment too is white embossed. The front panel is stuck on white card base with foam tape.

IMG_8659

The second card is a geometric bloom. I used My Precious stamp set for this card.  I stamped the precious stone is a circular fashion to give a look of a flower and colored with copic markers and added wink of stella clear glitter over it. The sentiment too is from the same stamp set and add a couple gold enamel dots. I took a white card stock colored the all four edges of the card with same copic maker and used foam tape to stick the front panel on the the card base.

IMG_8664

And for my third card I used In Bloom: Addie's Garden and The Big, the Bold, and the Happy stamps sets.  I used mustard seed, spiced marmalade, vintage photo and mowed lawn distress ink for stamping. I first inked the stamp with distress ink and sprayed some water over it and stamped directly onto the card base.  Also sprayed vintage photo ink with a small brush over the card base.

IMG_8668

I thoroughly enjoyed making these cards and would love to see your comments.