Showing posts with label scenery: holiday trimmings. Show all posts

Saturday, November 24, 2018

November Leading Lady Jill Vickers | Take Four

As November ends we sadly must bid adieu to our superb November Leading Lady Jill Vickers.  The last few weeks with Jill has been a spotlight for her dazzling depth and scope of skill, innovation and terrific techniques.  Jill has exhibited her tremendous talent and astounding creativity week after week.  I feel so fortunate Jill shared her talents with us this month and made this month something special.

If you missed her smashing debut you must see it...
CLICK HERE or her sensational second performance sure to ensnare your focus CLICK HERE or her triumphant third performance with a plethora of cards that will have you reaching for dies CLICK HERE!  Today's projects !

Lucky for us all we have her final command performance today.  


I can't believe how quickly November has flown by and that it is already time for my last act! I want to thank Shay for her generosity and her invitation to join this wonderful Winnie & Walter blog for the month. I also want to thank everyone for their wonderful comments - both here and on my blog - they have brought me such joy and I am truly grateful that you took the time to leave them.


So now - onto my finale :)

Last week, I focused on building backgrounds using die cuts - so this week, I am focusing on stretching my stamps to create fun backgrounds.

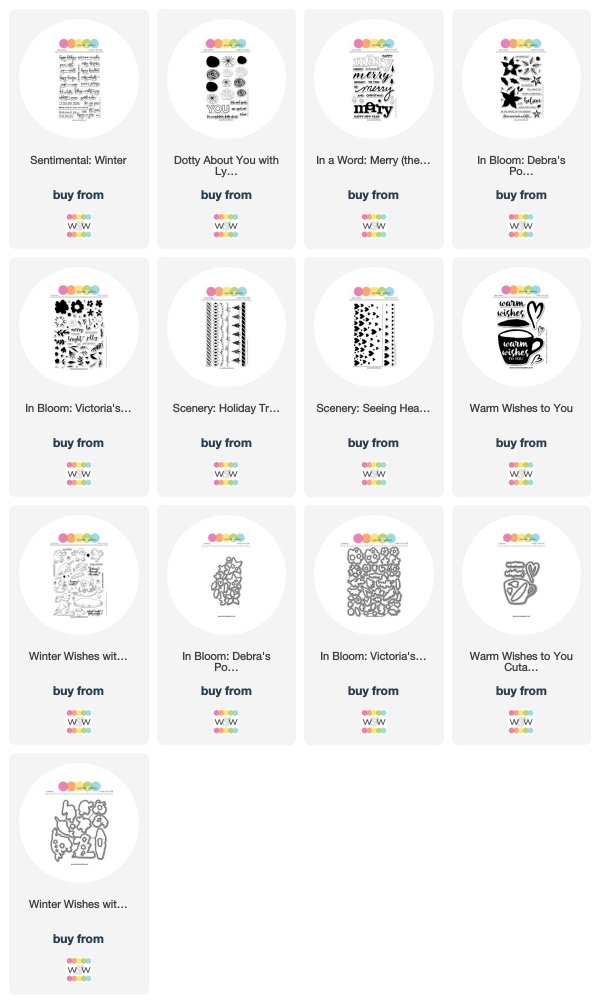
For my first cards, I used the Scenery: Holiday Trimmings stamp set - this is one of my favourite sets for decorating holiday card envelopes - but the border images are perfect for building backgrounds as well. I stamped the tree image repeatedly across the card fronts in Versamark ink- I did shift the border to the left and the right to change the styles of trees on each row. On one card front, I embossed with detail clear embossing powder, and on the other, I embossed with clear sparkle embossing powder. I then sponged ink across the panels- on the clear embossed panel, I used Picked Raspberry, Mustard Seed, and Salty Ocean to create a rainbow effect. I used Cracked Pistachio, Peacock Feathers, and Blueprint Sketch on the sparkly one. I added a simple white embossed greeting from In A Word: Merry to each of the panels, and a few silver star sequins to a few of the trees before adhering the foam-mounted panels to some cards bases dressed up with silver glitter washi.


For my next cards, I wanted to create a "knit sweater" style background - there a quite a few background stamps that do this but I was pretty sure that I could make my own. I used two more borders from the Scenery: Holiday Trimmings set, a border from the Julie's Roses set (a 2016 Black Friday W&W Special set), and a row of hearts from Scenery: Seeing Hearts. I stamped two panels - both using light grey ink - one onto a white panel and one onto a light grey panel for a tone-on-tone look. This process is really straightforward using the MISTI - the hardest part is deciding what the pattern should look like but once the stamps are lined up, it is just a matter of shifting the panel up and down to create the pattern.


To complete the grey tone-on-tone card, I used some stamped images from In Bloom: Debra's Poinsettia with Lydia Evans and In Bloom: Victoria's Very Merry Flowers with Lydia Evans as well as an embossed greeting from Sentimental Winter and a scattering of crystal gems. To complete the white panel card, I added a pink ombre stamped mug from Warm Wishes To You, a greeting from Sentimental Birthday and a few pink gems.


For my last card, I used the swirl stamps from the Dotty About You with Lydia Evans set to create a Van Gogh inspired wintery background. I stamped the panel using a light blue ink - I did do some masking as well to avoid the overlaps but it was pretty easy to cut the masks. I added the panel to a light blue card base. To complete the wintery scene, I added the skiing bear from Winter Wishes with Evelin T Designs (seriously - how cute is he?), Copic coloured in soft colours. To finish the card, I silver embossed sentiment from the same set (after doing some minor stamp surgery to position it linearly) and a few iridescent silver-blue snowflake sequins.


I love creating backgrounds like this, and I could have easily done many more with all the wonderful Winnie & Products but unfortunately, I ran out of time....  I do hope that this post has given you some ideas on how to stretch your stamps to create backgrounds, and that you enjoy it as much as I do.

Shay has kindly offered up a $30 Winnie & Walter gift card for me to give to one lucky commenter on my blog, My Life in Paper For your chance to win, leave a comment on this post and/or any of my leading lady posts and I will randomly pick a winner from all the comments left by November 30th.


Thanks again for all your lovely comments and your support for my Leading Lady act - it was so much fun! 
Jill


w&w-supplies

Friday, October 27, 2017

Peace of Earth with Lydia

Hi there everyone and a very happy (or should I say merry) Friday to you!

Today I'm sharing with you a Christmas card..... I hope I'm not too early ;)


I started by stamping the wreath swag from Merry & Bright with Evelin T Designs twice to create a full wreath using black pigment onto a piece of watercolour cardstock. I then stamped a sentiment from the same stamp set in the centre of the wreath using pigment ink I then clear heat embossed the sentiment so it stands out a little more than the wreath. I then used inks as watercolours to add colour to the wreath and a blue wash behind it. Once dry I added a few splatters of gold.


I cut this piece slightly smaller than the card base so I could add some interest to the side. I stamped the candy cane stripe border from Scenery: Holiday Trimmings in red ink onto the right side of the card base. I have to say I just love this stamp and it's one that I keep going back to again and again! Before adding the watercoloured piece to the card base I added a strip of gold to tie in the gold splatters I added to the watercolour piece.


So have you made a start on your holiday cards for this year? I do hope this inspired you to start if not.

See you again soon!

Hugs, Lydia x


w&wDT_lydiaevans_blog-sig 2

w&w-supplies

Saturday, December 10, 2016

December Leading Lady Shona Chambers | Take Two

Our December Leading Lady, Shona Chambers, is back for her sensational second performance!  If you missed her smashing debut you must see it...CLICK HERE.  Shona takes on the holidays focusing upon one of my favorites with awesome results!

Ladies and gentlemen, Shona....

Hi everyone!! Thanks for coming back to visit with me again on the Winnie and Walter blog!! 

Shona_Chambers_december2016


I hope you enjoyed last Saturdays 'Clean and Simple' Christmas card theme and it gave you some ideas. For today's post I decided to concentrate on something I don't usually think about much - Backgrounds!!

As you can see from last weeks post I'm very much addicted to my white card bases and tend not to cover them up too much. However, every now and then I like to go crazy with a few stamps and dies and see what I come up with!!

shona_week2_image002

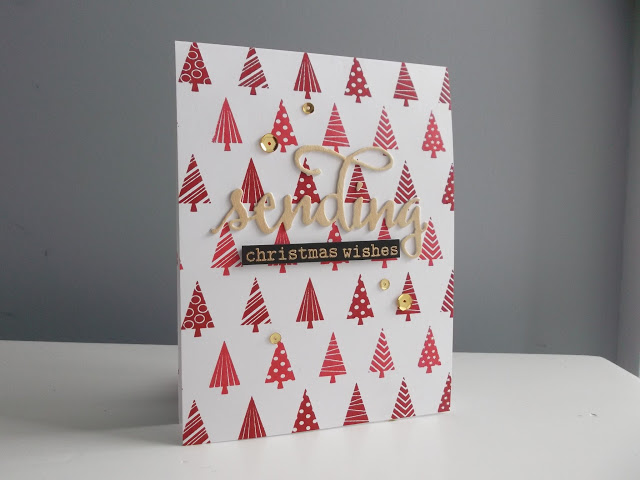
For this first card I used my MISTI and one of the new release stamp sets ''Scenery: Holiday Trimmings'.  Trying to line things up is not one of my best skills, so the MISTI was a great help to make sure the tree's were straight and spaced correctly. I simply stamped them in row's across my card front, using two different shades of red dye ink. I didn't want to cover them up, so I die-cut the sentiment from 'The Big, the Bold and Greetings Cutaways' from some wood veneer card stock, glued it to another few layers and then adhered to the card. The rest of the sentiment (from 'The Big, the Bold and Greetings') was heat embossed on black card stock, popped up on foam tape and some gold sequins added from Pretty Pink Posh.

shona_week2_image003

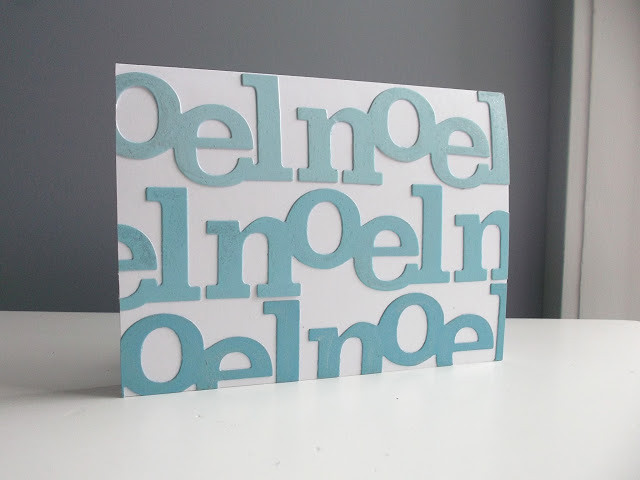
For my second card I decided that I could use some die-cuts to create a background. I chose some paint chips in slightly different blue shades (to create an ombre effect) and die-cut the 'In a Word: Noel Cutaway' from them all. I then simply adhered them in lines across the card front, cutting off the overhang. I then covered them in lashings of Wink of Stella for a bit of sparkle!!

shona_week2_image004

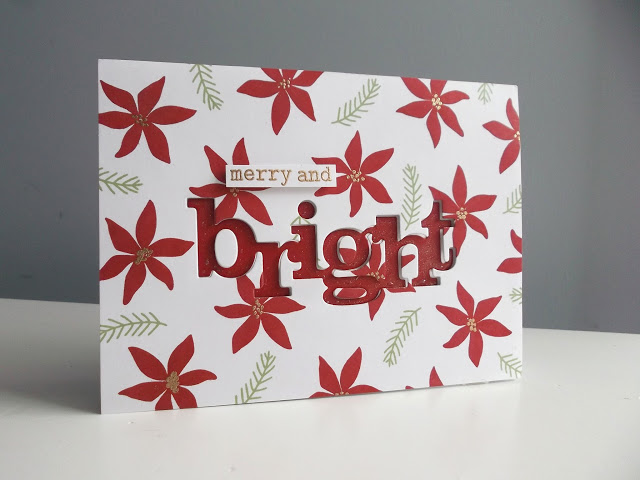
For my last card I combined both stamping and die-cutting. I cut a panel of white card stock the same size as the card front. The poinsettia and sprig (both from 'In Bloom: Frenchy's Festive Florals with Angelica Suarez) were stamped randomly across it. For a bit of shine I added dots to the middle of each flower with an embossing pen and heat embossed with gold. 

I die-cut the 'In a Word: Bright Cutaway' from the stamped panel and also from a red paint chip. The panel was popped up over the card front with foam tape and the red die-cut 'bright' was glued inset into it. I heat embossed the rest of the sentiment (from 'The Big, the Bold and the Merry') in gold and put on foam tape as well. I then put Wink of Stella on the red 'bright' for a bit of shine too.

I really hope you liked these cards and they have maybe given you a few ideas for your Christmas cards or any other cards you need to create. 

Don't forget to pop over to my blog to leave me a comment on this post and all my other Leading Lady posts to have a chance to win a Winnie and Walter $30 gift card.  Have fun crafting and see you all next Saturday!!

Take care
Shona


w&w-supplies