Monday, February 25, 2019

w&w 5th Birthday Bash | Customize Die Cuts with Crystal (Video)


Happy Monday!  Crystal has an awesome video tutorial for you today showing how she made this gorgeous card using Cover Model: The Peppermint Zone Cutaway, In a Word: Birthday Cutaway and Sugar Rush stamp set.


>>>CHALLENGE<<<

Create a new project featuring a die cut you customized like Crystal did with inks for the large background die cut and glitter on the word.


>>>GIVEAWAY<<<


Link up your take on this challenge for a chance to win a $75.00 gift card (gift code) to the w&w shop.  One random winner will be chosen.


Saturday, February 23, 2019

February Leading Lady Rosali | Take Four

As February wains we sadly must bid adieu to our our February Leading Lady Rosali.  The last few weeks with Rosali has been a tour de force of astounding design and impeccable technique.  Rosali has exhibited her tremendous talent and crazy creativity week after week.  I feel so fortunate Rosali shared her talents with us this month and made this month something special.

If you missed her smashing debut you must see it...CLICK HERE or to be wowed by the tremendous trio of cards from her sensational second performance CLICK HERE or her triumphant third performance where outdid herself today with her ability to create a gorgeous scene CLICK HERE!  Today's post will unmask some new ways of using your stamps!

In honor of our birthday month we're doing something a bit different this year and including a challenge to you on each of Rosali's posts this month.  See the end of this post for more details and to link up!

Lucky for us all we have her final command performance today.  


Hi there and happy Saturday!

How are you today? February has flown by so far and I am excited to bring you my last post as Winnie & Walter's Leading Lady and show you another masking technique! It's kind of a bitter sweet moment as I had so much fun creating with their products but I feel very lucky to have gotten this opportunity!! :-)
winnie_walter_leading_lady_rosali_february2019
So far, I have been telling you something about "masking backgrounds with stencils & with dies", and about "building a scene with masking". Today I am gonna focus on:

ALTERING STAMP IMAGES WITH MASKING


winnie and walter altering stamp images 3

I always like to come up with ways to use my supplies in a way they weren't necessarily intended for and make the most out of them that way! This goes especially for Christmas stamps ... I don't know about you but mine don't get used enough because I have a lot of them and they are all so cute! Therefore, I am gonna show you two ways of altering stamp images so you can use them the whole year round! I will try to explain everything as clearly as possibly - but if there are any questions left just leave me a comment under my post, okay?

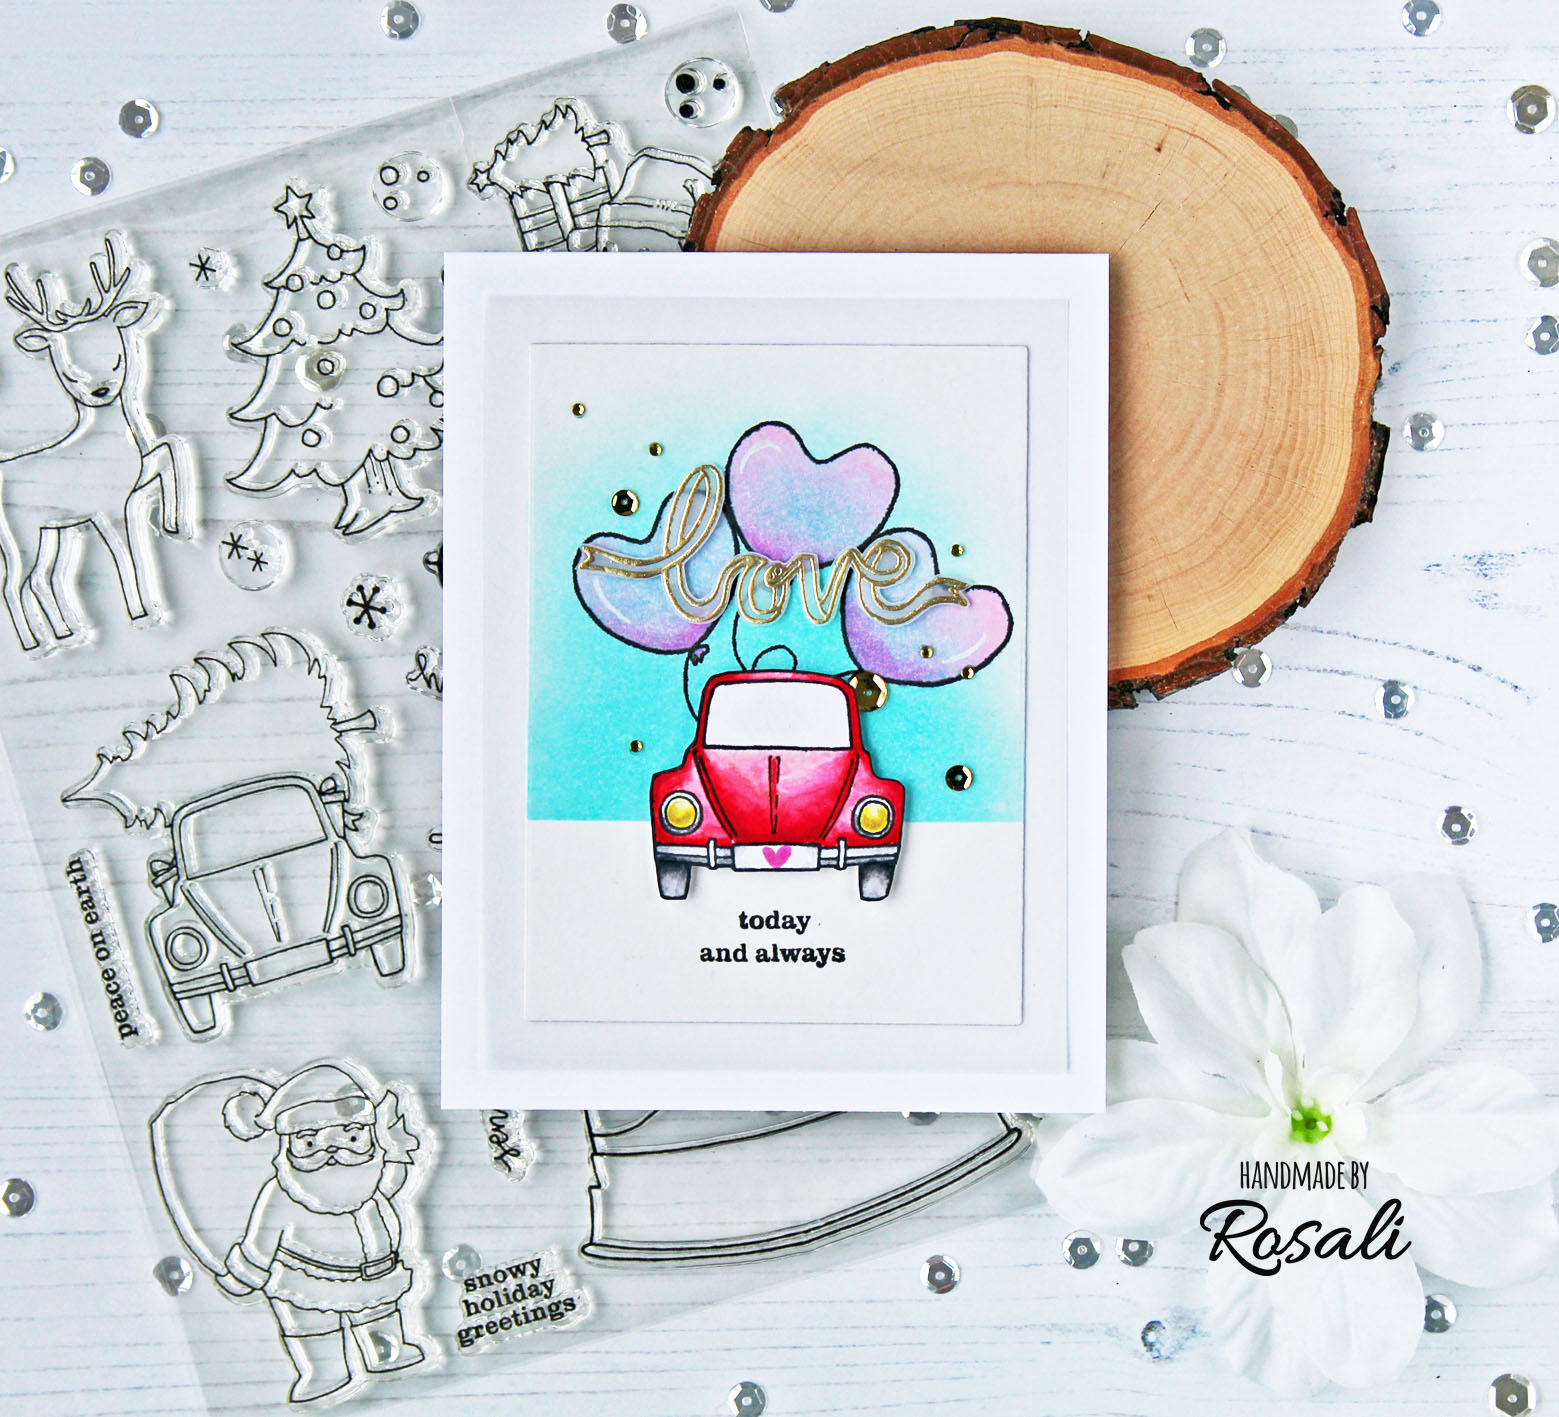
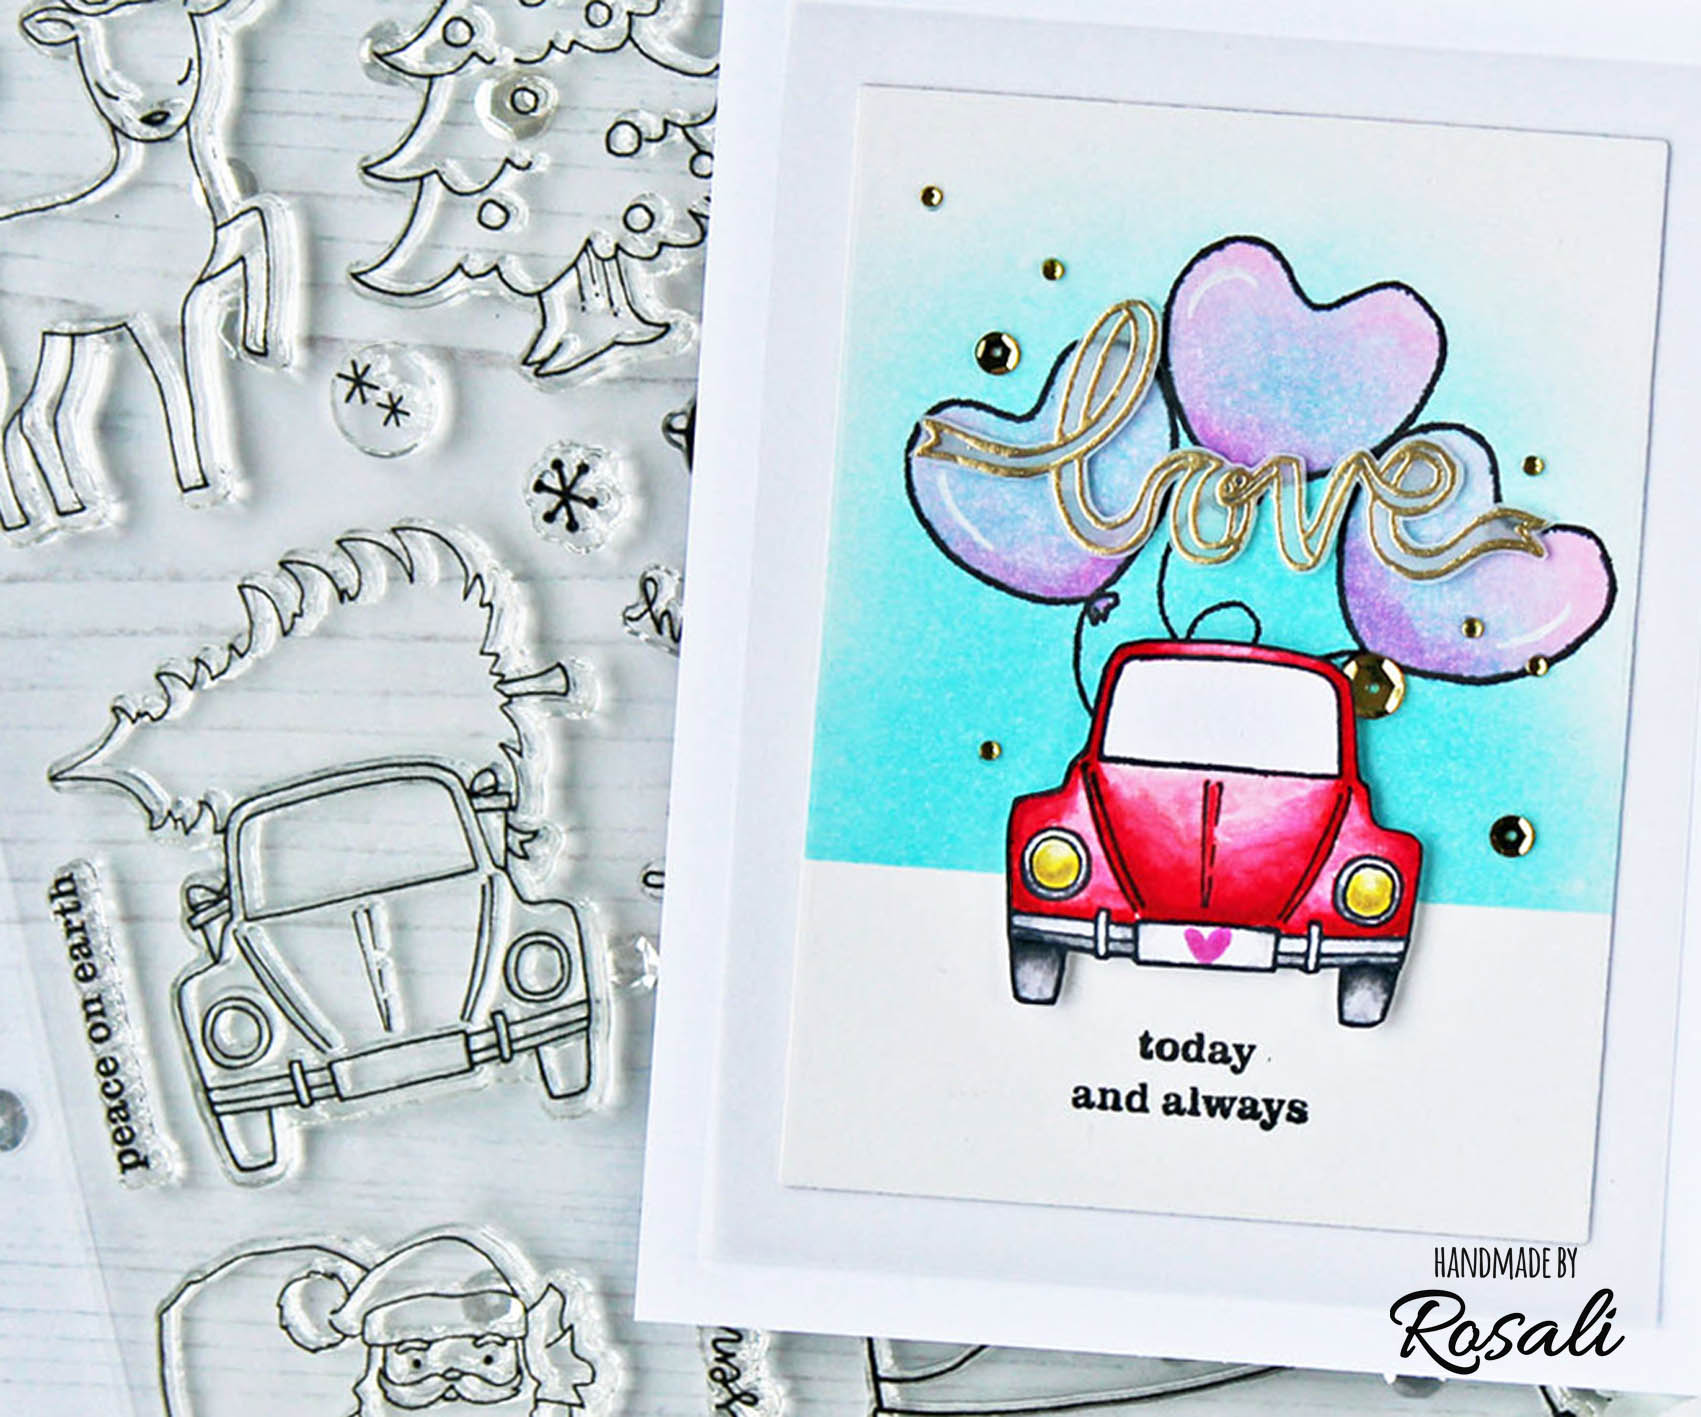
LET'S TAKE A CLOSER LOOK AT THE FIRST CARD:


Altering Stamp Images 4

The cute Volkswagen Beetle stamp from "Snowy Holiday with Evelin T Designs" originally has a tree and Christmas presents on top of it. Here's two ways to get rid of those so you end up with just the car:
  • Use washi or painter's tape to mask off the tree and presents when inking up your stamp. You can also use your finger to wipe off ink if you have any left where you don't want it.
  • I cheated a little bit and did it the lazy way: I stamped and watercolored the car image and then simple cut the tree and presents off with my scissors.
I still did some masking on the background: I used a strip of Post-It tape over my background panel and blended an aqua-colored ink sky over it. It's the quickest way to create a background for a simple scene!
Since balloons are often translucent I just stamped those on top of the ink and colored them in with Copics. I took sentiments stamps from "So Tweet with Evelin T Designs" and heat embossed "love" in gold on Vellum. I also added a bit of gold to the headlights and gold rhinestones and sequins. I am happy with how the non-traditional wedding car(d) turned out! :-D

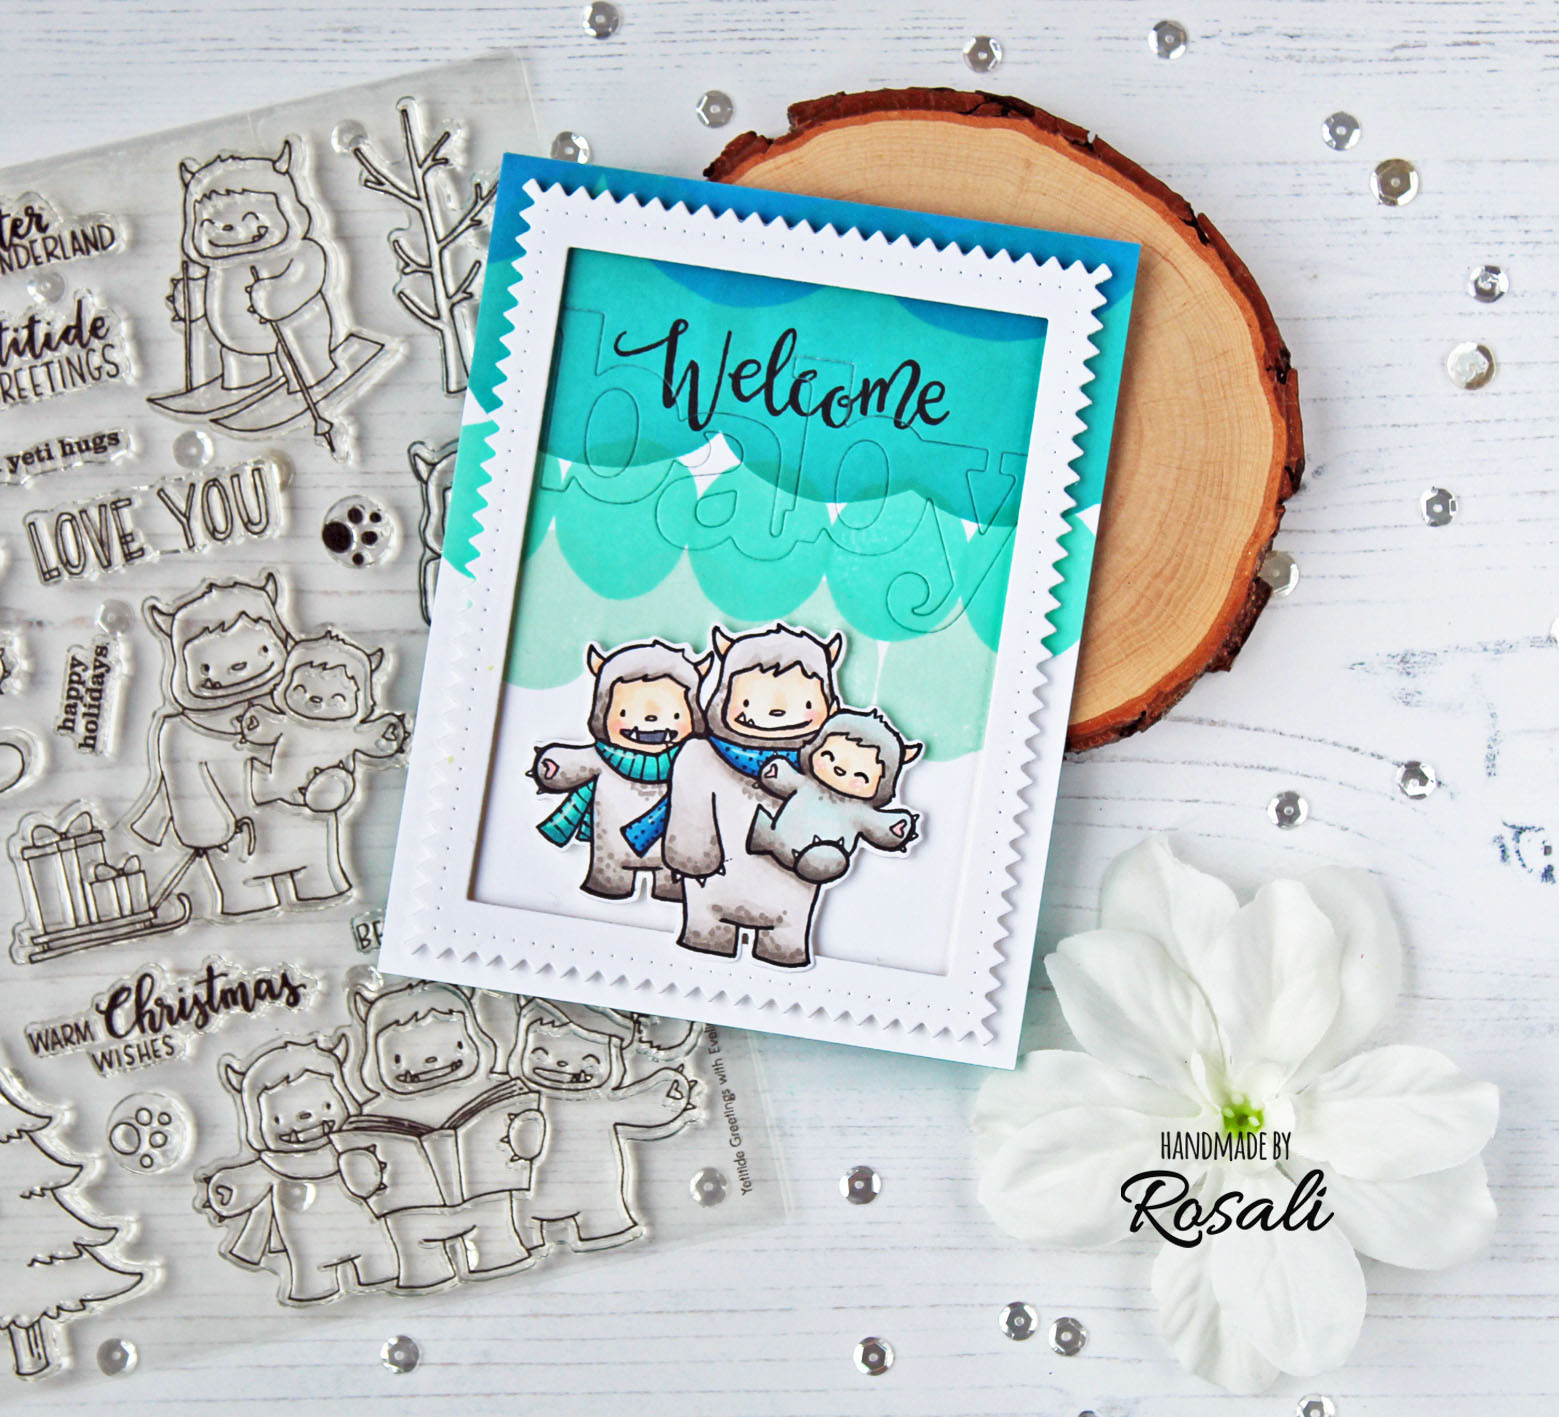
SECOND CARD: ALTERED YETI IMAGE


winnie and walter altering stamp images 1

I had this idea in my head of a yeti family on a baby card! So I took the "Yetitide Greetings with Evelin T Designs" stamp set and combined two stamps into one.

HERE'S A MASKING HOW-TO:

1. Take the first stamp (yeti with baby yeti and sleigh) and use washi or painter's tape to mask off the sleigh and the piece of rope in the yeti's hand before inking it up. You can also use your finger to wipe off ink.
2. Stamp this yeti and baby yeti after you removed the washi tape. Stamp it again on a piece of masking paper, fussy cut it and put it over your stamped image.
3. Now take the second stamp (caroling yetis) and place the stamp over your masked image so that the left caroling yeti fits and the music book won't show. Remove the mask when finished. Tadaaa!

winnie and walter altering stamp images 2


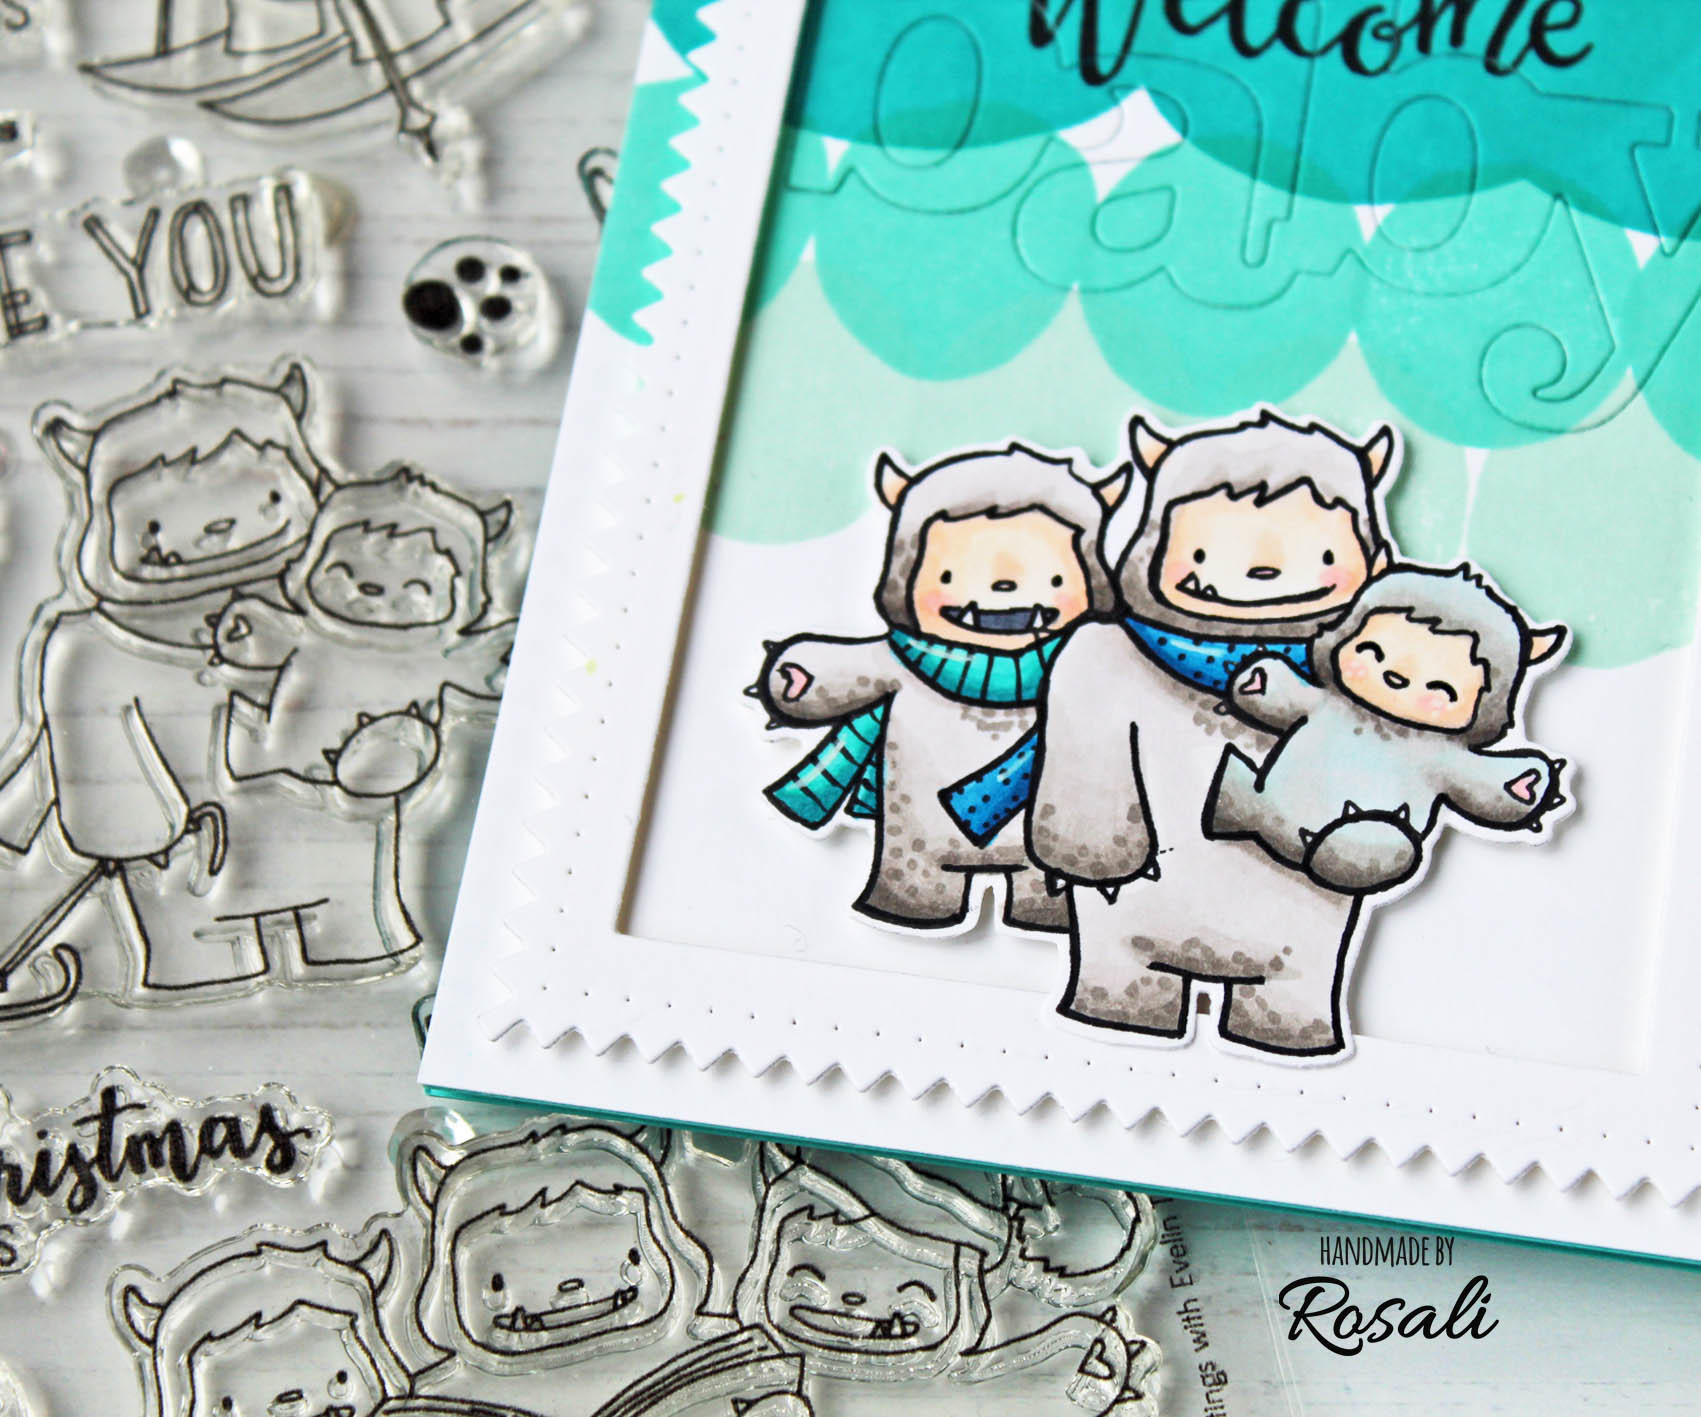
I adhered my yeti family using foam tape. I created a frame out of the biggest rectangles from "Tilda Cutaways". For the background I repeatedly stamped circles from the "Scenery: Dotty" stamp set in my favorite shades of mint and blue. Then I used the "Baby Cutaway" and cut it right into my background and adhered the panel flat onto a teal cardbase. The "Welcome" sentiment stamp from "So Tweet with Evelin T Designs" made my baby card complete!

COPIC GUIDE & COLORING TIPS:

Card 1
Balloons: RV02, RV04
TIP 1: I used watercolors to color the red car. To get enough shading it's best to add at least two layers of watercolor. Let the first layer dry completely, then add more pigment with a second layer.
TIP 2: After fussy cutting the beetle I went around the cutting borders with a black marker to get a finished look. I learned this from Kristina Werner when I started cardmaking and it makes a big difference! :-)
Card 2
Yeti’s faces: YR30, E51, E21, R20
Yeti’s fur: W1, W3, W4, W5 & B00
Scarfs: BG15, BG09 & B14, B06, B37
TIP 3: For some texture and additional shading, add tiny dots with the tip of your marker like I did on the fur of all three yetis.


I'd like to thank all of my lovely readers for leaving comments and reading my long posts! :-D I hope to have inspired you a little bit. And a huge THANK YOU again to Shay for having me on the blog this month, it has been a crafty dream come true!! ♥

For today's challenge, any type of masking and altering a stamp image will be fine! I am totally aware that my second example with the yetis might be a little complicated so that not everyone feels like it. ;-)

And don't forget to leave comments on my blog for your chance to win a gift certificate sponsored by Winnie & Walter. I am gonna pick a winner after Sunday 24th!

winnie_and_walter_30giftcard-giveaway

Thank you for stopping by!! ♥
Rosali


USED SUPPLIES:

Winnie & Walter stamps, dies and stencils:
Essentials: Tilda Cutaways
Snowy Holiday with Evelin T Designs Stamp Set
Snowy Holiday with Evelin T Designs Cutaways
LS Exclusives: So Tweet with Evelin T Designs Stamp Set
Yetitide Greetings with Evelin T Designs Stamp Set
Yetitide Greetings with Evelin T Designs Cutaways
Scenery: Dotty Stamp Set
In a Word: Baby Cutaway


CHALLENGE:

Now that you've seen Rosali do it, "Altering Stamped Images with Masking" to create your own project and link up here by Friday, March 15, 2019, 11:59 p.m. CST to be entered to win $50.00 credit to the w&w shop!  One (1) lucky randomly chosen winner will be picked from each of Rosali's Leading Lady posts this month.


Thursday, February 21, 2019

w&w 5th Birthday Bash | Layering Die Cuts Challenge with Jessica


Hi everyone! I’m so excited today because it’s Winnie & Walter’s fifth birthday! We are celebrating with tons of prizes and challenges, and I hope you’ll join us this year, too. 


My challenge is layering die-cuts. Whether it’s word dies, cover plate dies or stand alone dies, you can always find new ways to use them creatively. So I encourage you stretch the use of your dies and layer them!

I have two cards to share with you today; the first one features the number dies from Typecast: Cary Number Cutaways set, and the second one uses the In a Word: Love Coordinating Cutaways set. 


For this CAS rainbow card, I decided to die cut the numbers from Stampin’ Up’s cardstock. The colors I used are Merry Merlot, Tangerine Tango, Hello Honey, Cucumber Crush, and Blueberry Bushel. 


I die cut 5 of each number (because it’s W&W's 5th birthday!) and adhered them together with On-Point glue. This makes the numbers dimensional and almost look like chipboard pieces. 

Then I adhered a strip of silver vellum paper to my card base, added some enamel dots, and the card is complete!


The second card features one of my favorite product lines from Winnie & Walter: the In a Word series! I love these dies so much, and they are actually what captured my heart when I first saw Winnie & Walter. I was inspired by one of Lydia’s cards from a previous release and decided to layer these two love word dies to create this fun look. You can also use In a Word: Happy Coordinating CutawaysIn a Word: Thanks Coordinating Cutaways, and In a Word: Merry Coordinating Cutaways to create similar effects. 


I hope you enjoyed today’s easy tips on layering die cuts. If you would like to learn 3 more techniques about die cut layering, be sure to come back for my next post/video. Thanks so much for stopping by, and I’ll see you very soon.  


>>>GIVEAWAY<<<


Link up your take on this challenge for a chance to win a $75.00 gift card (gift code) to the w&w shop.  One random winner will be chosen.


Sunday, February 17, 2019

w&w 5th Birthday Bash | 3+ Stamp Set Challenge with Kelly


Hi Folks!

Wow, FIVE YEARS. Half a decade. I'm very happy to be celebrating Winnie & Walter's big milestone birthday today! My challenge is a fairly simple one, but one that hopefully may get you looking at your supplies in a new way.

Make a project using stamps from three or more different sets.


This card uses the two elephants from Big Hugs with Evelin T Designs, an elephant from Welcome to the Family with Evelin T Designs, and a bunch of balloons from Happy Dance with Evelin T Designs. It wasn't until I came up with this challenge that I noticed how well the elephants from the two different sets go together as parents with a new baby.  I love that it allowed me to represent an entire family on this card. The parent elephants are colored blue and pink, so that they could make a purple baby : )


I masked off the strings of the balloons, sprayed adhesive on the balloons, and sprinkled chunky glitter on top. Glitter makes me happy any day, and I think it's especially sweet on a baby card.  


I hope you get a chance to play along in one or more of the month-long challenges in honor of this event. If you pick this challenge, I'll be anxiously waiting to see what you come up with!

Thanks, and a big happy birthday to Winnie and Walter!
Kelly


>>>GIVEAWAY<<<


Link up your take on this challenge for a chance to win a $75.00 gift card (gift code) to the w&w shop.  One random winner will be chosen.

Inlinkz Link Party

Saturday, February 16, 2019

February Leading Lady Rosali | Take Three

Our February Leading Lady Rosali is back for her triumphant third performance!  If you missed her smashing debut you must see it...CLICK HERE or to be wowed by the tremendous trio of cards from her sensational second performance CLICK HERE.   Rosali has outdone herself today with her ability to create a gorgeous scene!

In honor of our birthday month we're doing something a bit different this year and including a challenge to you on each of Rosali's posts this month.  See the end of this post for more details and to link up!

Without further ado, Rosali...

Hello everyone!
First, I would like to thank you all for your comments on my first two posts here on the blog! They made my day!! :-)
And now I am thrilled to bring you my third post as Winnie & Walter's Leading Lady!

I will show you another masking technique, and this one is really easy! But you can also make the most of it and take it to another level - which then needs a little more planning. I made two cards to show you an easier and a more elaborate way to:

BUILD A SCENE USING MASKING


So let’s get started with a clean and simple (CAS) card design using this technique. I picked a cute bird image from the So Tweet with Evelin T Designs stamp set as my focal point and the Mini Scenery: Into the Woods stamp set to create a background for the birdie.

Building a stamped scene with Masking - Winnie and Walter 1

Here is how the masking works:

  1. Stamp the bird onto your cardstock panel where you want him to be.
  2. Stamp the bird image a second time, this time on masking paper / a piece of removable label and use scissors to cut the image out right on the outer stamping line. You don't need to mask the feet so you can just cut them off.
  3. Place the mask directly over the stamped image on your panel.
  4. It's best to use a stamp positioner or stamping tool of some kind for the next step. Align the bottom of the tree scenery stamp with the bird's feet and stamp it down really well so the ink reaches right to the edges of the mask.
  5. Stamp several times with the ink colors that you like until you are happy with the ink coverage and colors.
I used a light blue ink for the largest part (sky) and fir green ink for the bottom (forest floor). It didn't stamp completely solid (I later discovered I had some air bubbles under my stamp) but I actually liked the texture the ink gave my 'sky' so I left it as is and embraced the look by adding even more texture with tiny black splatters. :-)

Building a stamped scene with Masking - Winnie and Walter 2


COLORING TIPS

TIP 1: I added a little bit of shading to the white birch trees using colored pencils to give them a more three-dimensional look.
TIP 2: For the birdie, I used first Copics (Y08, R27, R29, R39) and then colored pencils on top! I call this method 'two step coloring' and it's one of my favorite ways to color because it takes less patience than using just colored pencils!
TIP 3: I like to use a black Glaze pen from Sakura for the critter's eyes to make them pop. You can also use a basic black gel pen or even Ebony Black Nuvo Drops in a fine tip bottle!

SENTIMENT

The sentiment is a combination of stamps from So Tweet with Evelin T Designs ("my tweet") and Yetitide Greetings with Evelin T Designs (white heat embossed "LOVE"). Lastly, I added a strip of white cardstock that I had die cut with the biggest rectangle dies from the Tilda Cutaways.

For my second card, I masked several images to build a scene:


Building a stamped scene with Masking - Winnie and Walter 3

Isn't this such a cute group of dogs?! I had a blast coloring them. :-)
The masking technique is generally the same as above! You just have to:
  • plan ahead where you want to place all the dogs and
  • which images you have to stamp first and mask.
I like to lay all the stamps onto my piece of cardstock and decide where they should go and which images I want to be up front and which I want to be behind others. The images that you want to be up front have to be stamped first! In my case, it's the smallest two dogs (the second one to the left and the far right one).
I stamped those two dog images using my stamping tool, masked them and then placed the next stamps onto the panel. This time the poodle and his friend were to be stamped and masked. After that, the remaining three dogs (which I interpreted as two huskys and a Saint Bernard dog) could be stamped. That made my dogs complete! I colored them all in using watercolor markers and a water brush.

COLORING CLOSE-UP:

Building a stamped scene with Masking - Winnie and Walter 4

WATERCOLOR TIPS

TIP 4: When you took too much pigment to your paper dab it off with a paper towel to preserve the lightest spot on your coloring.
TIP 5: To get a smooth blend on the background put down a wash of clean water on your paper FIRST where the color should go, THEN apply the marker/pigment to your paper and drag it out with your brush. It's easier to avoid harsh lines this way.

SENTIMENT

On this card, the sentiment is a combination of stamps and a die: "From all of us" is from Big Hugs with Evelin T Designs and "birthday" from Wishing You with Evelin T Designs. The Happy Cutaway was die cut right into the colored panel and popped up with fun foam.
Don't forget to hop over to my blog post and leave me a comment over there for your chance to win a 30 $ gift certificate sponsored by Winnie & Walter.

CHALLENGE WITH A PRIZE!

I would love to see your take on this technique!! Winnie & Walter is offering a challenge under each of my blog posts in celebration of their birthday month! So awesome! All skill levels are welcome so don't be shy. :-)
Have an amazing day! ♥
Rosali


USED SUPPLIES:

Winnie & Walter stamps, dies and stencils:
LS Exclusives: So Tweet with Evelin T Designs Stamp Set
Mini Scenery: Into the Woods Stamp Set
Yetitide Greetings with Evelin T Designs Stamp Set + Cutaways
Essentials: Tilda Cutaways
Dog-gone Cute with Evelin T Designs Stamp Set
In a Word: Happy Cutaway
Big Hugs with Evelin T Designs Stamp Set
Wishing You with Evelin T Designs Stamp Set

CHALLENGE:

Now that you've seen Rosali do it, "Build a Scene Using Masking" to create your own project and link up here by Friday, March 15, 2019, 11:59 p.m. CST to be entered to win $50.00 credit to the w&w shop!  One (1) lucky randomly chosen winner will be picked from each of Rosali's Leading Lady posts this month.

Inlinkz Link Party

Friday, February 15, 2019

w&w 5th Birthday Bash | Challenge Details


RULES OF PLAY
  • Post an original and new project (card, layout, journaling card, tag, gift, art journal page, etc.) following the w&w 5th Birthday Bash Challenge on your blog and/or online gallery and link up here using the InLinkz Link-up tool below.  {Feel free to combine the w&w 5th Birthday Bash Challenge with any other current challenges.} You can also combine w&w 5th Birthday Bash Challenges and enter 1 project in all the w&w 5th Birthday Bash Challenges it qualifies for.
  • Use at least one (1) winnie & walter product.  This can include Cutaways (dies), Creative Screenings (stencils/masks), printable/digital items, cut files and/or stamp sets.  Remember we offer freebies in our shop.  Our freebies can be used to create your project(s) for any of the w&w 5th Birthday Bash Challenges.
  • You have until March 15, 2019 at 11:59 p.m. (central standard time) to link up.
  • Play as many times and in as many challenges as you wish.  We love playful people!  
Now, why would you join in and play?  One, you love w&w, right?!?  But if that is not enough here's why:

>>>EACH CHALLENGE GIVEAWAY<<<

We will be randomly choosing one (1) participant per challenge to receive a $75.00 gift card (gift code) to the w&w shop!

>>>CHALLENGE LINKS<<<

links will be added as they go live
Also there is a challenge found on each of Rosali's Leading Lady posts in February!

w&w 5th Birthday Bash | Five Challenge with Shay

Hello fellow party goers!  It's Shay here.  I am so excited to bring you my challenge.  To commemorate our 5th birthday I am following up on my One Challenge from our first year and Two Challenge from our second year and Three Challenge from our third year and Four Challenge from last year.  This year it is the Five Challenge!

>>>CHALLENGE DETAILS<<<

Make a new project using the number 5 or five, five colors, five patterns, five layers, five embellishments, five photos, five words or five stamp sets (and so on)...really anyway to incorporate four into your project!  You can focus on a single option or combine the options (for instance a five layer card using five colors + five embellishments).

>>>MY PROJECT<<<


The five for this card is pretty obvious with the repetition of the In a Word: Cheers Cutaway 5 times which I colored blending blue and orange Distress Inks.  I attached the cheers to a white A2 card base.  The banner was cut using Essentials: Katharine Cutaways and the sentiment stamped from Sparkle and adhered with dimensional foam adhesive.


Now it is your turn to link up your Five Challenge project!

>>>GIVEAWAY<<<

Link up your take on this challenge for a chance to win a $75.00 gift card (gift code) to the w&w shop.  One random winner will be chosen.

Inlinkz Link Party

w&w 5th Birthday Bash | Card Set Challenge with Heather


Good morning! I'm super excited today to be hosting one of the challenges to celebrate Winnie and Walter's Birthday! My challenge is to create a CARD SET - at least 3. This is one of my favorite ways to stretch my cardmaking time, by coming up with one idea or design, then switching out the colors or sentiments to create several cards at the same time! So since this is a birthday celebration - and you can NEVER have enough birthday cards on hand - I created this fresh and fun trio of birthday cards to share today!


I paired up a fun mix of older and newer releases to create these, and just by switching out the colors of ink, I was able to easily create 3 unique cards with minimal effort! 


I started off by stamping Mini Scenery: Bed of Roses 3 times on white cardstock and heat embossing with clear embossing powder. This allowed me to blend distress oxides over the top and the image "resists" the ink, making it pop out magically on the cardstock. I used 3 duos of ink colors: Fossilized Amber and Ripe Persimmon; Shaded Lilac and Wilted Violet; and finally, Cracked Pistachio and Evergreen Bough.


Next, I was delighted to discover that by trimming them down, they were the perfect size to mat with the smaller size die in the new Essentials: Tilda Cutaways. LOVE discoveries like that!


Another fun discovery - In a Word: Happy Coordinating Cutaways has a little surprise in it as well! I die cut the thinnest "happy" from black cardstock, and then discovered that if I also die cut the next thickness die, it made a PERFECT matte for the thinner one! YAY!


I layered those together, then added a tiny additional sentiment from In Bloom: Carolina's Florals with Angelica Suarez, trimming it down and tucking it over and under some of the "happy" word. I mounted the sentiment with foam adhesive carefully placed behind it, and then mounted the entire front panel on soft gray cardbases to help the white pop a little extra.


Now - I can't WAIT to see what you come up with! They can be as simple or difficult as you like! You can change the colors, the sentiments, or the images - just make sure you have a set of at least 3 cards! And have fun!

>>>GIVEAWAY<<<

Link up your take on this challenge for a chance to win a $75.00 gift card (gift code) to the w&w shop.  One random winner will be chosen.

Inlinkz Link Party

Saturday, February 9, 2019

February Leading Lady Rosali | Take Two

Our February Leading Lady Rosali is back for her sensational second performance!  If you missed her smashing debut you must see it...CLICK HERE.   Today you will be wowed by Rosali's tremendous trio of cards!

In honor of our birthday month we're doing something a bit different this year and including a challenge to you on each of Rosali's posts this month.  See the end of this post for more details and to link up!

Ladies and gentlemen, Rosali...

Hi there!
I am very happy to be back on the blog with my second post as Winnie & Walter’s Leading Lady!!
winnie_walter_leading_lady_rosali_february2019
Last week I shared two card designs where I used masking with stencils to create backgrounds. This week I am instead:

MASKING BACKGROUNDS WITH DIES!

Using dies to die cut a mask for your background is an additional way to use stand-alone dies. I really like the seamless look you can get by doing this. And, another advantage is that it minimalizes layers on your cards and keeps them flat for easy and inexpensive mailing.
For today’s cards I chose one of Winnie & Walter’s True Multifaceted Heart Cutaways. With Valentine’s Day being only a few days away I thought I would share an idea for rather simple friendship cards – in case some of you want to make last-minute Valentine’s Day cards. :-)

I MADE THREE VARIATIONS OF MY DESIGN:

winnie and walter masking backgrounds with dies

Here’s how I created my masked backgrounds:
  1. I took a piece of masking paper and die cut it using the triangled True Multifaceted Heart Cutaway. By the way, I always use repositionable labels as masking paper as it comes in a large pack and works perfectly fine for me.
  2. I took the largest die from the Tilda Cutaways set (with the cool jagged edges) and die cut three backgrounds panels from Neenah Solar White cardstock. Then I adhered the die cut heart onto one of the panels and picked a yellow, peachy and pink ink pad from my stash.
  3. For the first card (yellow birdies), I inkblended the three inks all over the background panel going. For the second card (dog & cat), I inkblended each color from left to right as well but just covered the heart and left the rest of the card white. For the third variation (pink birdie), I started inkblending pink ink in the center of the heart, and then added peach and yellow around it.
  4. After removing the mask from the last panel I added different splatters to all three backgrounds: tiny black watercolor splatters, pink ink splatters and Perfect Pearls splatters for some shimmer.
I picked three cute images from the So Tweet and Big Hugs stamp sets. Both sets are illustrated by Evelin T Designs and I just love all her critters! :-D I colored the images with Copic Markers, cut them out and adhered them over the hearts using foam tape.

winnie and walter masking backgrounds with dies 2
winnie and walter masking backgrounds with dies 3

COPIC GUIDE & COLORING TIPS:

Pink birdie: RV02, RV04, RV06, RV09 / YR 68 / Y13, Y08, Y35
Dog: W0, W1, E21, E33, E35, E57, R20
Cat: W1, W3, W5, W9, R20
Yellow birdies: Y11, Y13, Y08, Y35 / RV13, RV04
TIP 1: Use flicks from a white gel pen to get a feathery look - like I did on the pink bird. It's the same easy coloring technique that I used last week for the yeti's fur!
TIP 2: Add a little bit of grey shading to the dog where his fur is supposed to be white.
TIP 3: For the dog's light brown spots, first draw them in with the lightest E-marker. Then add shading from outer parts of the spots or where the shadows would be.

ADDING SENTIMENTS TO MY CARDS

For the sentiments I used “You’re so tweet” from So Tweet with Evelin T Designs stamp set and “Sending Big Hugs” and “just for you” from Big Hugs with Evelin T Designs stamp set.
On the pink birdie card, I heat embossed the sentiment in white on a wider strip of kraft cardstock. I die cut that strip with the Tilda rectangle die to give it the same jagged edges as the card front. For the cat & dog card, I used a banner sticker from my stash for the sentiment. And for the yellow birdies card, I heat embossed the sentiment with shiny platinum embossing powder that matches the color of the Perfect Pearls splatters.

TAKE A LOOK AT THE BEAUTIFUL SHIMMER:

winnie and walter masking backgrounds with dies 1

I hope you like today's cards! For your chance to win a 30 $ gift certificate sponsored by Winnie & Walter, hop over to my blog post and leave me a comment over there, too.
Thank you for stopping by today! ♥
Rosali


USED SUPPLIES:

Winnie & Walter stamps, dies and stencils:
True Multifaceted Heart Cutaways
LS Exclusives: So Tweet with Evelin T Designs Stamp Set
Big Hugs with Evelin T Designs Stamp Set
Essentials: Tilda Cutaways
Ink Pads:
Catherine Pooler Designs - Party Dress Ink


CHALLENGE:

Now that you've seen Rosali do it, "Masking Backgrounds with Dies" to create your own project and link up here by Friday, March 15, 2019, 11:55 p.m. CST to be entered to win $50.00 credit to the w&w shop!  One (1) lucky randomly chosen winner will be picked from each of Rosali's Leading Lady posts this month.

Inlinkz Link Party

Saturday, February 2, 2019

February Leading Lady Rosali | Take One

Happy February!  I am so excited for this special month as it's our birthday month so we have lots of challenges.  Speaking of challenges and special we have an incredible February Leading Lady to introduce you to today: Rosali!  

I have been awed by Rosali's projects ever since she began entering our challenges.  I love how thoughtfully and beautifully designed each of her cards are and I can't wait to see what she has in store for us this month and in honor of our birthday month we're doing something a bit different this year and including a challenge to you on each of Rosali's posts this month.  See the end of this post for more details and to link up!

Please give Rosali a big round of applause to welcome her as she steps onto the stage for her first performance as our February Leading Lady! 

Hello everyone!

It's Rosali and I am super excited to be joining Winnie & Walter as their Leading Lady this month!! Eep!! Shay is one of the most generous and kind shop owners in the industry with lots of amazing products and I am honored that she asked me to guest design!!


For those of you who don’t know me yet - I’m a 30-something crafter, I live in Northern Germany with my hubby and you might know me under my social media nickname ilovestamping. Because I just loooove stamping, hah! 😃 My little addiction with cardmaking started about 4 years ago and shortly after I joined Instagram and met so, so many wonderful crafters there. I also started my own blog last year! I love to connect with people from all over the world through this amazing hobby.

I am gonna have a blog post for you guys each Saturday during February and I thought I would focus on a technique that I use super often on my cards: masking! It’s a very versatile technique that helps you get the most out of your supplies! I am gonna concentrate on a specific way to use it every week. I am also gonna share Copic guides and a few tips on coloring alongside the masking techniques. Today's post makes a start in which I will show you two examples on how to:

USE MASKING WITH STENCILS

So let’s ‘dive’ right in, shall we? This is my first card:

winnie and walter masking backgrounds with stencils 1

Here is how I used masking to create the background on this first card with the help of two graphic stencils - Polka Creative Screenings and Triangled Creative Screenings:
  1. I took a strip of Post-It Tape and put it across my cardstock panel at an angle to mask off the area for my sentiment. You can also use a strip of masking paper or a piece of painter's tape!
  2. First, I used light colored ink pads and a blending tool to add a minty base color above the tape and a light blue base color below the tape. This helped to define the borders of the masked area.
  3. After that I placed the Triangled stencil above my mask and inkblended three shades of green ink over it. I also added black watercolor splatters because I always love the artsy feel that it gives. 😊
  4. For the bottom part I took the Polka stencil and inkblended light grey ink over it.
Removing the tape after you're finished is always an exciting moment! I was happy with the outcome and went on to design the rest of my card. I die cut the Wonder Cutaway once from white cardstock and once from black fun foam and glued both together for dimension. I adhered them onto the background.

In addition, I stamped "winter" and "land" from one of the sentiment stamps from Yetitide Greetings to create my "winter wonderland" sentiment. To mask off the parts of the sentiment stamp that I didn't need I used a piece of washi tape when inking up the stamp! Just remember to remove the washi before stamping on your project (ask me how I know lol) ...

winnie and walter masking backgrounds with stencils 1 detail

The skiing yeti from Yetitide Greetings was the perfect critter for my card. I colored him with Copics (see coloring guide below) and adhered him using foam tape. If you use your imagination it kind of looks as if the white masked strip could be a snowy hill and the green triangle pattern could be trees!

For my second card, I followed a similar idea:

I wanted to use the Triangled stencil to represent mountains on my background. To get that look, I used Post-It Tape once more - this time putting it onto the stencil instead of the cardstock. I masked off a bigger triangle on the Triangled stencil to use as a mountain and took light blue and teal Distress Oxides for inkblending over the stencil.  Using this method, I added three mountains onto my grey background panel.

winnie and walter masking backgrounds with stencils 2
Then I took Copic Opaque White paint to
  1. give my mountains snowy tips,
  2. add small splatters as snowflakes and
  3. paint on a snowy ground (with a damp / rather thirsty flat brush - to get the painted look that I wanted)
The snowboarding yeti and a small "warm yeti hugs" sentiment from Yetitide Greetings made my winter scene complete. Instead of plain grey I added a tint of lilac to my yeti this time. I really like the teal and lilac together in front of the grey card front!

CARD CLOSE-UP:

winnie and walter masking backgrounds with stencils 2 detail

COPIC GUIDE & COLORING TIPS:

Card 1
Yeti’s face: E51, E21, R20
Yeti’s fur: 0, W1, W3, W4, W5
Skis & ski poles: G000, G00, BG13 & YG03, YG13
Card 2
Yeti’s face: YR30, E81, R20
Yeti’s fur: W1, BV02, V20, V22
Snowboard: V22, V25, V28
TIP 1: For an easy fur look, add small flicks over your Copic coloring with a white gel pen!
TIP 2: Add patterns to the skis and snowboard with a Memento Marker for some extra interest.

I hope I have given you some inspiration today! Thanks for reading all the way down. :-) And don't forget to hop over to my blog and leave a comment over there as well. Winnie & Walter has generously sponsored a 30 $ gift certificate for one of you to win!

See you next week! ♥
Rosali


USED SUPPLIES:

Winnie & Walter stamps, dies and stencils:
Yetitide Greetings with Evelin T Designs Stamp Set
Yetitide Greetings with Evelin T Designs Cutaways
In a Word: Wonder Cutaway
Scenery: Pennsylvania Polka Creative Screenings
Scenery: Triangled Creative Screenings


CHALLENGE:

Now that you've seen Rosali do it, "Use Masking with Stencils" to create your own project and link up here by Friday, March 15, 2019, 11:55 p.m. CST to be entered to win $50.00 credit to the w&w shop!  One (1) lucky randomly chosen winner will be picked from each of Rosali's Leading Lady posts this month.