Showing posts with label christmas. Show all posts

Wednesday, November 15, 2017

Merry + Bright with Kelly


Hello Folks! Kelly here from Notable Nest with a special card to share with you. You may notice there is a pull tab on the side. Any guesses what it does? I'll give you a hint ... it will become bright. Literally. "Bright" will be bright. Hahaha! Let's take a look ...


This card uses the new In a Word: Holiday Tiles Cutaways from the November release. To make the cute scallop panel I want to make sure the sentiment die is perfectly in the center of the opening when I send it through the die cutter. That calls for some old washi tape to temporarily hold the two dies in place.


Once I have the frame and inset cut, I backed the "bright" letter openings with red vellum. The vellum will help diffuse the light shining from below. The scallop panel is mounted onto a larger panel, and then the card base itself. 

Want to see what's underneath the scallop panel?


Circuitry! The three lights will go on once you pull the tab out. Underneath the tab is a switch made from copper tape. When the copper tape underneath is lined up over the gap, the circuit will be completed and the lights will turn on. I have also added foam tape to allow room for the height of the battery. If you are interested in how this works, I have a more detailed tutorial on the Chibitronics blog (featuring another Winnie & Walter card) that you can check out.


Here is the card before you pull on the tab,


And here's what it looks like once the tab is pulled! It's BRIGHT! You can't guess how many times I moved the tab back and forth watching the lights go on. It's just too much fun!


In hindsight I should have placed the light stickers a little higher up so the light is more hidden under the cardstock, and diffused across the vellum. That would avoid the three intense spots of light. But it's still a great effect, and definitely something to make your cards stand out for someone special.


I enjoy how simple the general design of the card is with the white-on-white elements and clean font, and then the bright red and lights are allowed to really stand out. The nice thing about the In a Word: Holiday Tiles Cutaways is that there are 6 different words and the scallop panel included in the set. So you have a lot of options. This Merry + Bright sentiment, however, is just perfect for this use. 

Thanks so much for looking! Have a wonderful, and bright, day : )

- Kelly



w&wDT_kellygriglione_blog-sig

w&w-supplies

Friday, November 10, 2017

The 25 Days of Christmas Tags

Don't miss out on our November 2017 Release Premiere Day No. 4 HERE!  
25 Days of Christmas 
Hello loverlies!  It is Shay here today with a very fun post.

Tracey McNeely has a wonderful event called The 25 Days of Christmas Tags in which for 25 days she features Christmas tags.  There are lots of guests and giveaways along the way!

One of the first things I learned to stamp was tags so this is near and dear to my heart.

We are just wrapping up our November 2017 Release today (products are available tonight, November 10, 2017 at 10:00 p.m. CST) and we happen to have some fun tag products releasing this Release.

shay_IMG_4227

I used the largest hexagon from Essentials: Josephine Cutaways to cut out 2 hexagons from colored cardstock.  For each I kept the two layers together with washi tape on the back.  Then I used some sheer shimmer spray with the Scenery: Rugby Stripe Creative Screenings to spray stripes of shimmer on the hexagons.  I let it dry and then shifted the stencil so the plastic was covering the shimmer stripes and used ink of a shade similar to the cardstock to add more depth to the stripes.  Next I used a black pen and used the stencil to trace the lines of the shimmer stripes. Over the lower shimmer stripe I stamped the sentiment from In Bloom: Debra's Poinsettia with Lydia Evans in black ink.

I then cut out In a Word: Believe Cutaway 4 times from white cardstock.  For two of them I sprayed with shimmer sprays and then inked up a bit with black.  I added one of the white believes over the sprayed believe slightly offsetting it to give it dimension when I adhered them together before I adhered them to the tags using foam dimensional adhesive.

To make the hexagons tag I added the tiny sweet little tag that comes with the Essentials: Josephine Cutaways.

Now you have some simple, bold and vibrant tags to add to gifts or to a project.

Heather and Kate also played along with a truly magnificent tags using the November 2017 Release products.  CLICK HERE to see Heather's and CLICK HERE to see Kate's!

Don't forget to visit Tracey's blog HERE to get more details, inspiration and enter tons of giveaways including one from w&w!

Happy tag making,
Shay

Friday, October 27, 2017

Peace of Earth with Lydia

Hi there everyone and a very happy (or should I say merry) Friday to you!

Today I'm sharing with you a Christmas card..... I hope I'm not too early ;)


I started by stamping the wreath swag from Merry & Bright with Evelin T Designs twice to create a full wreath using black pigment onto a piece of watercolour cardstock. I then stamped a sentiment from the same stamp set in the centre of the wreath using pigment ink I then clear heat embossed the sentiment so it stands out a little more than the wreath. I then used inks as watercolours to add colour to the wreath and a blue wash behind it. Once dry I added a few splatters of gold.


I cut this piece slightly smaller than the card base so I could add some interest to the side. I stamped the candy cane stripe border from Scenery: Holiday Trimmings in red ink onto the right side of the card base. I have to say I just love this stamp and it's one that I keep going back to again and again! Before adding the watercoloured piece to the card base I added a strip of gold to tie in the gold splatters I added to the watercolour piece.


So have you made a start on your holiday cards for this year? I do hope this inspired you to start if not.

See you again soon!

Hugs, Lydia x


w&wDT_lydiaevans_blog-sig 2

w&w-supplies

Wednesday, December 21, 2016

Merry Christmas with Kelly


Hi Folks! We have a restaurant in town that offers a bowl full of peppermint candies on your way out, and while I'm not a fan of the candy, I always enjoy looking at all the happy red and white swirly patterns layered on top of each other. One day I thought surely that could be translated into a card, right? So I tried! These "candies" are made from the Mini Scenery: The Peppermint Zone stamp, stamped through the hole made from a circle cut out of copy paper.
 

After I stamped the first candy, I covered it completely with a circle mask on top, and then put the circle hole mask to the side to stamp the second candy. So I was using both the circle and circle hole at the same time. Kinda like eating a donut and donut hole at the same time. OK, not really, but it's a good analogy in case you're having trouble picturing it! And goes along with the sweet theme : )

The "merry" is from In a Word: Merry Cutaway, and "christmas" was on a strip I had on hand. I wanted to tie the two words together so I threaded the black strip of paper with "christmas" on it through the "y" on "merry". The mat is one of my favorites from Essentials: Audrey Cutaways. I like that the scallops on the map echo all the circles of the candies.

Sure hope you all have a wonderful holiday season! Thanks for looking!
-Kelly
w&wDT_kellygriglione_blog-sig


w&w-supplies

Monday, December 19, 2016

Merry & Bright with Laura

Happy Monday everyone! It's Laura here from makingcardsisfun.com and I'm so glad to be here again with a new card featuring some adorable stamp sets. 

laura_merry and bright full

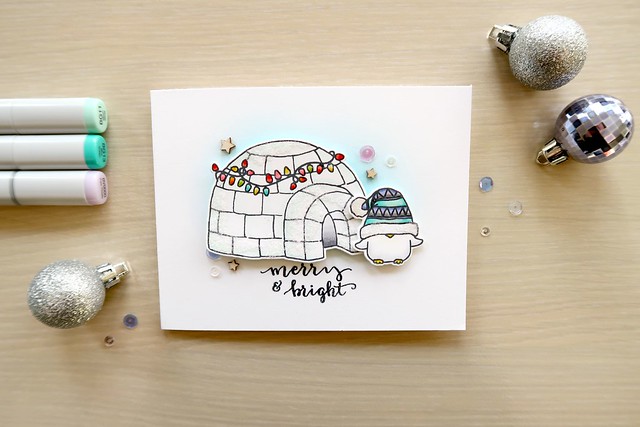
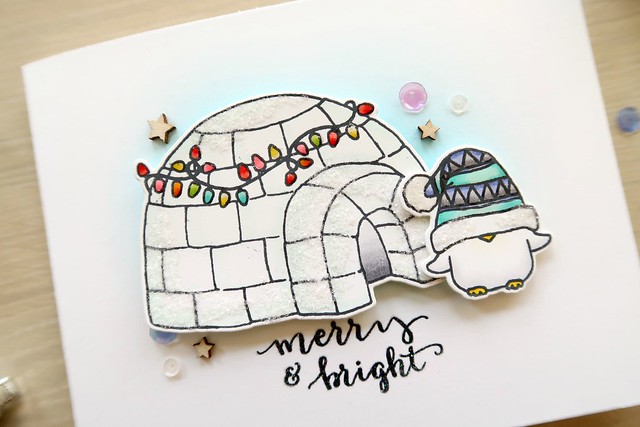
I started out by stamping and coloring the igloo and the penguin with Copic markers. I did some basic ink blending but added an extra oomph with Tim Holtz Distress Rock Candy Glitter and Glossy Accents. I dapped some Multi Medium Matte on the edges of the igloo and on the penguin's cap with my finger. Next, I sprinkled on the glitter and tapped of the access. For some dimension on the bulbs, I used Glossy Accents. I love how festive and sparkly these images ended up looking!

laura_closeup

Since I wanted the images to be the focal point of this card, I did some really soft ink blending with Tumbled Glass Distress ink. Before putting everything together, I figured I still needed a greeting on this card. I used the MISTI tool to stamp the sentiment from the Happy Owlidays with Evelin T Designs set with black ink. After cleaning my stamp, I re-inked it with the Ultra Sticky pad from WOW. Finally, I sprinkled on some Neutral Ultra Shimmer embossing powder and heat set it. To finish off the card, I adhered the colored images and added some wood veneer stars and sequins.
That's it for now! Thanks for reading today's post! Happy holiday season! Xo


w&wDT_laura_blog-sig

w&w-supplies

Wednesday, December 14, 2016

November 2016 Release with Vanessa

Hi everybody! Vanessa here with four cards to share with you today. I am so happy to be able to share some cards made with the new, amazing release! So let's get started.


Who could resist the cute images from Season's Tweetings with Evelin T Designs? Not me :) Here I placed the little bird onto a snow hill, framed it with patterned paper and embellished the card with wood veneer stars. 


Here comes another fun image from the same set. I die-cut two of the largest tags using Essentials: Carly Cutaways to assemble them with ribbon. The front is inked with an ink blending tool, then I added a snow hill cut with the inner circle die and placed the snowman onto it with foam tape. The star he holds is from Happy Owlidays with Evelin T Designs. Finally, I stamped and heat-embossed the sentiment from Sentimental: Winter onto a strip of red cardstock and adhered it.


The third card is more festive with all the sparkle. I stamped and heat-embossed the Mini Scenery: Merry Berry using gold glitter embossing powder. Then I trimmed the image, matted it with Kraft cardstock and adhered it to the card. I stamped and heat-embossed the sentiment onto a strip of Kraft cardstock and adhered it above the image. Finally, I added gold and white sequins.

The last of today's cards was made with another favorite new set of mine. In Bloom: Frenchy's Festive Florals with Angelica Suarez is so versatile! Here I stamped all the solid elements, die-cut them with the matching dies and added little dots to the images. I arranged them onto my card, stamped the sentiment and added more little dots around the clusters.

I hope you liked my samples today! Can't wait to play some more with all the beautiful new products!! Thank you so much for stopping by :)


 w&wDT_vanessamenhorn_blog-sig

w&w-supplies

Thursday, December 8, 2016

Advent Calendar Extravaganza with Taheerah Atchia

Hello there lovelies!  It's Shay here joining in on a very special event.

Advent Calendar Extravaganza
Advent-Calendar-Extravaganza-2016

Advent Calendar Extravaganza is -the- festive event of the season! This ‘hop with a twist’ was dreamed up by Taheerah Atchia and features surprise destinations each day! Joining in the fun with Taheerah are ONE HUNDRED special guests - each serving up some fantastic Christmas inspiration! Just like an Advent Calendar, you’ll never know where you’re going to be visiting next until you ‘open the door’!

And that’s not all! With 25 *amazing* sponsors taking part as guests as well, your crafty wish list is bound to get a boost with a chance to win a prize EVERY SINGLE DAY!!

Now on to my card....

shay_IMG_4081

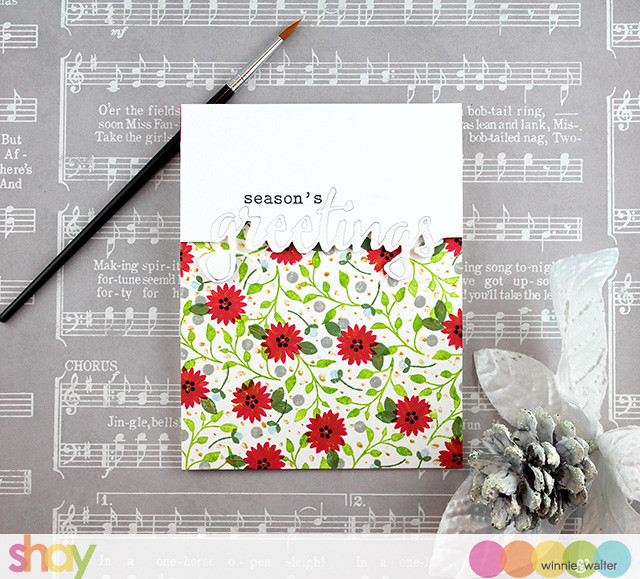
I just can't stop stamping backgrounds!  I pulled out this month's featured Rerun stamp set, In Bloom: Hollie's Festive Florals, and got to stamping (all while watching a documentary about gingerbread...which was fascinating, made me crave gingerbread and put me in the holiday mood).  I stamped flowers, leaves and dots until I felt good about the colors and design.

As the background was pretty busy I decided to add white space with the sentiment.  I die cut "greetings" from The Big, the Bold and Greetings Cutaways on an A2 panel of white cardstock...I placed the die about a third of the way into the panel and tried to center the sentiment.  I decided how much I wanted the word to hang down from the panel and then cut to the die cut from the left and right side and pulled the bottom portion of the panel away making sure not to pull the top of the die cut from the rest of the white panel.  To ensure it stays together you can tape the back of the panel together.  I placed quite a bit of foam dimensional adhesive on the back of the panel which helped keep pieces together.  I stamped the "season's" from The Big the Bold and Greetings in black ink.  I attached the white panel to the background.

I felt the background needed something so I added some dots of gold acrylic paint to the background panel as well as adding some details to the flowers and some leaves.  I also used Wink of Stella over the "greetings" which you can see in person, but is not apparent in the photo.  All of this is all attached to a white A2 card base.

That's it from me, but there is so much more to see from Taheerah this month.

Join in the fun every day at taheerah-atchia.com to see what special surprises await behind the door!

It’s not a party without a prize - and with prizes every day there are several chances to win! Today’s prize is supplied by w&w so you’ll definitely want to win! Simply leave a comment on this post - then head back to taheerah-atchia.com and leave a comment there too! You must leave a comment on Taheerah’s blog as well as here in order to be eligible to win! Don’t forget to grab the other surprise destinations from Taheerah’s blog and head over to them to leave comments there as well to improve your odds even more! You have until 23:59 EST on 31st December 2016 to enter.

Don’t forget Advent Calendar Extravaganza runs from 1st-25th December inclusive so make sure you visit taheerah-atchia.com every day for fabulous inspiration and amazing prizes every single time! Merry Christmas!

Happy crafting,
Shay.