Wednesday, May 31, 2017

Winner of Guest Star Contest from our 3rd Birthday Bash

After considerable thought and contemplation I *finally* have chosen the Guest Star Contest winner from those that qualified during our 3rd Birthday Bash Challenges.

Before I make the announcement I must thank each and every person who entered our challenges and then went a step further and entered the Guest Star Contest.  The level of work submitted made my decision exceedingly (exceedingly) difficult which I appreciated (and cursed). lol

The projects I saw were truly incredible and I marveled at the talent on display.  In fact, I have a whole new list of possible Leading Ladies now and you may be hearing from me pretty soon. ;-)

The Guest Star Contest Winner is...
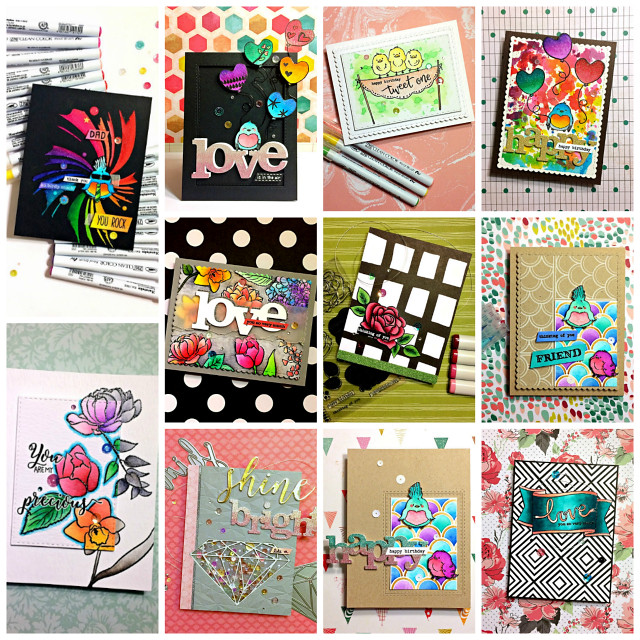
jessica_lin_3rd_birthday_bash_guest _star_contest_winner_collage
Jessica Lin!

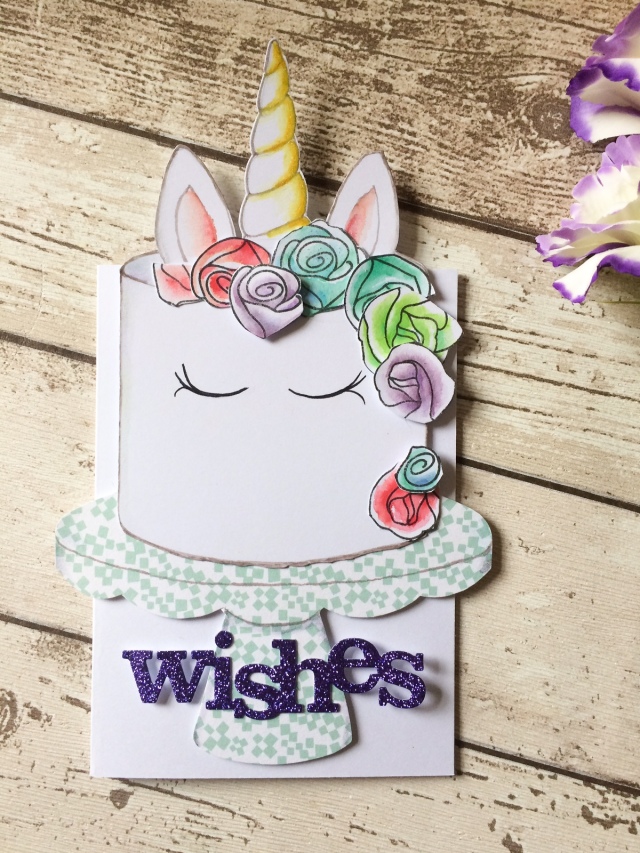
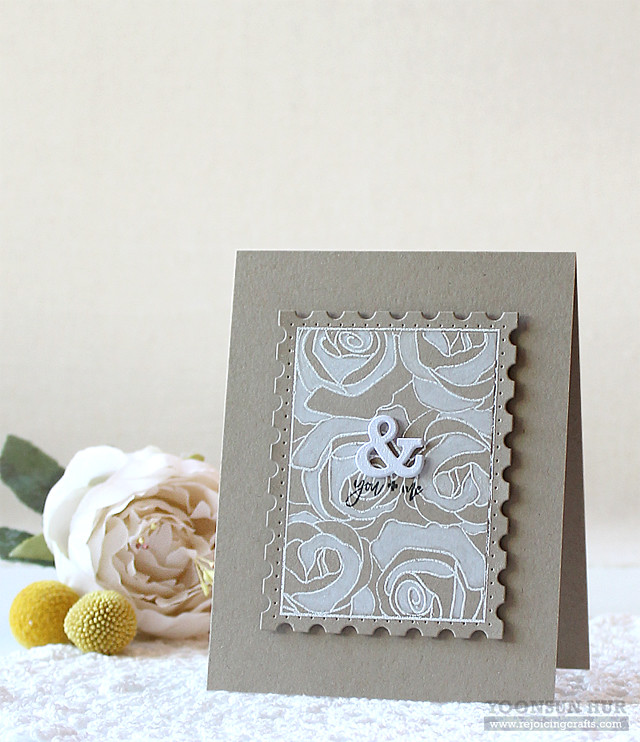
First, Jessica made an astounding 11 cards!  Not only did she make so many cards, they each were wonderfully crafted and showcased w&w products beautifully.  I was taken in by Jessica's bold, saturated colors, dramatic use of black, the different techniques and varied styles she took on from adorable to elegant always with panache.  Jessica gamely took on each of the challenges (often incorporating more than one challenge in a card) which really shows her skill, enthusiasm and dedication.  Color me impressed!

Jessica, please contact me at info{at}winniewalter{dot}com to claim your prize.

Thank you again to everyone for participating in our 3rd Birthday Bash and our challenges! It is because of you that w&w exists. :-)

Happy creating,
Shay + Winnie

Monday, May 29, 2017

Wishes with Keren

Hi there!
I'm happy to be back with you today using a stamp set in a slightly different way; hacking it into littler pieces to create a different look with it. The stamp set? Mini Scenery: Bed of Roses.
w_w_MSBedofRoses_3x4_web_large
The card was inspired by a cake I made recently. The cake was quite a challenge (putting it mildly!!) and was inspired by this creation.
unicorn-cake-buttercream-juniper-cakery-15
Here's my version!
IMG_0539
Hopefully you can see the Bed of Roses set. I've not coloured them to mimic real flowers; instead tried to make them look fake as they're icing swirls rather than roses!
I drew the cake and elements freehand and drew a cake plate on some Dream On paper (Pinkfresh Studio)
IMG_0540
You can see the In A Word: Wishes Cutaway die, cut out in glitter vinyl film.
I hope you liked my unicorn cake and you have a go at chopping up your stamped images to create something new!
Love,
Keren x


w&wDT_kerenbaker_blog-sig2

w&w-supplies

Saturday, May 27, 2017

May Leading Lady Yoonsun Hur | Take Four

As May wanes, we sadly must say adieu to our May Leading Lady, Yoonsun Hur.  I know I am not alone in being awed and inspired by each week's post by Yoonsun that displayed amazing balance, design, artistry, skill and use of color.  I am so thankful to have had Yoonsun share her magnificent talents with us this month!

If you missed her smashing debut you must see it...CLICK HERE or her sensational performance with a sweet and stunning background CLICK HERE or if you missed her triumphant performance with an adorable and pretty card CLICK HERE. 

Lucky for us all we have her final command performance today.  


Yoonsun_Hur_may2017

Hello and thanks again for talking with me today (May is almost gone, Phew~ time really flies)!

Today I want to share with you my simple (white on kraft) wedding card using the Mini Scenery: Bedof Roses Stamp Set and the Typecast: Cary Numbers Cutaways.

YoonsunHur-May2017-WW-LL-P04-01

I started by heat embossing rose images from the Mini Scenery: Bed of Roses set on kraft card stock in white. I then trimmed it down with the Essentials: Lana Cutaways. I then partially coloured the stamped image with white polychromos pencil. 

YoonsunHur-May2017-WW-LL-P04-02

I die cut “&” from white card stock using the Typecast: Cary Numbers Cutaways five times, and then stacked them up using fine tip glue pen – I made it thicker like chipboard. Lastly, I mounted the rose background panel on an A2 sized top-folded kraft card base using foam tape first, added white ampersand die cut using fine tip glue pen, and then stamped the “you + me” sentiment (from the Sentimental:Love set) in black pigment ink. 

YoonsunHur-May2017-WW-LL-P04-03
YoonsunHur-May2017-WW-LL-P04-04

Big thanks for being with me during May! Have a fabulous weekend!!


w&w-supplies

Saturday, May 20, 2017

May Leading Lady Yoonsun Hur | Take Three

Our May Leading Lady, Yoonsun Hur is back for her triumphant third performance!  If you missed her smashing debut you must see it...CLICK HERE or her sensational performance with a sweet and stunning background CLICK HERE.   Today you will adore the card for a little one she has to share!

Without further ado, Yoonsun....


Yoonsun_Hur_may2017

Hello again! One of my church members is expecting a baby girl in a few months so I wanted to make a cute baby shaker card for her. I am always happy to make baby cards!!

YoonsunHur-May2017-WW-LL-P03-01

To start off, I created my own background with the In Bloom: Elsa's Flora and the Welcome to the Family with Evelin T Designs stamp sets. I stamped images on watercolor paper using Memento Desert Sand dye ink, roughly coloured the panel with Tattered Rose Distress ink and a wet paint brush. Once the panel was dry, I trimmed it down with the Essentials: Lana Cutaways. I then die cut ‘baby’ sentiment using the In a Word: Baby Cutaway and adhered acetate sheet to back of the panel.

YoonsunHur-May2017-WW-LL-P03-03
YoonsunHur-May2017-WW-LL-P03-02


I stamped and watercolored the baby bear (from the Welcome to the Family with Evelin T Designs set) with Distress markers, die cut it with the Welcome to the Family with Evelin T Designs Cutaways. For the sentiment, I used the Sketchy Thoughts stamp set.

YoonsunHur-May2017-WW-LL-P03-04

This baby bear.. soooooooo cute!!!

Thank you so much for stopping by. Have a wonderful weekend!!


w&w-supplies

Friday, May 19, 2017

Hello My Precious with Lydia

Hello everyone and happy Friday!  Today I'm sharing with you a 'sort-of' one layer card.

Why I say 'sort-of' is because the letters are die cut but once I had stuck them down I then squished them into the card, you'll find out how further down the post.


I started by taking one of the large flowers from In Bloom: Eva's Favorite Flowers and stamping this in a bright pink in the centre of the card blank. Then I added in the branch and added in a few filler flowers in blue and yellow. To add more colour I choose to layer up the large flower, there are so many different combo layers it's so fun to play with! I added 3 layers in orange, red and purple and I love how those colours work together.


I then cut out the letters for 'hello' using Typecast: Cary Letters Cutaways out of some white card, I had double sided adhesive sheet on this so it would be easy to stick the letters down when cut. Once die-cut I then added the letters into place. To get these to stink down into the card I then ran my whole card through my die cutting machine. I love this effect as you can still see the letters but they are more part of the whole card.


To finish I then added a little added sentiment using Sentimental: Love in black ink. I do love the bold freshness of this card and I hope it inspired you today!

Hugs Lydia x


w&wDT_lydiaevans_blog-sig 2

w&w-supplies

Wednesday, May 17, 2017

You Are 3 with Kelly


Hi Folks! Today I've got a sweet little card for a sweet little three-year-old. This card gets most of its sweetness from one of my favorite sets, Welcome to the Family with Evelin T Designs, featuring a toppling tower of animals trying to balance themselves on a block. To keep this a one-layer card, the animals and block are all masked. The only tough thing about masking is figuring out which stamp goes first! In this case it's the elephant, and then I can stamp the block and remaining animals. I intentionally stamped them crooked to give the scene a little more energy. Since this card is for a toddler, I kept the coloring to bright solids for the animals.

 
Love how the block is just the right place to put your sentiment. When an image serve a purpose in a scene and is also the sentiment that's a win-win! I borrowed a portion of a sentiment from Happiest of Holidays from Evelin T Designs for the "you are." The number is from Typecast: Cary and fits  perfectly in the block.
 

The side panel was created by sponging ink through Scenery: Harleen Creative Screening. If you double up the design by shifting it slightly to the side and down for your second color of ink, it gives you a more dense background. I really like the negative spaces in this design too.

It's bordered by the secondary sentiment "giant hugs & lots of love" from Sending You with Evelin T Designs. I like how it serves as an end of the stenciled area, and also adds a little to the message to the card.


Love that with everything going on in this card, it's still one layer for mailing! It's always amazing to me how all of the Winnie & Walter sets mix so well together. This card has elements from five different sets and one stencil and you would never know it. They all get along so well : )

Thanks so much for looking!
-Kelly


w&wDT_kellygriglione_blog-sig

w&w-supplies


Saturday, May 13, 2017

May Leading Lady Yoonsun Hur | Take Two

Our May Leading Lady, Yoonsun Hur is back for her sensational second performance!  If you missed her smashing debut you must see it...CLICK HERE.   Today she brings you another stunning card with an amazing background!

Ladies and gentlemen, Yoonsun....

Yoonsun_Hur_may2017 


Hello, hello crafty friends! I am back with another Leading Lady project this weekend!! Oh, I was so happy for having your sweet comments last week! I read them over and over!!


Today’s card, I used my most favourite technique, random stamping + Distress marker watercoloring, using so adorable BigHugs with Evelin T Designs Stamp Set.

YoonsunHur-May2017-WW-LL-P02-01

To start, I randomly stamped images from the BigHugs with Evelin T Designs set (hearts from the Welcome to the Family with Evelin T Designs stamp set) on watercolor paper in black pigment ink. I then trimmed the stamped paper down using basic rectangle panel die (you can use your paper trimmer).

YoonsunHur-May2017-WW-LL-P02-02

I watercolored all images with Distress markers and find tip water brush, background with Tumbled Glass Distress ink and a wet paint brush. For the sentiment, I heat embossed it from the Big Hugs with Evelin T Designs set in white, die cut it with the Sketchy Thoughts Cutaways. Once the panel was completely dry, I mounted the watercolored panel on navy card base using foam tape, and then sentiment die cut on it using foam tape as well.

YoonsunHur-May2017-WW-LL-P02-03

I love all sweet images and the sentiment so much!!

Shay has generously donated a $30 gift card for me to give away on my blog, so don’t forget to leave a comment on my blog post. (https://rejoicingcrafts.com/).

Thank you so much for stopping by. I’ll see you next Saturday for my third post.

Sending a big hug to all of you!!


w&w-supplies