
April will soon be ending with sadly means it is our last Saturday with our awe-inspiring and awesome April Leading Lady, Rubeena Naz. The last five weeks with Ruby have been tremendously inspiring, fun and astonishing. Ruby's ability to create with such passion, skill and scope is something we can all aspire to and made each post a joy to read. I feel so blessed for Ruby sharing her talents and self this month!
If you missed her smashing debut you must see it...CLICK HERE or her sensational second performance of bright and bold watercolor wonders CLICK HERE or her triumphant third performance of dazzling My Precious projects CLICK HERE or her fashionably fabulous fourth performance CLICK HERE.
Lucky for us all we have her final command performance today.
Good morning! I am back with my fifth and last post as Leading Lady for Winnie & Walter! Thanks so much for all your comments on my last four posts. If you missed them, you can find them here.
As usual, I'm excited to continue and share my creative process with you! Shay is offering my blog followers a $30 Winnie & Walter gift card as a giveaway. You can see the details of the giveaway at the end of this post.
I have shared four posts full of ideas for finding inspiration for cardmaking. To be honest, I have struggled with figuring out what things to share with you. I am sure many of you can relate to the feeling of creating whatever you're in the mood to create. Often times, the inspiration just doesn't come when you need it. Guest designing is a great challenge for me because I set out to do something different. I really wanted to come up with masculine cards, but I'll just have to admit that I am still struggling there! Ha. So today I am sharing cards that focus on BACKGROUNDS! It's one of the easiest ways to come up with beautiful cards -- create your own backgrounds.
Once I knew I wanted to focus on this theme, I ended up with a hot mess in my room. Seriously, I even ended up spilling water all over my desk while I was trying to watercolor. The end result was eight cards! They're pretty basic but pretty!
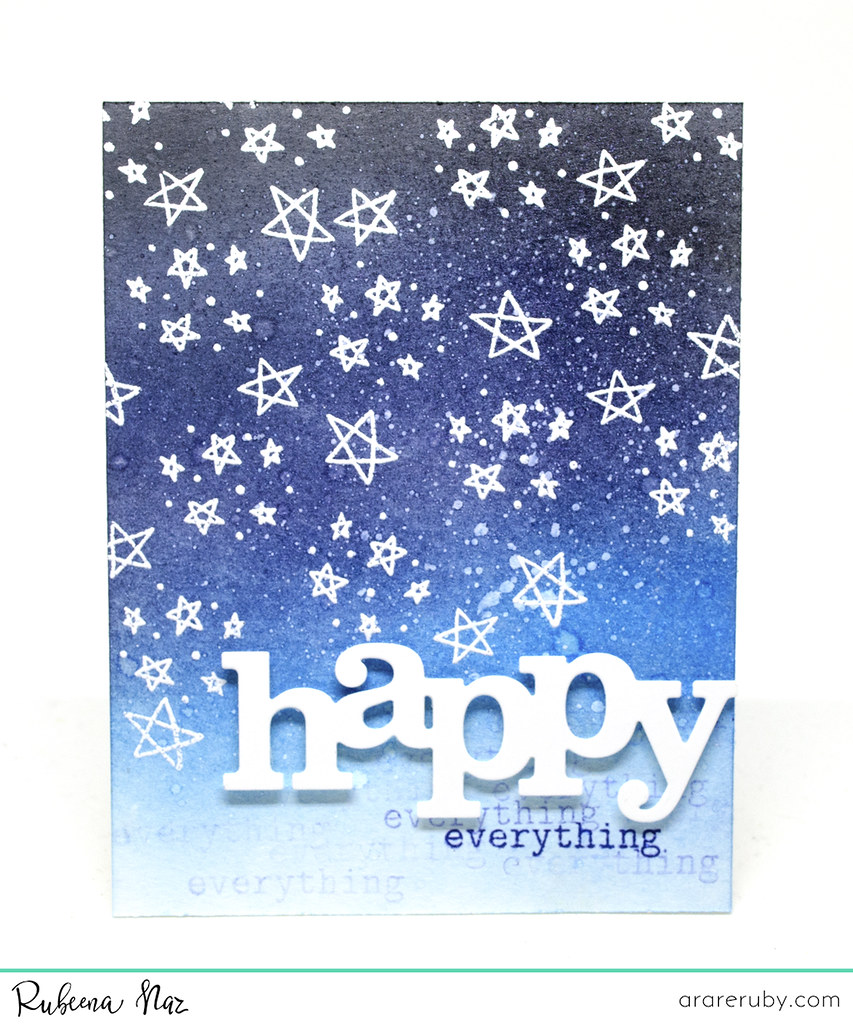
Cards 1 and 2: Distress Inks
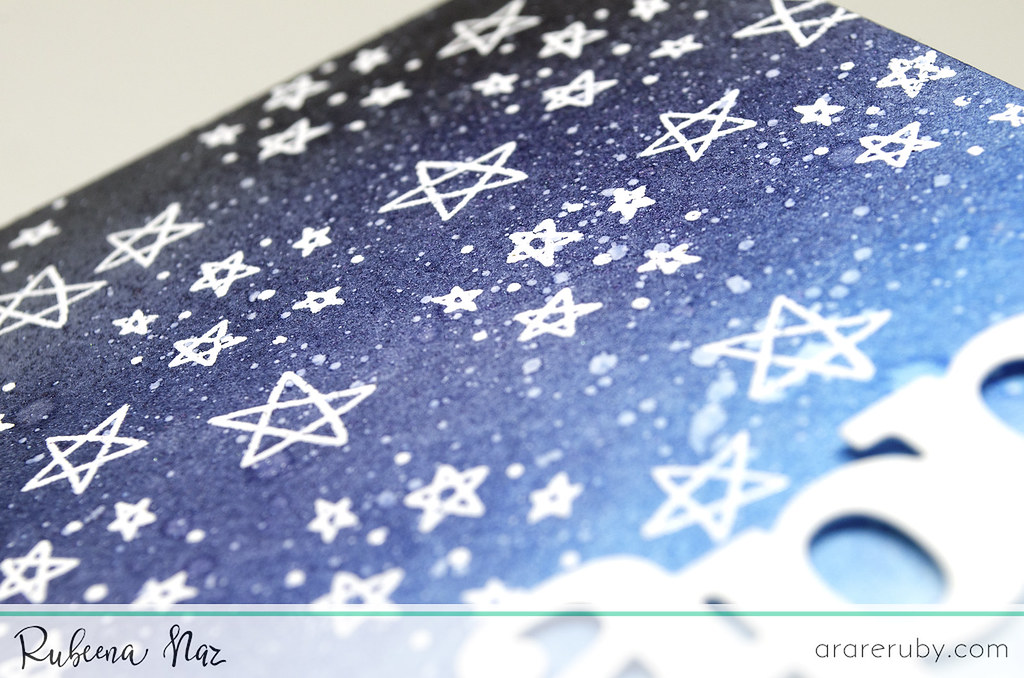
I love creating backgrounds using distress inks and the blending tools. You can create some great combinations for scenes like a sunset, sunrise, night sky, or galaxy look. For the first card, I used black and a few different shades of blue that I blended into an ombré night sky onto watercolor card stock piece. I prepped the base with powder to prevent stray embossing powder. I stamped the stars from Wishing You with Evelin T Designs with VersaMark and heat embossed with white embossing powder. I glued the panel to my white card base. Separately, I die-cut the word 'happy' from In a Word: Happy Cutaway from white card stock. I stamped 'everything" from The Big, the Bold, and the Happy using a dark blue ink and second generation stamping. Finally, I added the 'happy' with foam tape above the words.
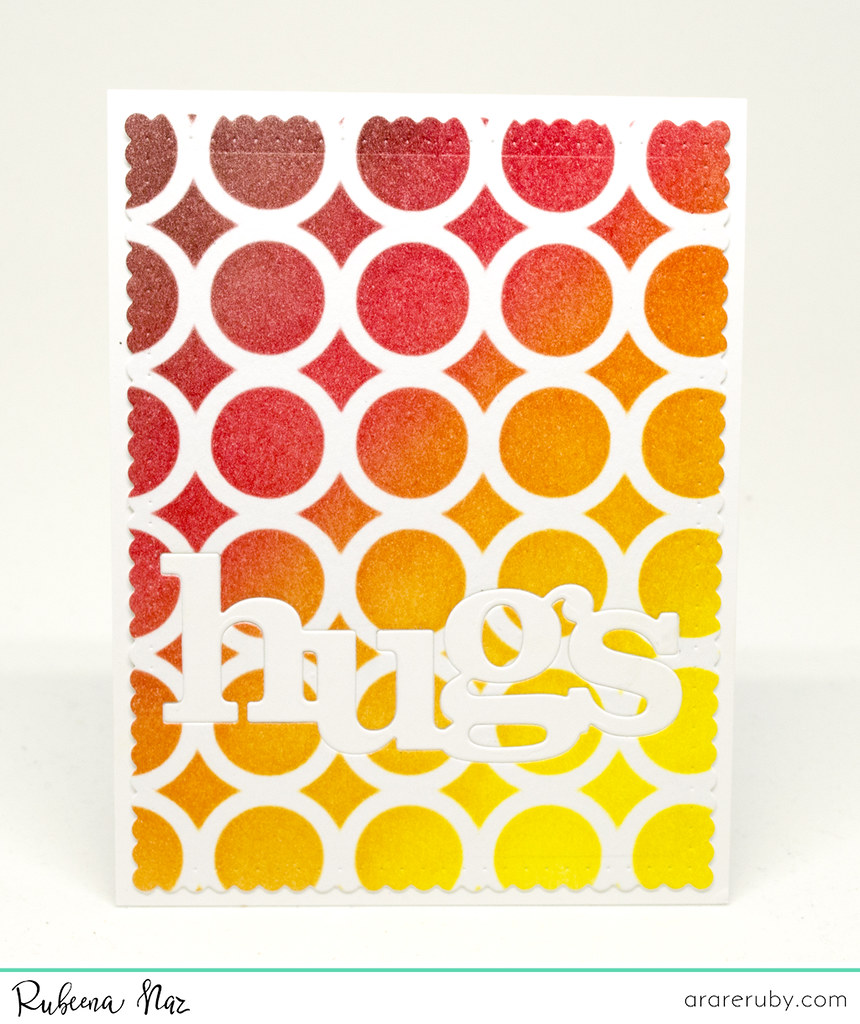
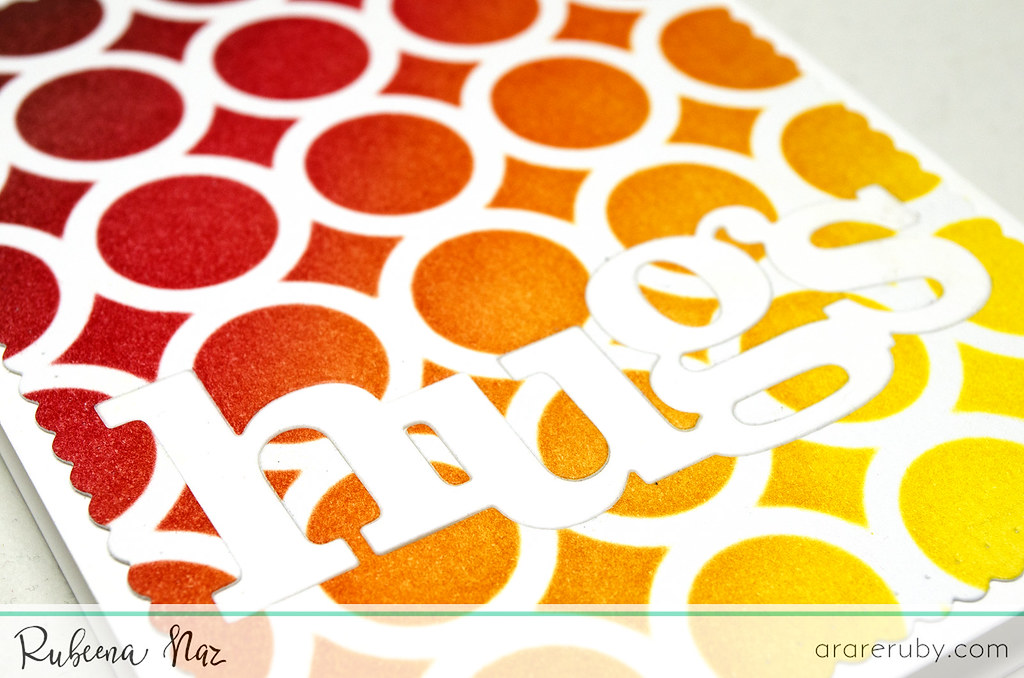
For the second card, I used different shades of red, orange, and yellow and Scenery: Pattern of the Rings Creative Screenings. Once the colors were blended, I die-cut the panel using the large scallop frame die from Essentials: Audrey Cutaways. I die-cut the word 'hugs' from In a Word: Hugs Cutaway from the center of the colored panel as well as from a separate white card stock piece. I removed the color version and inserted the white 'hugs' and glued the panel onto a white card base.
Cards 3 and 4: Shapes
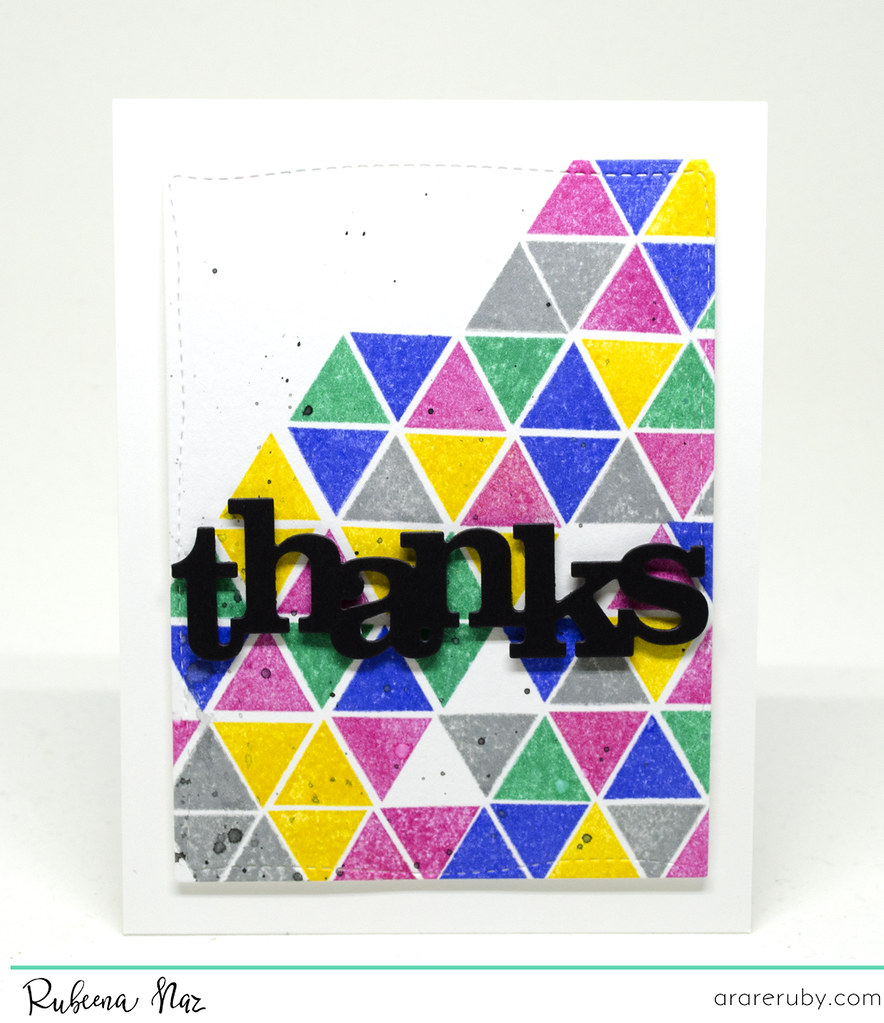
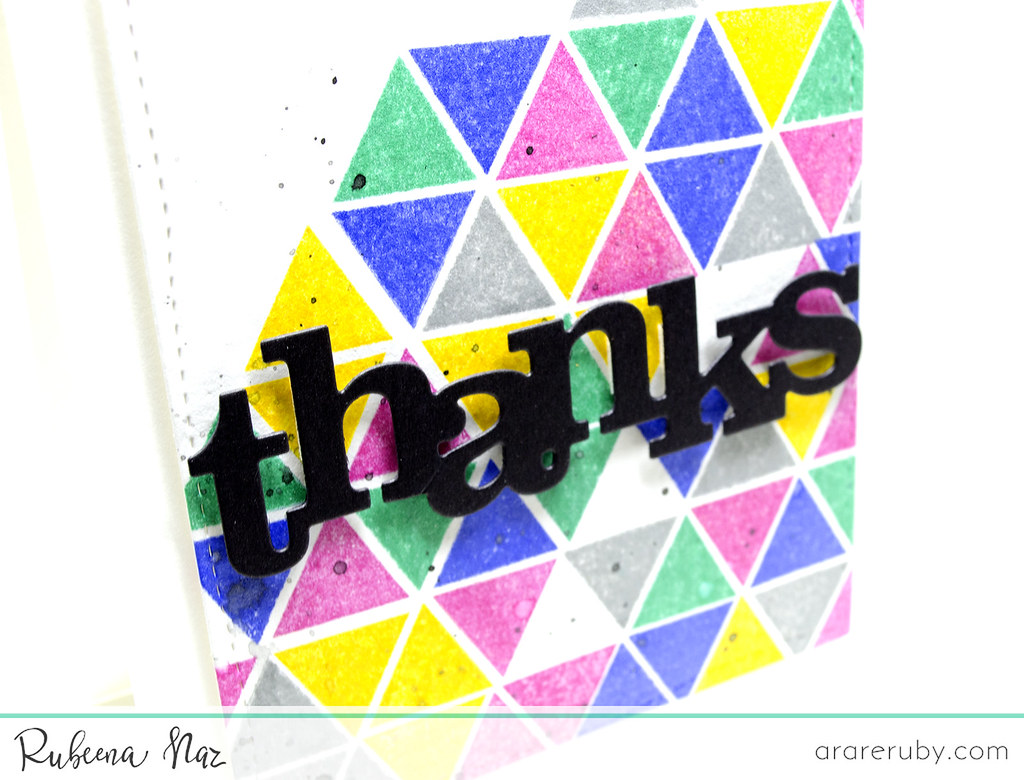
Another way to create your own background is using solid or outline shades. For the next two cards, I used images from Scenery: Rectangled & Triangled. I stamped the small solid triangle in different Distress Ink shades and created a colorful background. I die-cut to a small panel and added some black watercolor splatters. I attached the panel to the center of a white card base. I die-cut the word 'thanks' from In a Word: Thanks Cutaway from black card stock and attached to center with foam tape.
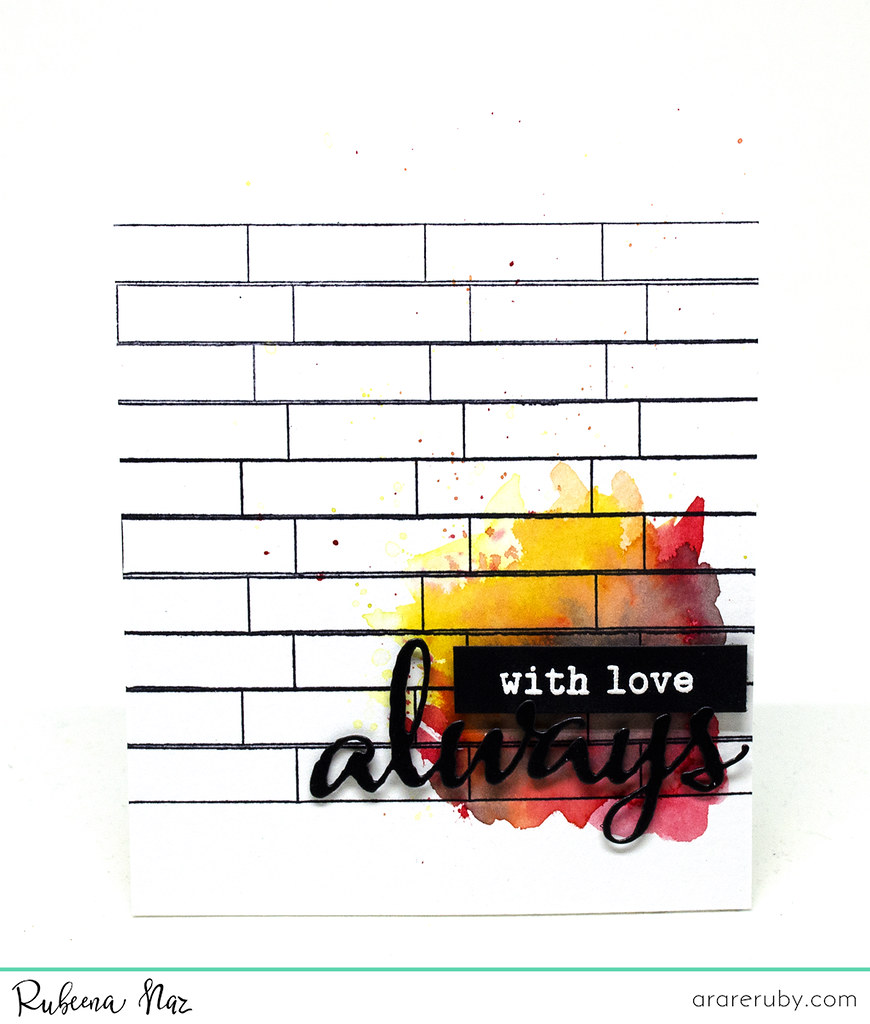
For the next card, I stamped the long rectangle stamp a few times to create a brick-like pattern on a white watercolor panel in a waterproof black ink. I added some watercolor in the bottom corner. I die-cut the word 'always' from The Big, the Bold and Comfort Cutaways from black cardstock and attached it with foam tape. I stamped 'with love' from The Big, the Bold, and the Happy with VersaMark on black card stock and heat embossed with white embossing powder. I trimmed it down to small label size and glued it above 'always' with foam tape.

Card 5: Words
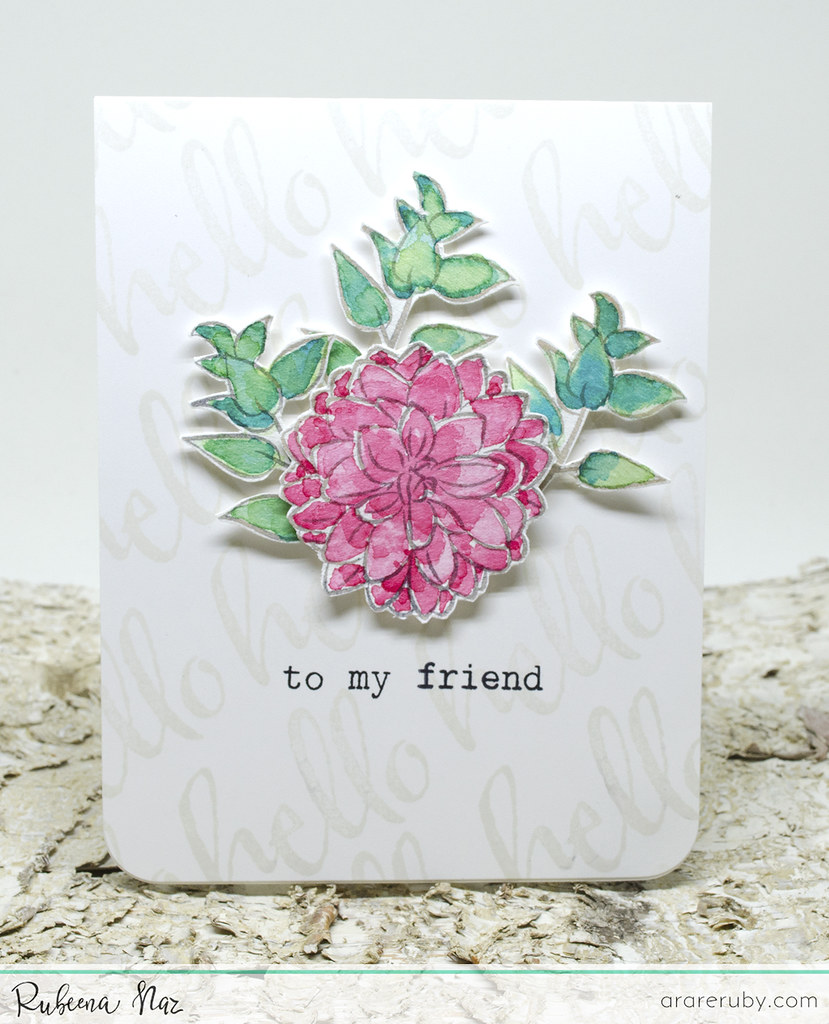
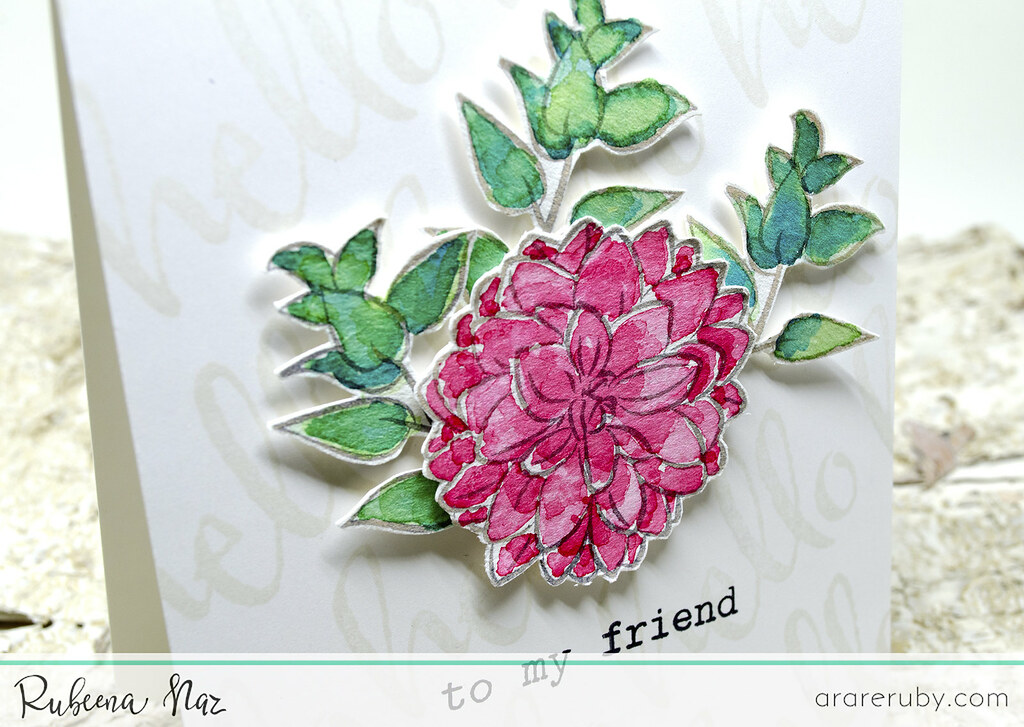
One interesting way to create your own background is to stamp sentiments repeatedly. I stamped 'hello' from The Big, the Bold, and the Happy in a light gray ink on my card base. I rounded off the bottom corners. On watercolor cardstock, I stamped a flower and some ferns from In Bloom: Addie's Garden and colored them. I attached them to the center of the panel with foam tape. I stamped 'to my friend' from The Big, the Bold, and the Happy in black ink.
Cards 6, 7, and 8: Florals
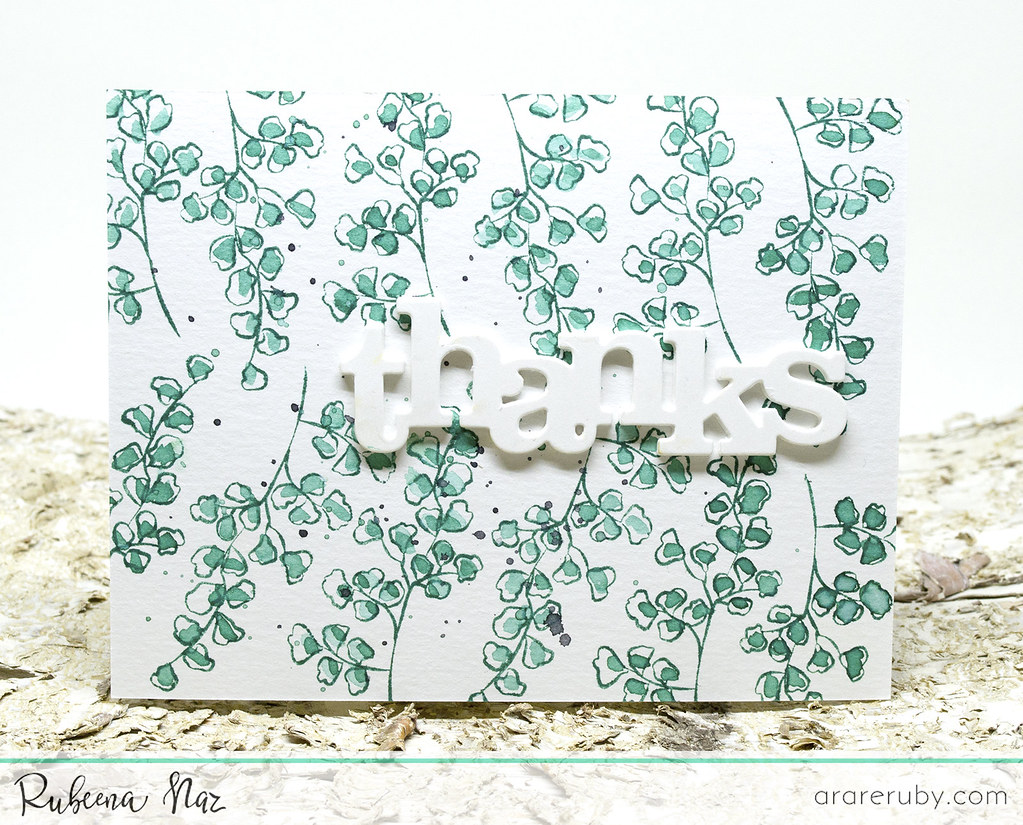
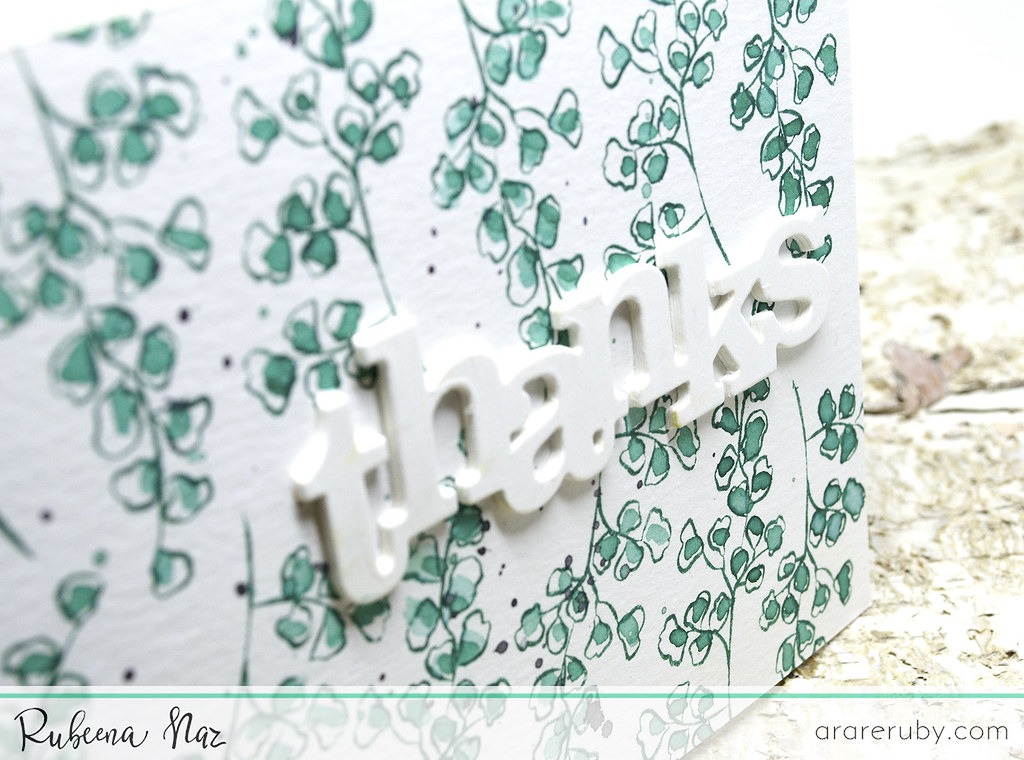
One of the best ways to create gorgeous cards is to stamp a background using flowers or ferns. You can leave them without color or add coloring. I share three different looks. For the first card, I stamped one of the images repeatedly on a watercolor panel using Pine Needles Distress Ink. I used the same color to add a bit of color to the images. When dried, I glued the panel to a white card base. I die-cut the word 'thanks' from In a Word: Thanks Cutaway four times and stacked them together over the center. Such a simple and quick card, but look how pretty it turned out! It would be great to create a set of these in different colors.
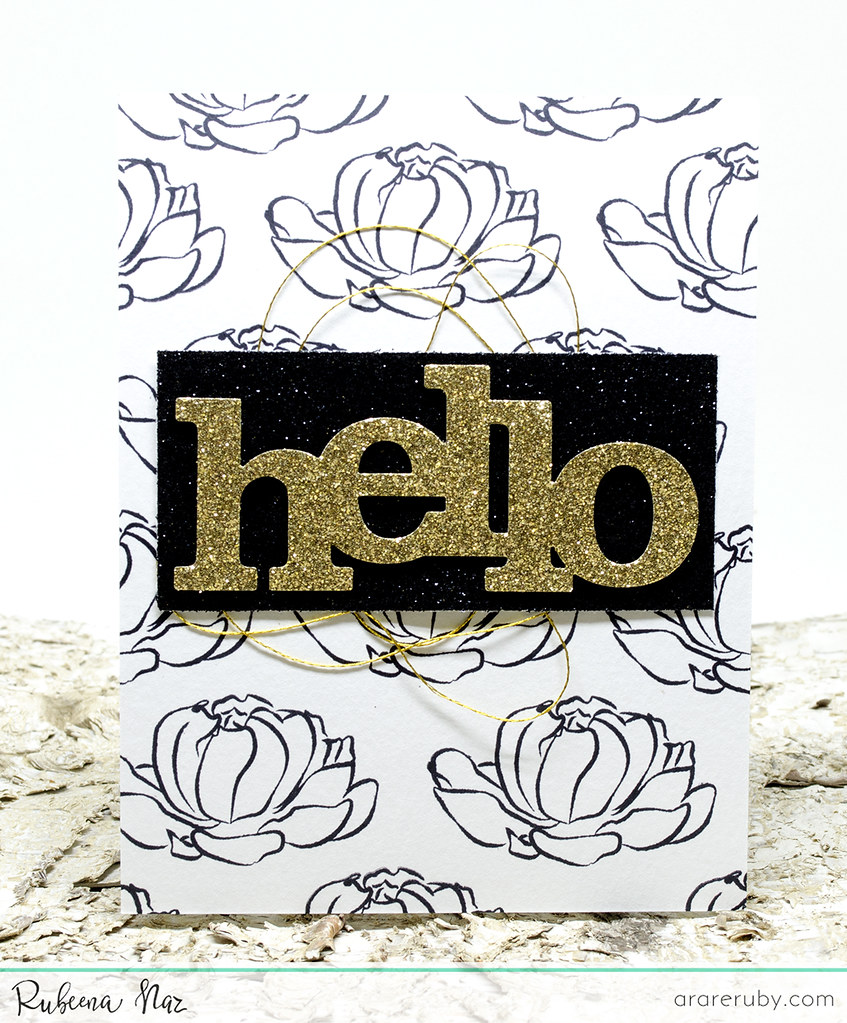
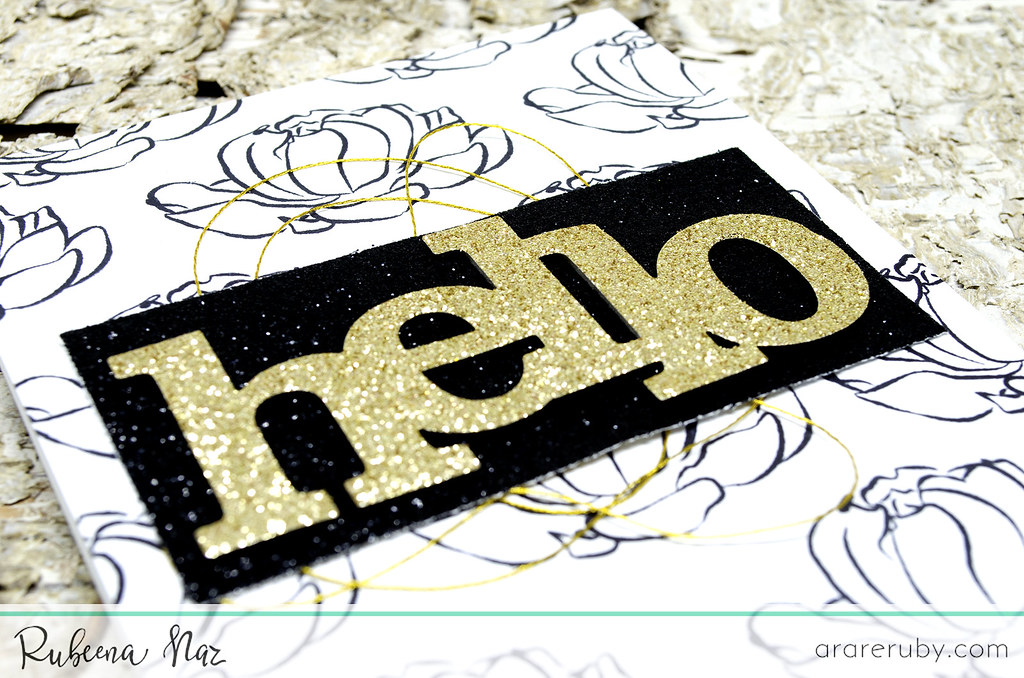
For the next card, I stamped one of the flowers from In Bloom: Addie's Garden repeatedly in black ink on the card base. I left them alone and did not color them. I die-cut the word 'hello' from In a Word: Hello Cutaway from gold glitter cardstock. I glued it to a small rectangle panel of black glitter cardstock and matted it down over some gold thread before sticking it to the stamped panel.
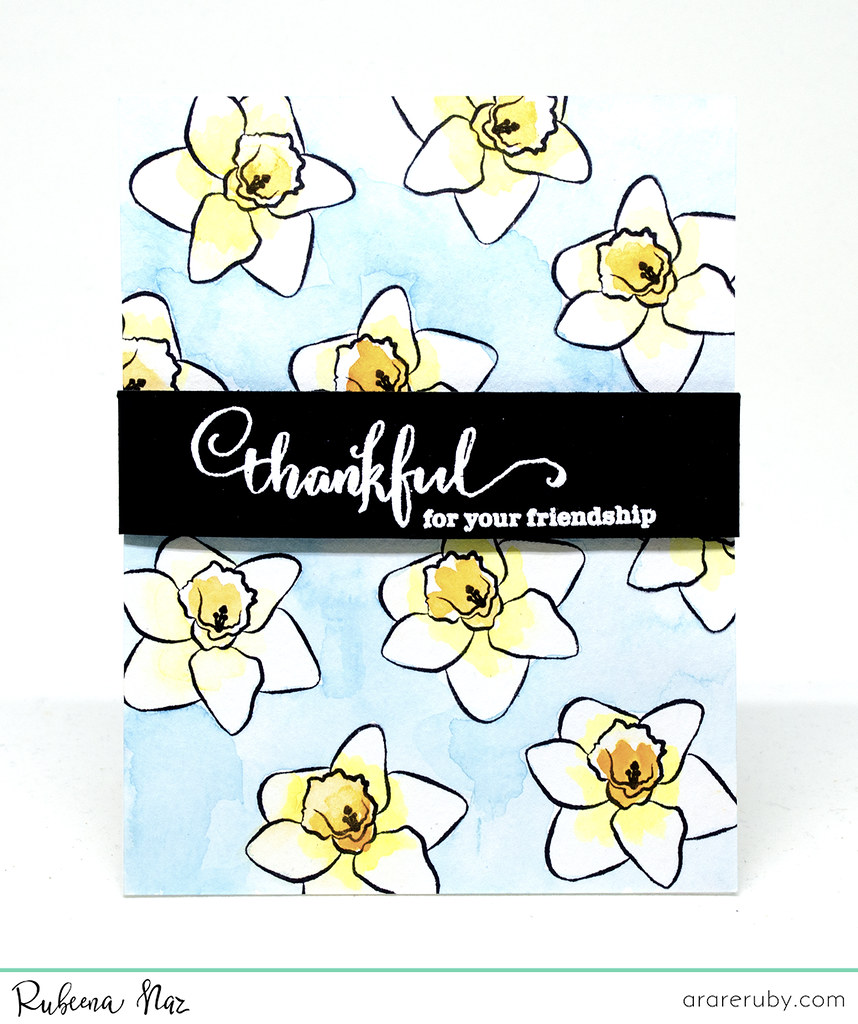
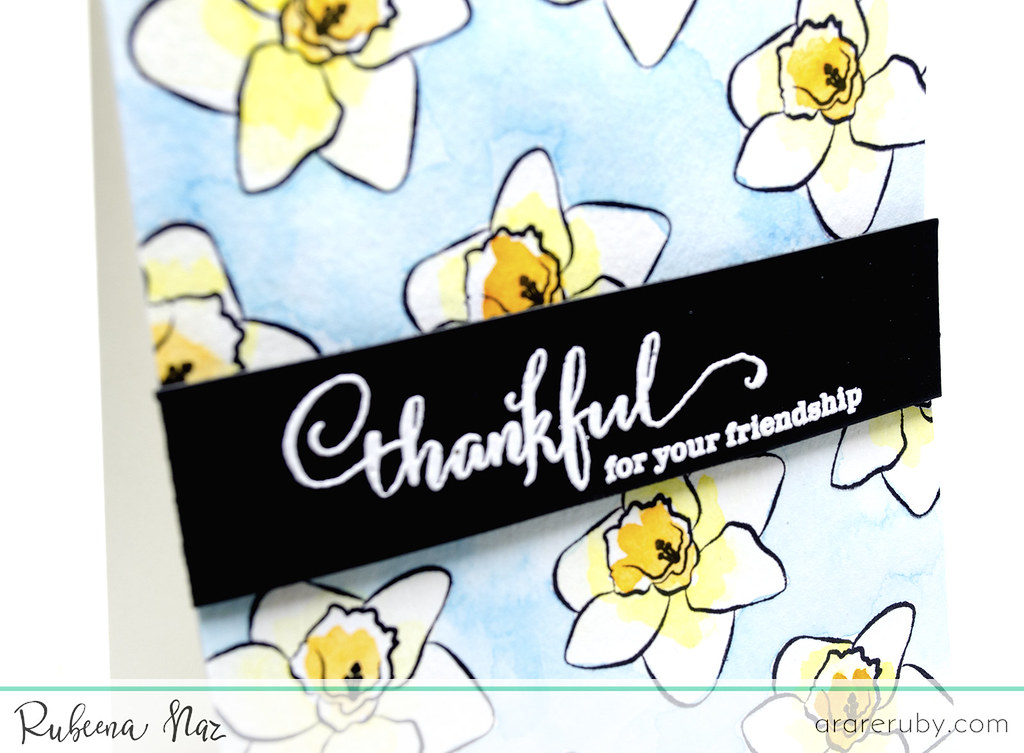
My last card shows one of my favorite ways to create backgrounds. I stamped another image from In Bloom: Addie's Garden repeatedly as I did in the last card. This time, I colored using my Mission Gold watercolors. Once it dried, I glued it to a white card base. On a strip of black card stock, I stamped the sentiment from Happiest of Holidays with Evelin T Designs with VersaMark and heat embossed with white embossing powder. I added the strip to the center with foam tape.
I hope you have felt inspired by all the tips I've shared in my Leading Lady posts! Thank you so so so much for all the amazing comments you've left me! It's been a great experience to share my work with you. Winnie & Walter is generously offering a $30 gift card to my readers so be sure to visit me at A Rare Ruby to enter to win! :)


