Thursday, May 31, 2018

Sweet Baby Card with Gayatri

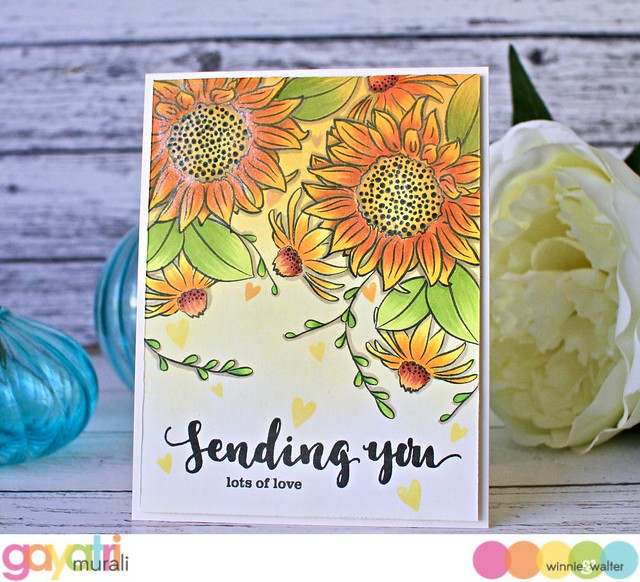
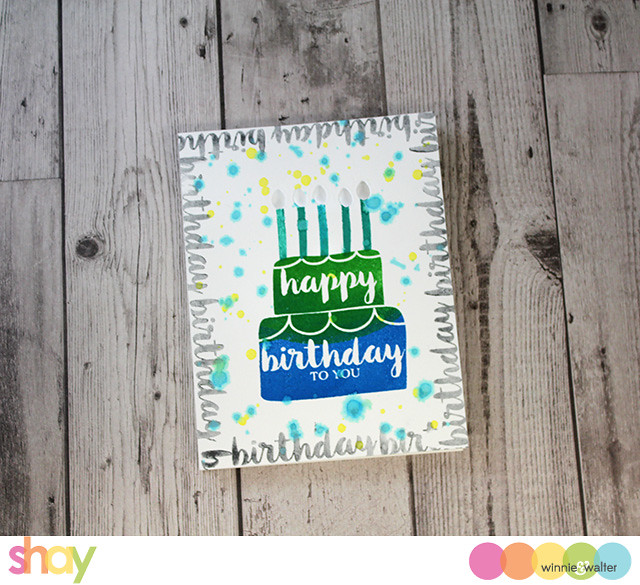
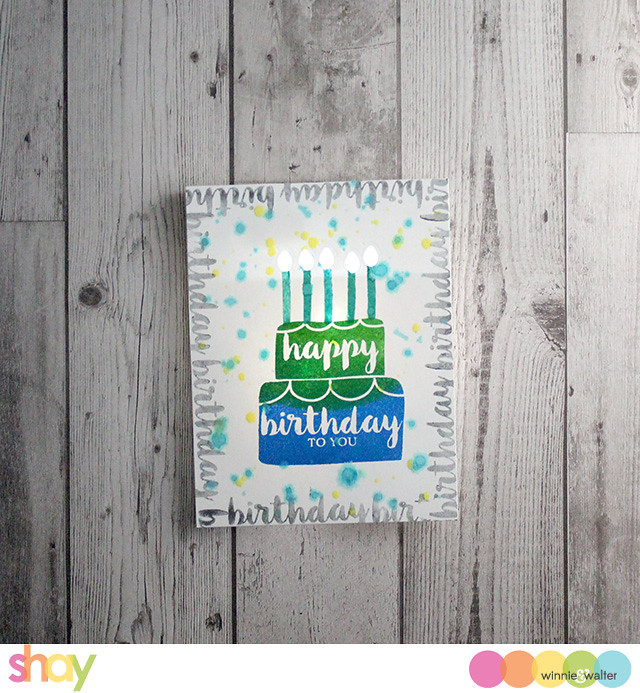
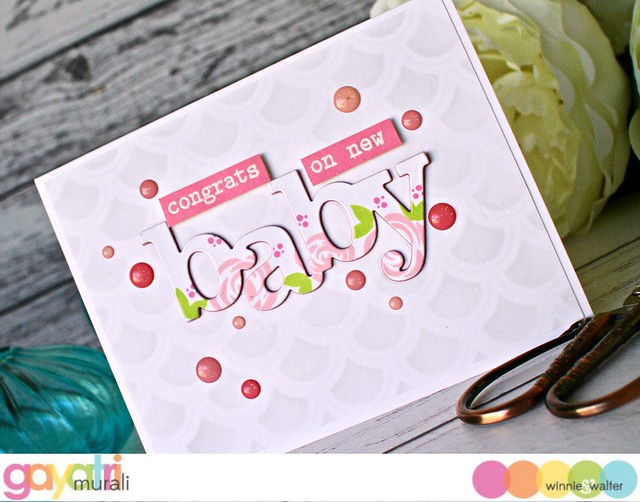
Hey everyone, I have a baby card to share with you today. This is a clean and simple with dimension. Hope you like it. Here is the card for you.

gayatri_Baby card1

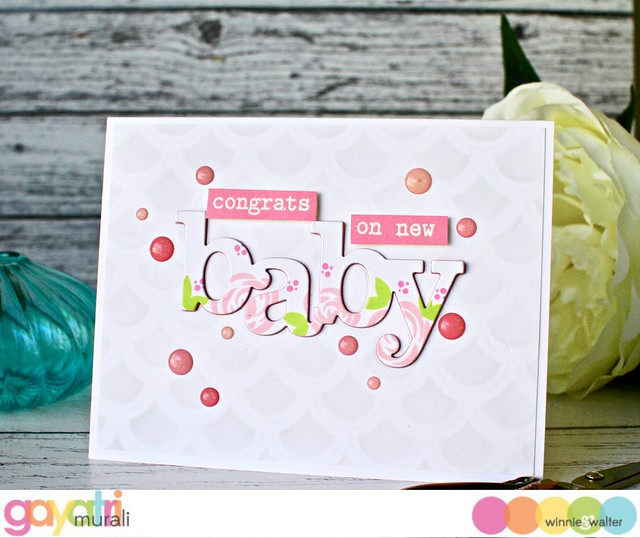
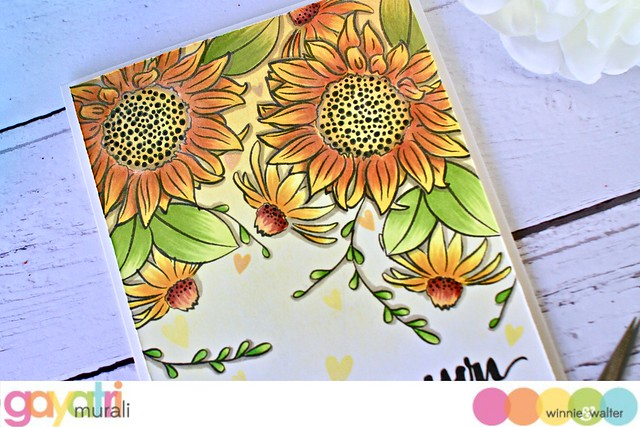
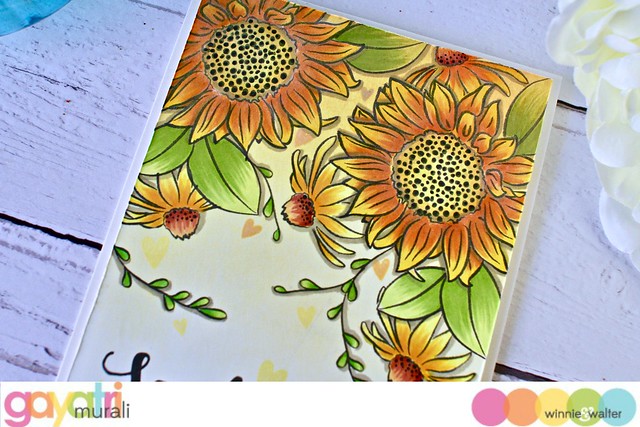
I really love how this card turned out. Although this was not in the plan while making the card. I wanted to make a baby card and use In a Word: Baby cutaway. Also I wanted a subtle background and a dressed up Baby Cutaway. So after going through the stash, I picked Lola's Bouquet stamp set to dress the Baby Cutaway. I stamped the floral images and leaves using Altenew Pink Diamond and Bamboo inks on the Baby cutaway. I also die cut three more Baby cutaway using pink cardstock. Then I stacked and glued the three pink die cuts with the stamped die cut on top.

For the background, I used Creative Screening Madison and sponged Hickory Smoke distress ink lightly to get subtle pattern on a white panel. I used the same In a Word: Baby cutaway to die cut in the middle of the background panel. I adhered the negative panel on a white card base. Then I inlaid the stacked dimensional Baby die cut on the panel.

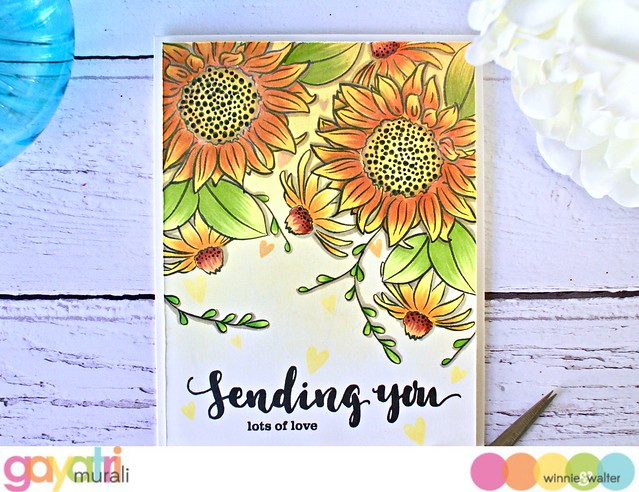
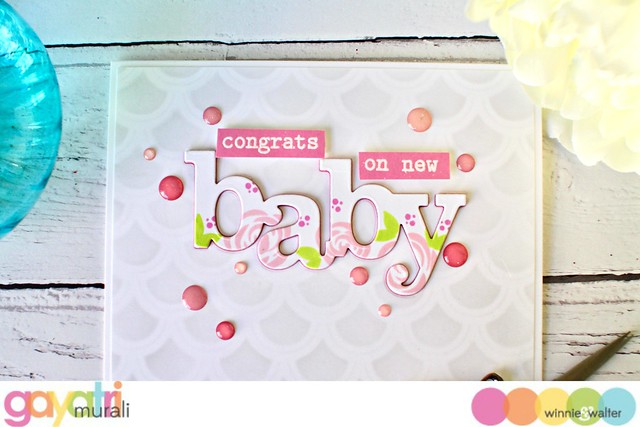
The secondary sentiment from The Big, the Bold and Baby stamp set is white heat embossed on a strip of white cardstock and sponged with Pinklicious ink to tie in with the pink colour on the Baby dimensional sentiment. The sentiment strips are trimmed and adhered as shown using foam adhesives. To tie in all the pink colours on the card, I added three shades of pink sparkly enamel dots from Doodlebug Cupcake Sprinkles.

gayatri_Baby card closeup1 gayatri_Baby card closeup

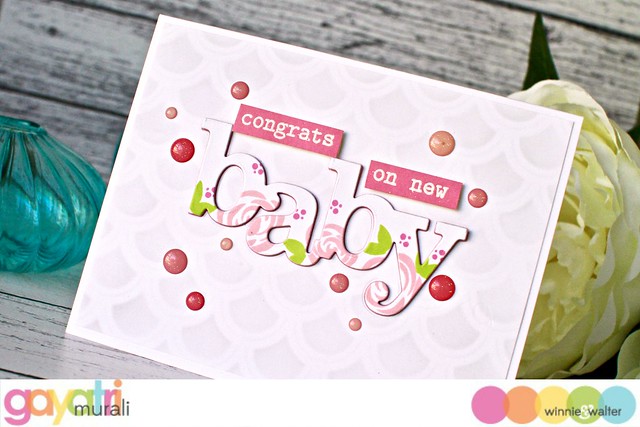
I absolutely love the soft colours and lots of white on this card. All supplies used to make this card are listed below.

gayatri_Baby card flat1

Hope you got inspired and share with us if you recreate this card.

Have a lovely day!


w&w-supplies

Wednesday, May 30, 2018

Layered Sentiments with Crystal (Video)

Today we have another fabulous video tutorial with Crystal to create this beautiful card with layered sentiments!


Have an incredible day!

Happy creating,
Shay.

w&w-supplies

Saturday, May 26, 2018

May Leading Lady Cynde Whitlow | Take Four (Video)

As May wanes we must sadly bid adieu to our amazing May Leading Lady Cynde Whitlow.   The last few weeks with Cynde have been a marvel with Cynde showing her mastery of coloring, design and creativity.  I am awed by her skills and very inspired to work harder at my coloring at the very least!  I feel so blessed to have had Cynde gift us with us her incredible talent this month and made this month something special.

If you missed her smashing debut you must see it...CLICK HERE or her utterly charming sensational second performance CLICK HERE or her triumphant third performance showcasing tremendous skills of masking and coloring CLICK HERE!

Lucky for us all we have her final command performance today.  

Hey folks!

It's Cynde and I'm back for my fourth and final take for Winnie & Walter! I've shared a lot of coloring this month. We've covered Creative Masking and coloring with Copic's, Colored Pencils on Kraft and Stamping In Shapes then combining Copic coloring with your colored pencils. In today's video, I thought I take another clean & simple approach and do some watercoloring. I do run in to a few bumps, but I show you how you can fix it!


I used the Winnie & Walter Dog-gone Cute with Evelin T Designs Stamp Set for both of my cards. I can't get over this stamp set. I adore all of the dogs, but I'm especially over the moon for the dog house. There is coordinating a Cutaway die set as well that includes the dog house!


You can watch the video on how I made my cards HERE. You can also click on the thumbnail link below.


I wanted to make larger landscape cards, so I cut my watercolor cardstock to 4"x9". You could totally make these on A2 (4.25"x5.5") cards. You could either leave of the sentiment on a side fold card or add the sentiment above the scene on a top fold card.

When I started these cards I chose to use Zig Clean Color Real Brush Pens. You could use any watercolor medium you like, but I like how easy Zig's are to use. However, I couldn't find my swatches and I didn't take the time to re-swatch them, so I did struggle with the color a little bit. I talk more about this in the VIDEO.


On my first card, I watercolor each image completely before I moved on to another image. I did make sure to let each layer dry before I added another. On my second card, I colored all of the images with a quick wash of color then went back to tho add more color. Either way works just fine, whatever works best for you.


Since I was having a hard time getting the colors and the depth that I wanted, I brought in my Prismacolor Pencils. If you've been following along, you can probably see that colored pencils are super versatile and can add so much to a card. Plus they can be a huge lifesaver if you're struggling like I did. I also talk more about this in the VIDEO.

To finish off my card, I stamped sentiments from the In A Word: Happy Stamp Set. I love, love, love this stamp set. I think this stamp set is a must for your stash folks. It's a great all around set that you can use on so many different types of cards.

That's it!


It's time for a GIVEAWAY folks! Courtesy of Winnie & Walter I have a $30.00 gift card to give to one lucky person! All you need to do is head over to my blog, THE PINK ENVELOPE and tell me which one of the four cards I've shared is your favorite and why! I have the last three videos linked below, on My Blog, as well as on my YouTube Channel.

You have until May 29, 2018 11:59 p.m. MST to enter. I will announce the winner on my blog on May 30, 2018. Good luck!

I truly had a blast this month folks and a HUGE thank you to Shay for giving me this opportunity!! I hoped you enjoyed my cards folks and as always thanks so much for stopping by!

Until next time.

Supplies used:

Friday, May 25, 2018

May Documentarian Lilith Eeckels | Take Two (Video)

Our May Documentarian, Lilith Eeckels is back for her final performance. 

Don't miss out on her introduction HERE or her first utterly charming layout HERE.  

It has been such a privilege to have Lilith as our Documentarian this month.  Lilith's whimsical use of  pattern, color and design is so enchanting!  I hope you will try some of her techniques on your memory keeping projects or even on other crafting projects.   

Today's projects are so full of wonder, joy and brightness!  

Once again, Lilith....


Hello everyone.

Today I'll be sharing my last project (projects) for Winnie and Walter. For my double project I decided to create a layout and as I had some leftovers I created a quick card too.


I do this a lot. I LOVE making layouts but I also enjoy creating cards but as I don't have much time I usually don't get out all my supplies just for a card so usually once I have finished a layout I just create a card at the same time.


For my projects I went through my patterned paper stash and picked out some fun vibrant patterns that go together. I cut out different sized balloons and then started playing with the design on my layout.


I drew some string by hand and also added a couple of bows that are on the die set to the balloons. For the embellishments I used some old stickers and chipboard elements.

The card was really simple and I used the same ideas as in the layout.

You can see how the two came together in the video. Some of the creative process is missing due to a problem with uploading the videos. I lost some of the videos. I hope it gives you an ideas of how the layout and card were made.


Thank you so much for having me as May 2018 Documentarian Winnie and Walter. I loved creating with your products and will create many more.

Lilith

w&w-supplies

Thursday, May 24, 2018

Sending You Lots of Love with Gayatri

Hello every one, it is Gayatri again with you. I have a very summery card share with you today. There is link blending and copic colouring techniques used on this card. Hope you like it.

gayatri_Sending You card

I haven't used these floral images from In Bloom: Anna's Flora stamp set from Winnie & Walter. So I decided to stamp and colour them. I started with a white cardstock panel. I used Inkylicious ink duster to dust Squeezed Lemonade, Wild Honey, Fossilised Amber and Carved Pumpkin distress oxide inks in a gradient on the panel. I love the soft look because that is what I wanted for the background.

Then I stamped, masked and stamped the floral images from Anna's Flora stamp set using Simon's Intense Black ink and MISTI. Using copic markers, I added shading to the images and make them pop from the background. I also added drop shadow to the images.

The sentiment is from Sending You with Evelin T Design stamp set. I simply stamped the sentiment on black on the bottom of the panel. I stamped the heart shapes from the stamp set randomly in the same colours of distress oxide inks to add interest to the card.

I trimmed the panel to 4" x 5.25" in size, roughed the edges with scissors and adhered on a cream card base using foam adhesives. Finally brushed the flowers with clear shimmer pen.

Here are some closeups of the card.


gayatri_Sending You card closeup2 gayatri_Sending You card closeup3

All w&w supplies used to make this card are listed below for you. Hope you give these techniques a try and enjoy. 

gayatri_Sending You card flat1

Thanks so much for stopping by.
image.png

w&w-supplies
 

Wednesday, May 23, 2018

Chibitronics + w&w Blog Hop!


Hello lovelies!  It's Shay here.  We have such a fun blog hop for you today as we are joining up with the amazing ladies from the Chibitronics design team to create illuminating projects with Chibitronics + w&w products.

You should have come from Lydia's blog, but if you loose your way here is the entire blog hop:

Chibitronics Blog
Jessica Frost-Ballas
Eiko Uchida
Kelly Szafron
Wei Wei Wang
Kelly Griglione
Tiffany Au
Lesley Oman
Maya Isaksson
Vanessa Amann
Gayatri Murali
Heather Hoffman
Jessica Lin===>Jessica's awesome video is on our YouTube Channel HERE!
Kate Capper
Keren Baker
Lea Lawson
Lydia Evans
w&w blog

Go ahead and check out the rest of the stops, if you haven't already.

Now, it's on to my card....

Alright after all the awe-inspiring projects you will get to see my toddler-level card. lol  Hey, you have to start somewhere, right?

shay_IMG_4339

In the picture the card is lit up, but all the lights are on...don't worry I have a picture where you can see the light.   I am telling you right now I have never used Chibitronics nor have any background that would make the experience easier, but after 2 failed attempts (first one didn't work and then the second the light worked but the design didn't work for the layout of the card) I had my little lights shining bright. :-)  Just follow the booklet included in your starter kit and try something basic.  I am here to tell you that you will be able to do it with a little practice and patience.

For my design I went really simple.  I stamped the cake from Happy Birthday to You in Something Borrowed and Grass Skirt inks and then 5 of the solid candles in Aquatini on a white panel of cardstock.  I then used the middle sized flame die from Happy Birthday to You Cutaways to cut out the flames.  The card was looking very stark so I stamped birthday from the same stamp set around the edge of the panel with Black Jack (this is second generation stamping) and then I dropped some aqua and yellow drops color spray.  I think it looks like confetti melting into icing...works.

I used a double layer of thick foam adhesive to adhere the panel to the light panel that I attached to an A2 cardbase.

Now, let's see the drama and why you will want to try these Chibitronics on a project (bonus: if you have a son or daughter or some other young one in your life they could have fun helping you out with this).

shay_IMG_4336

See it?!?  Yep, my simple little card is glowing. :-)

>>>GIVEAWAY<<<

Be sure you comment on each stop as there will be a randomly chosen winner of a $30 Chibitronics starter kit and then another randomly chosen winner of $30 credit to the w&w shop.  You will need to comment by 11:59 p.m. next Tuesday, May 29, 2018 to be entered to win.

We hope you are inspired to bring a little light to your projects!

Remember you have until 11:59 p.m. next Tuesday, May 29, 2018 to comment to win!

Happy hopping,
Shay.

Saturday, May 19, 2018

May Leading Lady Cynde Whitlow | Take Three (Video)

Our May Leading Lady Cynde Whitlow back for her triumphant third performance!  If you missed her smashing debut you must see it...CLICK HERE or her utterly charming sensational second performance CLICK HERE.   Today's card is a tremendous piece of masking and coloring!

Without further ado, Cynde...

Hey folks!

It's Cynde and I'm back for Take Three for Winnie & Walter! In today's video, I'm sharing how to stamp in shapes. It's one of my favorite things to do because you can get a lot of use not only out of your stamp sets, but your dies as well. It's always a great day when you can stretch your stamps and dies!

I used the In Bloom: Ashlee's Rosies Posies with Lydia Evans today. It is a stamp layering set, but the outline images are perfect for coloring!


The important thing to keep in mind when choosing a stamps set for this technique, is you want to look for stamps that will lend well to the shape of what your stamping in. In this case I was stamping in the shape of a heart and the In Bloom: Ashlee's Rosies Posies worked well because the set has some nice round shapes to fit in the curves and the leaves are perfect for the bow of the heart and the point.


You can watch the video on how I made my cards HERE. You can also click on the thumbnail link below.


To get the shape of my heart, I used the True Dotty Heart Cutaway and made a stencil out of acetate. You can use cardstock if you like, but I prefer acetate. They last longer, plus you can put some temporary adhesive on the back and use it as a stencil for ink blending.


I talk about this in the VIDEO, but I also recommend that you cut your masks before you start. This can save a ton of time. Plus you only need to cut maybe two for each image. You can move them around as you need them.

I decided to do Copic's and colored pencils, but you can only do one or the other if you like. You could also stamp all of these flowers in the layers as the stamp set is intended.


I thought about using the Georgette Border Cutaway to make a faux border on my card panel, but change my mind. In the end my daughter batted her blue eyes and got herself a 4" x 4" note card hot off the press to give to a friend.

Since there was enough going on with he flowers, I skipped the embellies outside of adding the black dots. I also didn't add any shimmer or glitter. Which for me is a huge deal, but again there was enough going on.

That's it!


Be sure to follow along folks! Next week is my last Take for Winnie & Walter and I will have a super fab giveaway! All you will need to do is leave a comment on my blog telling me which one of my projects was your fave and why!


Thanks So Much for stopping by! Until next time.

Until next time.

Friday, May 18, 2018

May Documentarian Lilith Eeckels | Take One

It is time for the first project post by our May Documentarian, Lilith EeckelsDon't miss out on her introduction from last Friday==> CLICK HERE.  She has such an incredible layout for you today full of whimsy, heart and creativity!

Ladies and gentleman, Lilith....


Hello there everyone. I am thrilled to be the May Documentarian here at Winnie & Walter.
I got the chance to worked with them a couple of years ago and I loved it. I had so much fun creating with the stamps and die they sent me.

Today I will be sharing my first project which is a layout. I used The Framed With Evelin T design stamp set and paired it with the Kindness set. I had filmed the whole process but something went wrong when I uploaded my files and I lost them all.  So I'll explain how I created the layout.

I started by stamping the frames and then I added the tree, cactus and leaf shapes. For colour I used alcohol markers and blended different shades together. I choose three tones: pink, grey and green and used black for the stamped images. 

To give the frames some depth and have the impression they pop off the page I added some shadow using a light grey alcohol marker. 


I also added the shadow to the photo to tie all the elements together. 

For my title I picked sentiments and words from the True stamp set. I added a touch of pink with stickers from sticker supply and chose some that would fit in with the layout. 


My layouts are a reflection of me, my feelings and things I would like to say to my loved ones. They aren't always about events or places. Scrapbooking helps me express myself which is sometimes a little difficult as my husband and children only speak French but my mother tongues are Dutch and English. I miss expressing myself in these languages and crafting has helped me get my words and feelings out on paper. 

A big thank you to Winner&Walter and I'll be back next week with another project. 

Lilith


w&w-supplies

Thursday, May 17, 2018

Cluster Florals with Crystal (Video) + Winner of Crystal/YouTube Giveaway

Crystal has a wonderful new video tutorial for you!


Also, I wanted to announce the winner of the giveaway in honor of Crystal:


Andrea, please contact us at info {at} winniewalter {dot} com to claim your prize!

Have an incredible day!

Happy creating,
Shay.

w&w-supplies


Monday, May 14, 2018

May Color Combo with Heather H. (Challenge)

Good morning! Heather here stopping by this morning to share a new Color Combo Challenge with you! This month is kind of that lovely in between spring and summer season - so I wanted to be bright and happy to celebrate the return of sunshine, flowers, and getting outdoors - plus, I really wanted to play a little more with the adorable kitties in the Purrfect with Evelin T Designs stamp set!


Here is my color inspiration for this month - I don't know about you, but I would just love to step into that scene!


I began by stamping a sentiment from another Evelin T stamp set - Wish Big using Black Jack Catherine Pooler Ink. I then did some distress ink blending on the top half using Spun Sugar Distress ink, then mixed a little of the same ink with some Worn Lipstick, mixed with a bit of water, then used it to add some splatters over my card front. I also added some white ink splatters over the top for even more texture.


Finally, I colored up my adorable image with Copics and a white gel pen for accents, then die cut with the coordinating dies and mounted with foam adhesive on my card.


Now - I have a few favorites from the last Color Challenge to feature! This challenge had a few less entries than lately - I'm blaming the weather making everyone want to get outside instead of craft! But there are still some GORGEOUS entries! Sooooo...on to the favorites!

First up - this soft and dreamy beauty from Maryam...seriously - this is breathtaking! Maryam had several beautiful entries - but this one stole my heart!


Next up, this fun and happy baby card by Rosali - LOVE those beautiful stripes, the cute critters so beautifully colored, and the sentiment and stars! Just a lovely card all around!


And finally, despite everyone being ready for spring these days, Trina P made the CUTEST little snowmen cards for her entries! I love the inky backgrounds and fun techniques - but this little cutie using the body of the snowman for the "o" in "snow" was SOOO cute!


>>>RANDOMLY CHOSEN WINNERS<<<

Celebrate your Day
No. 1 | MeganBeth
This is just such a fun card for any gender and age!  I love the movement on this card too!

And since we had so many gorgeous, colorful entries (and because I just feel like it and one the perks of being the boss at w&w is I can do these things on a whim!) I randomly chose one of the Heather's favorite cards featured above to also win as well!

No. 7 | Maryam
What an amazingly beautiful card!  I love the use of the wide swath of organic color behind the fabulously colored all-in-shades-of-greys flower.  Just lovely!

MeganBeth and Maryam, please email us at info {at} winniewalter {dot} com with the subject "April Color Combo Challenge Winner" to claim your prize.

>>>CHALLENGE<<<

New challenge will post on the second Monday of each Month, and will end on the Friday before the next challenge begins to allow time to pick a winner and some favorite entries to feature.

Now it's your turn to play along!
  1. Create a new project using the May Color Combo. 
  2. Use at least one (1) winnie & walter product.  This can include Cutaways (dies), Creative Screenings (stencils/masks), printable/digital items, cut files and/or stamp sets.  Remember we offer freebies in our shop.  Our freebies can be used to create your project(s) for this challenge.
  3. Link up your project below using the InLinkz Link-up by 11:55 p.m. CST on Friday, June 8, 2018.  
  4. Enter as many times as you want before the deadline.
  5. This May Color Combo Challenge may be combined with other challenges found here on the w&w blog or elsewhere. 
One randomly selected entry will receive a $25 gift certificate to Winnie and Walter. YAY!!! I can't wait to see your entries! 


Thanks for stopping by - have a wonderful day!


w&wDT_heatherhoffman_blog-sig 2


w&w-supplies