
Our February Leading Lady Rosali is back for her triumphant third performance! If you missed her smashing debut you must see it...CLICK HERE or to be wowed by the tremendous trio of cards from her sensational second performance CLICK HERE. Rosali has outdone herself today with her ability to create a gorgeous scene!
In honor of our birthday month we're doing something a bit different this year and including a challenge to you on each of Rosali's posts this month. See the end of this post for more details and to link up!
In honor of our birthday month we're doing something a bit different this year and including a challenge to you on each of Rosali's posts this month. See the end of this post for more details and to link up!
Without further ado, Rosali...
Hello everyone!
First, I would like to thank you all for your comments on my first two posts here on the blog! They made my day!! :-)
And now I am thrilled to bring you my third post as Winnie & Walter's Leading Lady!
I will show you another masking technique, and this one is really easy! But you can also make the most of it and take it to another level - which then needs a little more planning. I made two cards to show you an easier and a more elaborate way to:
BUILD A SCENE USING MASKING
So let’s get started with a clean and simple (CAS) card design using this technique. I picked a cute bird image from the So Tweet with Evelin T Designs stamp set as my focal point and the Mini Scenery: Into the Woods stamp set to create a background for the birdie.

Here is how the masking works:
- Stamp the bird onto your cardstock panel where you want him to be.
- Stamp the bird image a second time, this time on masking paper / a piece of removable label and use scissors to cut the image out right on the outer stamping line. You don't need to mask the feet so you can just cut them off.
- Place the mask directly over the stamped image on your panel.
- It's best to use a stamp positioner or stamping tool of some kind for the next step. Align the bottom of the tree scenery stamp with the bird's feet and stamp it down really well so the ink reaches right to the edges of the mask.
- Stamp several times with the ink colors that you like until you are happy with the ink coverage and colors.
I used a light blue ink for the largest part (sky) and fir green ink for the bottom (forest floor). It didn't stamp completely solid (I later discovered I had some air bubbles under my stamp) but I actually liked the texture the ink gave my 'sky' so I left it as is and embraced the look by adding even more texture with tiny black splatters. :-)

COLORING TIPS
TIP 1: I added a little bit of shading to the white birch trees using colored pencils to give them a more three-dimensional look.
TIP 2: For the birdie, I used first Copics (Y08, R27, R29, R39) and then colored pencils on top! I call this method 'two step coloring' and it's one of my favorite ways to color because it takes less patience than using just colored pencils!
TIP 3: I like to use a black Glaze pen from Sakura for the critter's eyes to make them pop. You can also use a basic black gel pen or even Ebony Black Nuvo Drops in a fine tip bottle!
SENTIMENT
The sentiment is a combination of stamps from So Tweet with Evelin T Designs ("my tweet") and Yetitide Greetings with Evelin T Designs (white heat embossed "LOVE"). Lastly, I added a strip of white cardstock that I had die cut with the biggest rectangle dies from the Tilda Cutaways.
For my second card, I masked several images to build a scene:
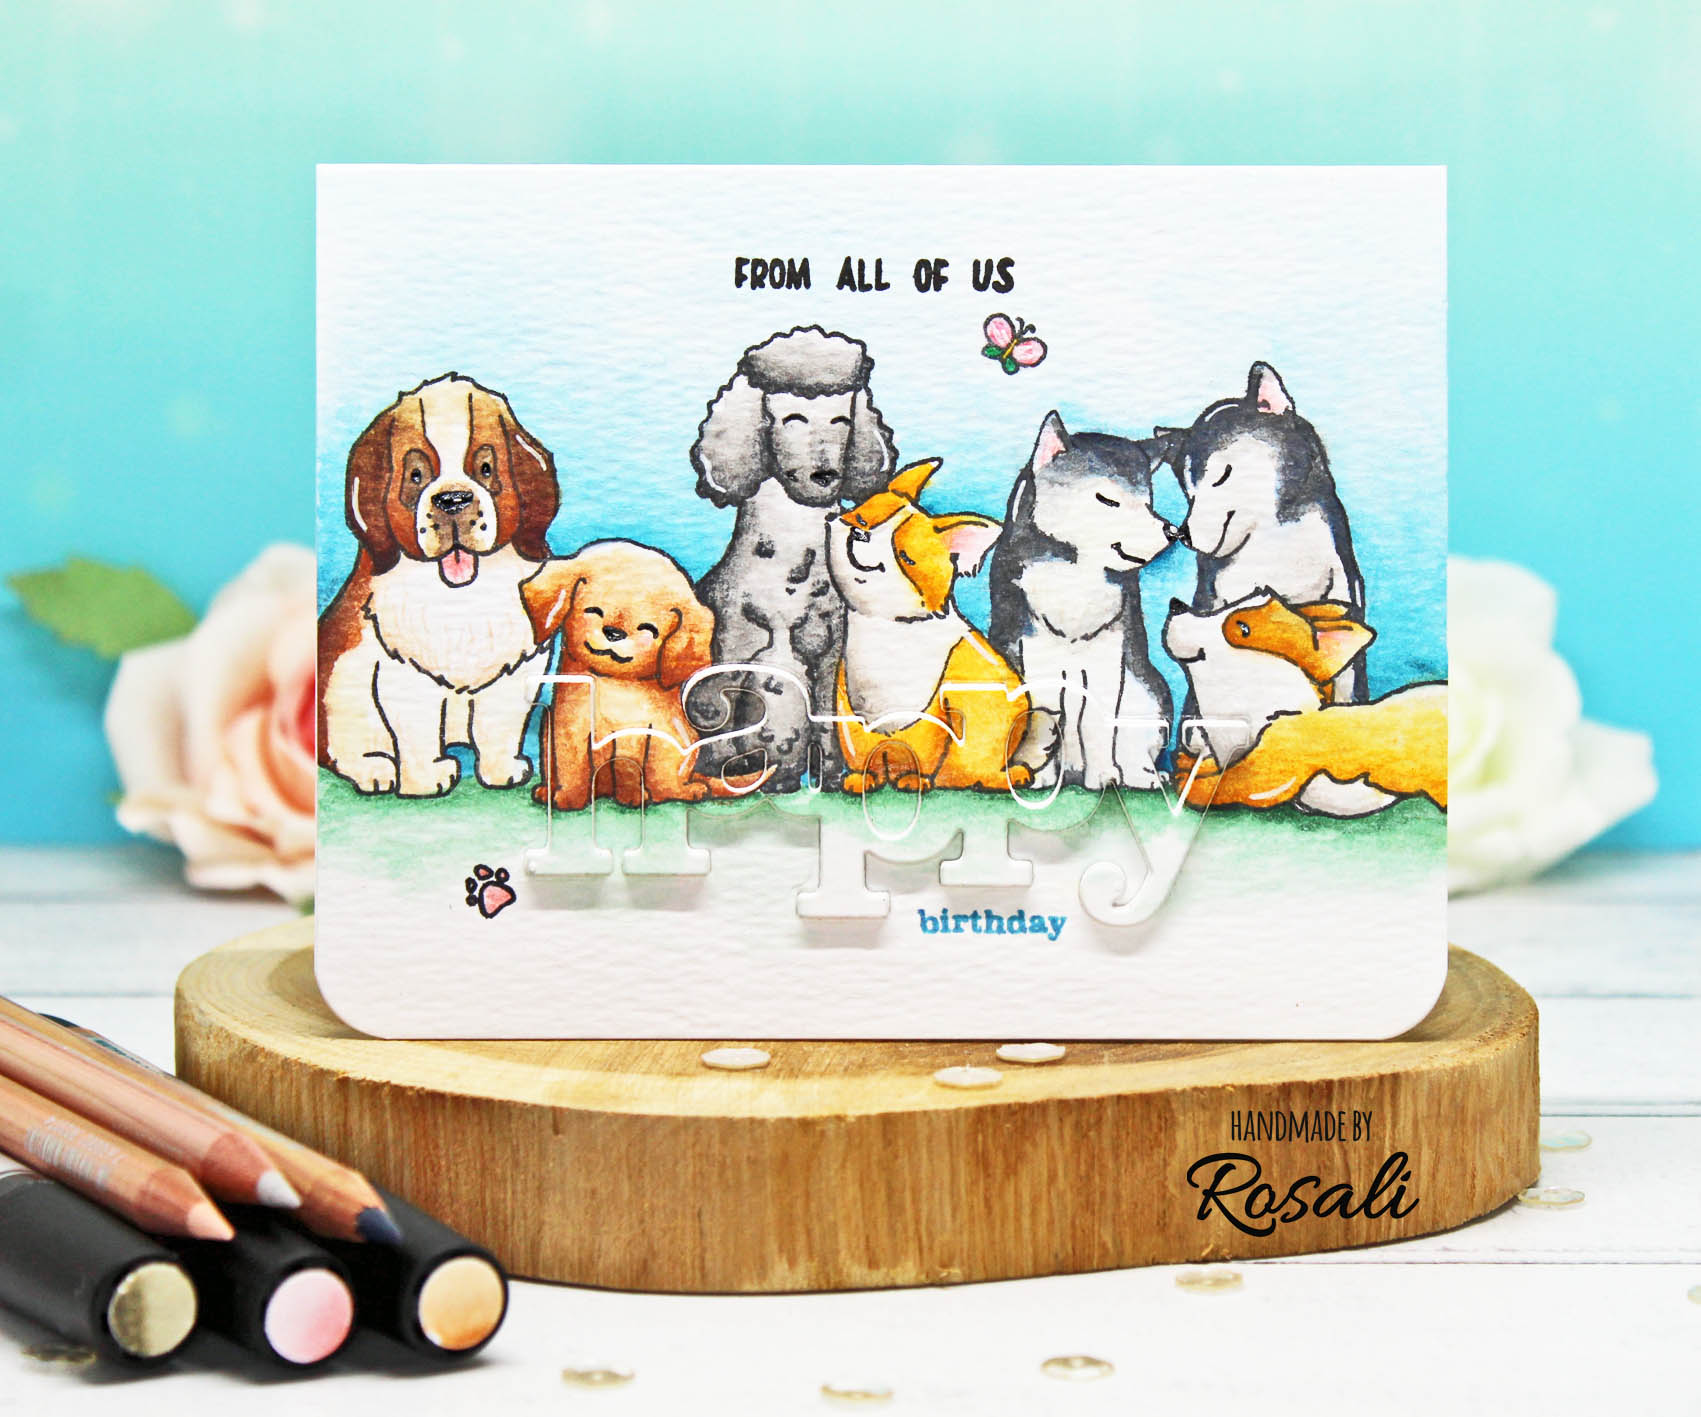
Isn't this such a cute group of dogs?! I had a blast coloring them. :-)
The masking technique is generally the same as above! You just have to:
- plan ahead where you want to place all the dogs and
- which images you have to stamp first and mask.
I like to lay all the stamps onto my piece of cardstock and decide where they should go and which images I want to be up front and which I want to be behind others. The images that you want to be up front have to be stamped first! In my case, it's the smallest two dogs (the second one to the left and the far right one).
I stamped those two dog images using my stamping tool, masked them and then placed the next stamps onto the panel. This time the poodle and his friend were to be stamped and masked. After that, the remaining three dogs (which I interpreted as two huskys and a Saint Bernard dog) could be stamped. That made my dogs complete! I colored them all in using watercolor markers and a water brush.
COLORING CLOSE-UP:

WATERCOLOR TIPS
TIP 4: When you took too much pigment to your paper dab it off with a paper towel to preserve the lightest spot on your coloring.
TIP 5: To get a smooth blend on the background put down a wash of clean water on your paper FIRST where the color should go, THEN apply the marker/pigment to your paper and drag it out with your brush. It's easier to avoid harsh lines this way.
SENTIMENT
On this card, the sentiment is a combination of stamps and a die: "From all of us" is from Big Hugs with Evelin T Designs and "birthday" from Wishing You with Evelin T Designs. The Happy Cutaway was die cut right into the colored panel and popped up with fun foam.
Don't forget to hop over to my blog post and leave me a comment over there for your chance to win a 30 $ gift certificate sponsored by Winnie & Walter.
CHALLENGE WITH A PRIZE!
I would love to see your take on this technique!! Winnie & Walter is offering a challenge under each of my blog posts in celebration of their birthday month! So awesome! All skill levels are welcome so don't be shy. :-)
Have an amazing day! ♥
Rosali
USED SUPPLIES:
Winnie & Walter stamps, dies and stencils:
LS Exclusives: So Tweet with Evelin T Designs Stamp Set
Mini Scenery: Into the Woods Stamp Set
Yetitide Greetings with Evelin T Designs Stamp Set + Cutaways
Essentials: Tilda Cutaways
Dog-gone Cute with Evelin T Designs Stamp Set
In a Word: Happy Cutaway
Big Hugs with Evelin T Designs Stamp Set
Wishing You with Evelin T Designs Stamp Set
Inlinkz Link Party
Mini Scenery: Into the Woods Stamp Set
Yetitide Greetings with Evelin T Designs Stamp Set + Cutaways
Essentials: Tilda Cutaways
Dog-gone Cute with Evelin T Designs Stamp Set
In a Word: Happy Cutaway
Big Hugs with Evelin T Designs Stamp Set
Wishing You with Evelin T Designs Stamp Set
CHALLENGE:
Now that you've seen Rosali do it, "Build a Scene Using Masking" to create your own project and link up here by Friday, March 15, 2019, 11:59 p.m. CST to be entered to win $50.00 credit to the w&w shop! One (1) lucky randomly chosen winner will be picked from each of Rosali's Leading Lady posts this month.
Wow, beautiful scenes Rosali. Love those cute doggies. Hugz
ReplyDeletegreat masking! love those pups!
ReplyDeleteWonderful use of masking techniques!! Loved both the cards.
ReplyDeleteLove that sweet bird and all the cute pups!
ReplyDeleteWow - both cards are awesome ! I have a soft spot for cardinals and birch trees so I really love that one!
ReplyDeleteI've thoroughly enjoyed all your posts this month, Rosali!! What great tips and tricks you have ... the coloring on your cardinal is just fabulous with the colored pencil on top of the copics. I need to remember that! and the tip for the eyes is great too ... so those aren't white spots, but actual glare?! I'm sure I have a souffle pen somewhere. Dying to try this out!
ReplyDeleteThank you, Kelly!! You know I admire your cards so your comments made me extra happy! :) You always have such an eye for detail - I had to look at the pics again, but yes:
Delete- the eyes of the bird have a light glare because the glaze pen is shiny!
- on some of the dog's noses I added a white detail on top of the glaze pen (after it was dry)
Xx
Your forest scene is gorgeous and I really like the way you added detail to the birch trees...and then upped the texture with spatters! Beautiful cards!
ReplyDeleteThis comment has been removed by the author.
ReplyDeleteFun and adorable, I love every single little detail!
ReplyDeleteI must tell you how much I am enjoying your Leading Lady series of cards. Each week I am jotting down a few of your tips and tricks because you have given us such detailed and easy to follow instructions. Thank you. Linda S. In NE
ReplyDeleteI love your puppies! Beautiful coloring!!!
ReplyDeleteCute cards and great masking.
ReplyDeleteWow--such incredible coloring on both cards! These are wonderful, Rosali!
ReplyDeleteHave really enjoyed reading all your advice on this & the previous two posts. Such a coincidence that I had done a lot of masking for a Valentine's card that I sent this week. I usually only mask a tiny bit but this was lots of masking & it worked ( for a change) Thank you for sharing all your advice.x
ReplyDeleteAdorable and sweet cards!!!
ReplyDeleteWonderful masking ...love using this method to create interest.
ReplyDeleteMasking is something I don't do very often, but the results are so impressive that I really should attempt it more often! Your cards are amazing. I love how colorful and detailed your scenes are.
ReplyDeleteThank you for this challenge and the wonderful inspiration.
<3 J
jwoolbright at gmail dot com
HerPeacefulGarden.blogspot.com
Thanks for sharing these two options to create scenes. I definitely lean towards the first simplier style.
ReplyDeleteSUPER CUTE scenes and SWEET cards!
ReplyDeleteLOVE your colouring and CREATIVE masking!
I've only done some very basic masking, can't wait to try building a scene :)
Your article looks really adorable, here’s a site link i dropped for you which you may like.
ReplyDelete토토
경마
list of sex crimes Whether in a personal, professional, or artistic setting, February Leading Lady Rosali | Take Three tells the tale of Rosali, a vibrant and significant individual who has drawn notice for her outstanding accomplishments or contributions.
ReplyDelete