I'm
delighted to be with you today, and thought that I'd mix up a few sets to show
you a simple clustered card.
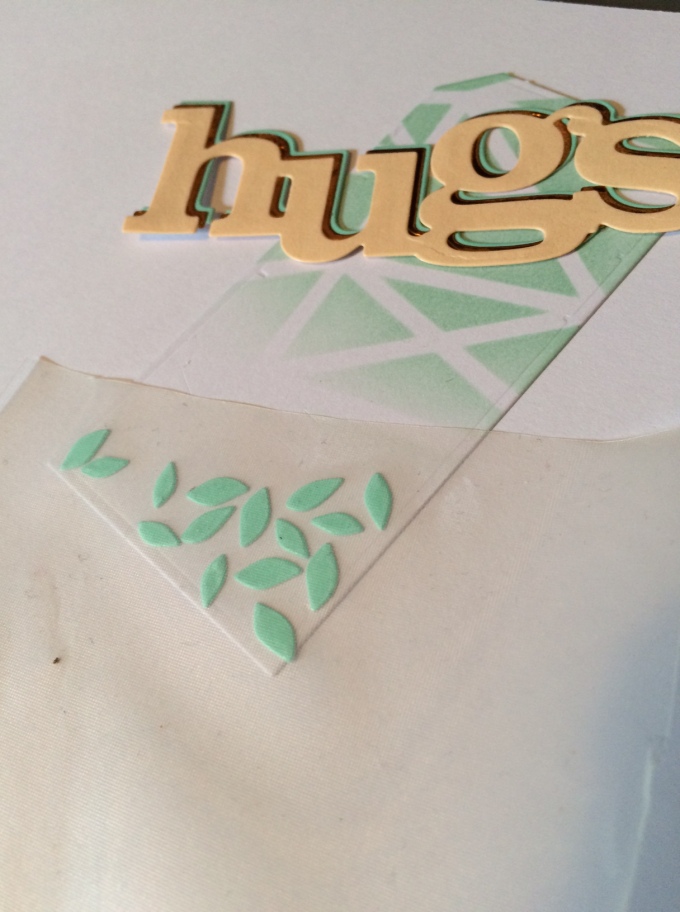
I started
out by triple die cutting In a Word: Hugs Cutaway and adding a mint
coloured ink over the Scenery: Multifaceted Creative Screenings onto a
tag cut from the Essentials: Katharine Cutaways
You can
see the little tiny green leaves- they are the negatives from the In Bloom: Paulina's Greenery Cutaways die. As
they're so tiny, I arranged them where I wanted them and then added a sticky
film over the top that I used when I'm transferring images from my digital die
cutting machine.
Just flip
the film over, add some glue and press down carefully and remove the film. A
really easy way to transfer little pieces and not have to glue them one by one!

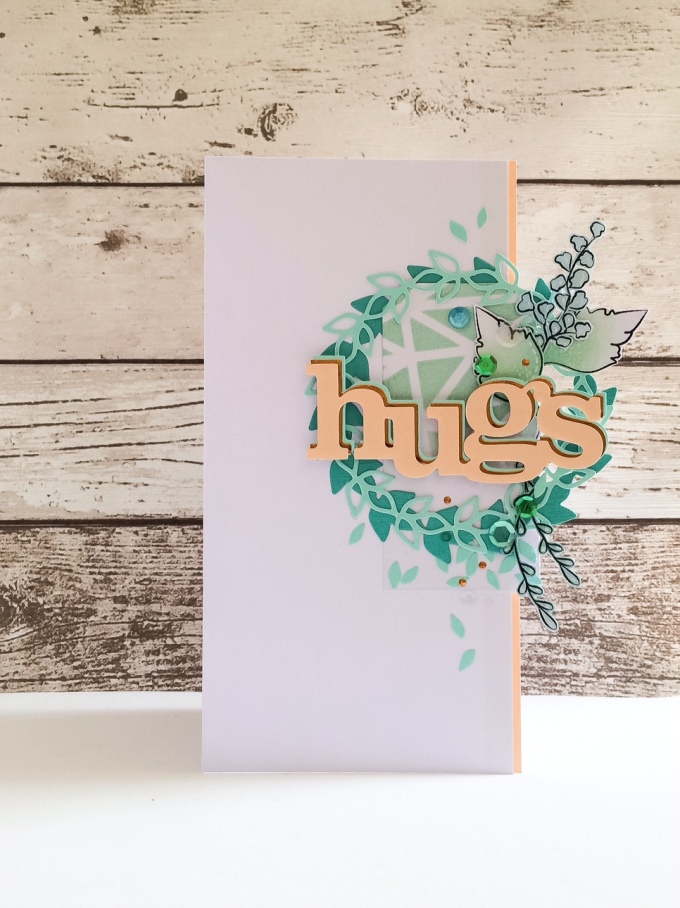
In the
next picture you can see some of the other products I've used; In Bloom: Paulina's Greenery Cutaways for
the circular wreath layer and then added some greenery courtesy of the
beautiful In Bloom: Anna's Flora stamp sets.

I simply
sponged Distress Inks onto the leaves in different shades and arranged the
leaves under the sentiment. Sometimes you need matching embellishments and I
needed some matching the bronze metallic layer so dug out the little dotted die
from Essentials: Katharine Cutaways. By passing
these through the die cutting machine with some adhesive backed metallic paper,
it created little raised sequin-like embellishments that were easy to position
and helped with the movement on the card.

This
close-up shows the layering and also the sequins which are the special Winnie
& Walter sequin mix from Little Things which were the perfect finishing
touch. Taking elements off the edge of the card makes the project just that
little bit different.

Hope you
enjoyed this project-I'll be back soon with more creations!
xx


Stunning.
ReplyDeleteWhat size is this card. Way cute.
ReplyDeleteThanks C2- glad you like it. The card is 9.5cm x 19cm (3 3/4 x 7 1/2)for the base. It's not a standard size as I don't use card blanks, I simply fold whatever size takes my fancy!
DeleteA big fat giant WOW says it all!! Mwah to Keren!! Hugs, Darnell
ReplyDeleteHow do you get this card in an envelope and through the postal system when it hangs over the edge like this? You have gone to way too much work to have it destroyed. It's beautiful.
ReplyDeleteFabulous card!!!
ReplyDeleteHow do you get this card in an envelope and through the postal system when it hangs over the edge like this? You have gone to way too much work to have it destroyed. It's beautiful.
ReplyDeleteLinda, thankyou for your lovely comment, I actually fold a piece of card slightly overlapping over to where the main part of the card starts- so it ends up fitting into a more square envelope!!
DeleteKeren is so innovative and creative! Just love her work, and this card shows how wonderful her designs are! Bev
ReplyDeleteFab card. Such a great way to stretch your supplies by repurposing the left-over bits and thinking outside the box!
ReplyDeleteLOVE this, so creative and oh so GORGEOUS!!
ReplyDeletewow totally gorgeous..
ReplyDeleteIt's just magnificent, love the style and design!
ReplyDeleteBeautiful card. Love the layers and the wreaths. Gorgeous
ReplyDeleteWOW wow WOW
ReplyDeleteABSOLUTELY FABULOUS card Keren!!!
LOVE the EXCITING design and LOVE the DELIGHTFUL colours, an ALL-ROUND-AWESOME card, LOVE IT ALL!!!
THANK YOU for sharing your CREATIVE INSPIRATION and CLEVER tip with the copper accents too :)
Fabulous card! I know I'm in for a treat when I come to see your cards... always surprising and kind of eco-friendly, because you don't waste anything :).
ReplyDeleteKeren, I love love love love this card! Your work of layering is fantastic. That falling leaves are perfect!
ReplyDelete