Saturday, October 3, 2015

WCMD 2015 | Color Challenge with Heather

To get all the information about w&w WCMD 2015 CLICK HERE. 

WCMDblogbanner2014


Happy World Card Making Day! I'm so excited to be hosting a color challenge on the Winnie & Walter blog today, and I hope you'll want to play along using the colors aqua, mint, yellow and kraft. :)

To create my card, I started by adding diluted aqua, mint and yellow distress inks to a piece of watercolor paper, then setting it aside to dry.  I then used the Cover Model: Leaf Effect Cutaways (October 2015 Release) on a piece of white card stock.  Once the watercolor paper was dry, I adhered the leaf die cut and several leaves to the front, then trimmed off the left and right edges.  I then adhered the panel to the front of a kraft card base with foam tape.


I stamped one of the leaf images from In Bloom: Renee's Leaves (October 2015 Release) in Versafine Smoky Gray ink before heat embossing them with clear powder.  I then colored them in with the same diluted distress inks that were used on the background.  While the images were drying, I stamped the sentiment from Happiest of Holidays (October 2015 Release) in Versamark ink onto mint card stock, then heat embossed it with white embossing powder.  To finish up, I adhered the sentiment to the card front with foam tape, then cut off portions of the stamped leaves and attached them to the sentiment strip.

If you decide to play along, please link up your card/project using the colors above to my post on the W&W blog here.  I'd love to see what you come up with! :)

Have a great one!

Prize: One randomly chosen project that is linked up will win $50.00 gift credit to the w&w shop.

>>>LINK UP<<
w&wDT_heatherpulvirenti_blog-sig

WCMD 2015 | Watercolor with Vanessa

To get all the information about w&w WCMD 2015 CLICK HERE. 

WCMDblogbanner2014

Hello everybody! Vanessa here with a fun challenge for World Card Making Day. 

For my challenge, I chose one of my favorite techniques: WATERCOLORS. It's a popular trend right now and I am sure there are many watercolor fans out there! I love that I can create a watercolor card using so many different mediums, like Distress Inks, Gelatos, Watercolor Pencils or real watercolors. It's fun to experiment and most of the time you can not be sure how it turns out :)
Sometimes you think it'll turn out ugly, but once it's dry, you might love it! Ha, or vice versa. 

I created two samples for today. Look closely, you might get a peek of the upcoming release!


Here I used Derwent Inktense Pencils to color the gorgeous chrysanthemum (new release!!). I started with a panel of watercolor paper and stamped/heat-embossed the images. Then I applied water to the panel and, using a water tank brush, picked up color from the pencils to color the flower, the leaves and the background. For more fun, I flicked a bit of the color onto the background. After it was dried, I stamped and heat-embossed the sentiment using silver embossing powder. I adhered the panel to the card and finished it off with sequins.


The second card is a sample of playing with watercolors without knowing how it'll turn out. And I have to admit, I love how it turned out. For this background, I used Distress Inks. I pressed my ink pad onto a large acrylic block, spritzed the ink with water and dipped one corner of the watercolor paper panel into it. Then I cleaned the acrylic block and applied a new color. After spritzing it, I dipped the next part of the panel into it and so on. I repeated this with the whole panel until I was satisfied. Then I adhered the dried piece to my card base. I die-cut the rose and leaves from vellum and white card stock, layered them and adhered them to the card. Then I die-cut the "hugs" from card stock and fun foam and adhered it, too. Finally I added sequins.

Now it is your turn! Can't wait to see your take on my watercolor challenge, the possibilities are endless!

Vanessa


Prize: One randomly chosen project that is linked up will win $50.00 gift credit to the w&w shop.

>>>LINK UP<<


w&wDT_vanessamenhorn_blog-sig

October Leading Lady Keren Baker | Take One

keren-baker-oct2015


Today we are thrilled to introduce our October Leading Lady, Keren Baker.   A wife and mum of 6 from England, Keren is a published artist and 2014 Top 10 Gallery Idol.  Keren really impressed us with her ingenuity, cleverness, individuality and artistry.      

Over the next few Saturdays in Keren will be leading us on a journey of her own design and imagining.  Make sure to visit her blog, Keren Baker's Blog, to see more from her and for a chance to win a giveaway! 

Give Keren a big round of applause to welcome her as she steps onto the stage for her first performance as our October Leading Lady!    
Hello! It's so lovely to be here with you all.

I'm pretty chuffed to have been asked to be a Leading Lady (although being a 'lady' makes me feel really old!) and to be honest, I've hardly known which lovely Winnie and Walter supplies to choose. So rather than focus on one set or die, I've gone with a theme;
'Making more out of your dies!'

I had intended on just bringing you one or two ideas and then the theme progressed to using up what I'd already created for the previous card and it morphed slightly out of control ;-)

The first card is using a die to create a simple stencil with cardstock to add embossing paste through. I've used the fabulous Cover Model: Multifaceted Cutaway


By not adding paste through the whole die-cut stencil it gives a really interesting shape. I just made sure I masked it off well.

The central heart is from the 'True' stamp set and I've just embossed onto vellum and added some watercolour markers.


I wanted to do a 'multi layered' stacked technique next and used the In A Word: Hi Cutaway


This was tonnes of fun creating, I just die cut 9 layers of 'hi's' in different cardstock colours. Next, I sewed around the top layer in matching threads and just offset each layer whilst keeping each layer straight. Whilst making this card I realised that the left overs were in fact, a brilliant shape just perfect for another card. Spy the gap between the 'h' and if you trim it out and add a little 'stick', you'll end up with something like this!


I've also added The Big, The Bold and Friends Cutaways for the sentiment. I just wanted 'smile' so trimmed the 's' off. Wouldn't a row of ice-lollies make anyone smile!

When I had added the strips of cardstock to the 'Hi' card, I had lots left and so thought I'd create a striped effect with another die. I used the Cover Model: Multifaceted Cutaway along with In A Word: Friend Cutaway.


This was done using an acetate die-cut of the Cover Model. I added some Distress inks onto the acetate stencil, spraying it with water and then pressing onto a piece of cardstock. Dab any excess off and you get a pretty watercolour effect.


I added the left over strips onto a piece of card and die cut the In a Word: Friend Cutaway die out twice. This gave it dimension without detracting too much from the background.

The thing was, I had a lovely leftover striped piece that now needed using too ;-)


So, I backed it onto another piece of card. I added the negative black parts from another die cut piece and that finished it off perfectly.

Who knew that one lovely die would lead to so many other cards!

Whilst I can't promise 5 projects each week, I am going to be exploring some Winnie & Walter digital files next week and using them with stamps and dies to get a different look.

Thanks for letting me join you this week, I'm really looking forward to being with you next week for Part 2!  

Keren x

w&w-supplies


WCMD 2015 | Welcome + Details + Craftie Challenge For All!

WCMDblogbanner2014

It is midnight of October 3rd here at w&w headquarters so we are kicking off the World Card Making Day (WCMD) celebrations!  Woohoo!

Beginning at 8:00 a.m. (CST) we will be posting challenges once an hour for 7 hours!  And at 7:00 a.m. you will get inspired by our October Leading Lady, the one and only Keren Baker!!  Wait until you see her cards!  She is hosting a giveaway on her blog as well, so don't miss that!

For right now let's get some of the nitty gritty information out of the way so we can have fun, fun, fun all day (and night) long!
  1. We want everyone to be able to play so there is *no* requirement to use w&w products although we would be thrilled if you did (and we have freebies in the shop and for our Facebook Family). ;-)  Please make a new card though!
  2. We will have all challenges open until next Sunday, October 11, 2015 at 11:55 p.m. CST to let you create a little more than just on WCMD because celebrations should never be limited to a single day, right?   
  3. If you are unable to participate in the challenges, simply comment on the posts.  We will be giving one prize to a randomly drawn commentor compiled from all WCMD 2015 posts.
  4. Add your link to the appropriate Inlinkz Link-up tool for that post.  You may enter as many times as you wish while the challenges are open.  There will a prize posted on each challenge and one card will be randomly chosen as a winner of that prize from those that Link-up.
  5. Have tons of fun!
>>>CHALLENGE LINKS<<<

>>>GRAND PRIZE<<<

We really want to reward those who enter multiple challenges.  The crafters who enter a different card for at least 3 of the challenges (hopefully all of them!) AND add GP to the name of their link (for example "Jane Smith GP") will be entered into a special pool to receive the Grand Prize.  Entering the WCMD Craftie Challenge below will qualify as 1 of those 3 challenges.    

What is the Grand Prize you ask?  We are giving away $100 credit to the w&w shop (just in time for our upcoming October 2015 Release)!

>>>WCMD CRAFTIE CHALLENGE<<<

So to kick off our challenges we have a fun and easy one for you just like we did for our second WCMD 2015.  Simply take a craftie.  A craftie can include a picture or two of where you are making all of your cards for WCMD (this may include the table you are working on, the room, locale, etc.), you crafting, your crafting companions, etc.  We simply adore pictures of crafting in action, crafty spaces and works in progress! Post about your picture(s) on your blog, instagram (#wwWCMD2015, #craftie), Facebook, gallery or the like and link them up below using the Link-up tool.

Craftie Challenge Prize: $25.00 credit to the w&w shop.

Enter the Challenge:


Now that you have all the information get comfy, grab your favorite drinks and/or snacks, inks, stamps, papers and the like and get your craft on!

Lots of love and happy card making,
Winnie, Walter, Julie and Shay.

Friday, October 2, 2015

Metallic | Happy Halloween with Heather P.


Hi, everyone! Heather P. here, and it's my turn on the Winnie & Walter blog today to share the card I've created using the Metallic theme as inspiration. 

To create my card, I started with a piece of white paper and stamped the spiderweb image from Moonlight in Versafine Ink to create the background.  I then photocopied the design onto a piece of white CS, then ran it through my Minc machine with silver foil.  Next, I die cut three scallops using one of the border dies from the Goldie Trim Cutaways on black CS, then adhered them to the foiled CS layer.


I adhered the foiled layer to a piece of coral CS, then attached it to a light orange card base.  I stamped one of the sentiments from Moonlight onto coral CS in black ink, trimmed one end into a banner shape then adhered it to the card front with pop dots.  To finish up, I used the Big, Bold and Happy Cutaways on a piece of silver foil CS and adhered it to the card front before embellishing with light orange enamel dots.

That wraps it up for me today, thanks so much for stopping by! :)

w&wDT_heatherpulvirenti_blog-sig


w&w-supplies


Thursday, October 1, 2015

Rerun No. 5 | Moonlight

w&w_rerun_logo

Welcome lovelies to our next monthly Rerun!

Each Rerun will provide plenty of inspiration focusing upon a featured product, a month-long sale on the featured product and a challenge (with a prize!).

w&w_Moonlight_web-wm

For our fifth Rerun we are concentrating on
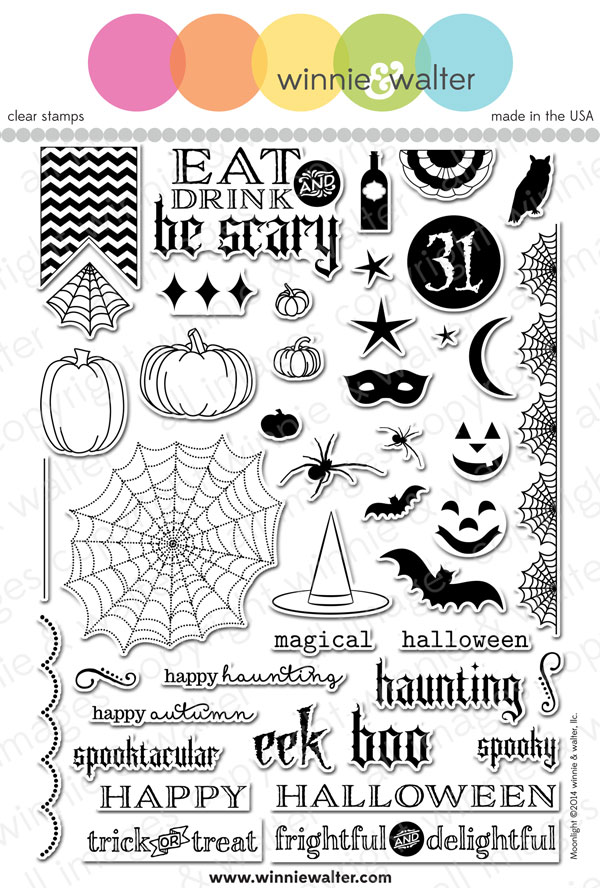
 Moonlight.  Moonlight is a frightful and delightful set that includes tons of magical elements for Halloween and autumn!  Pair it with A Tree for All Seasons or This Awesome House to create creepy and spooktacular scenes or add a touch of the macabre to your other products!

Now on to the cards!
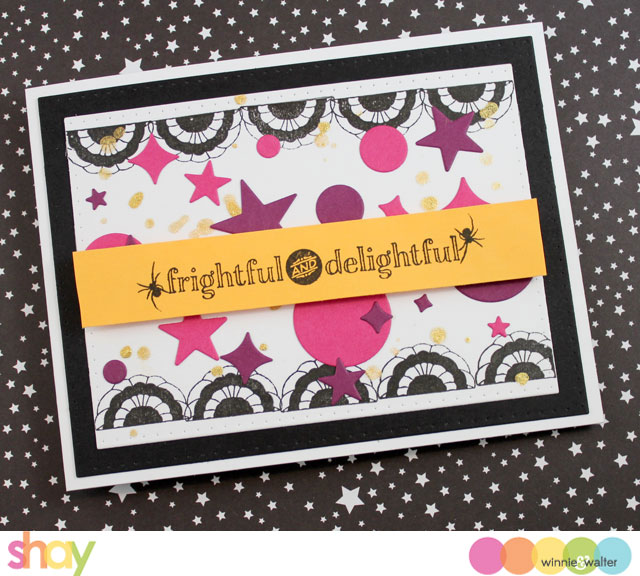
Shay

I must admit to having a deep and abiding love of Halloween.  I adore that there is a holiday that celebrates individuality, dressing up and sweet treats!  This set is so packed with images and sentiments that it will certainly become a Halloween crafting go-to.

Card No. 1

shay_1


I love to use black and white and for Halloween I like to pair it with bright rich colors.  In Moonlight is a small scallop looking stamp that can be used as bunting on 
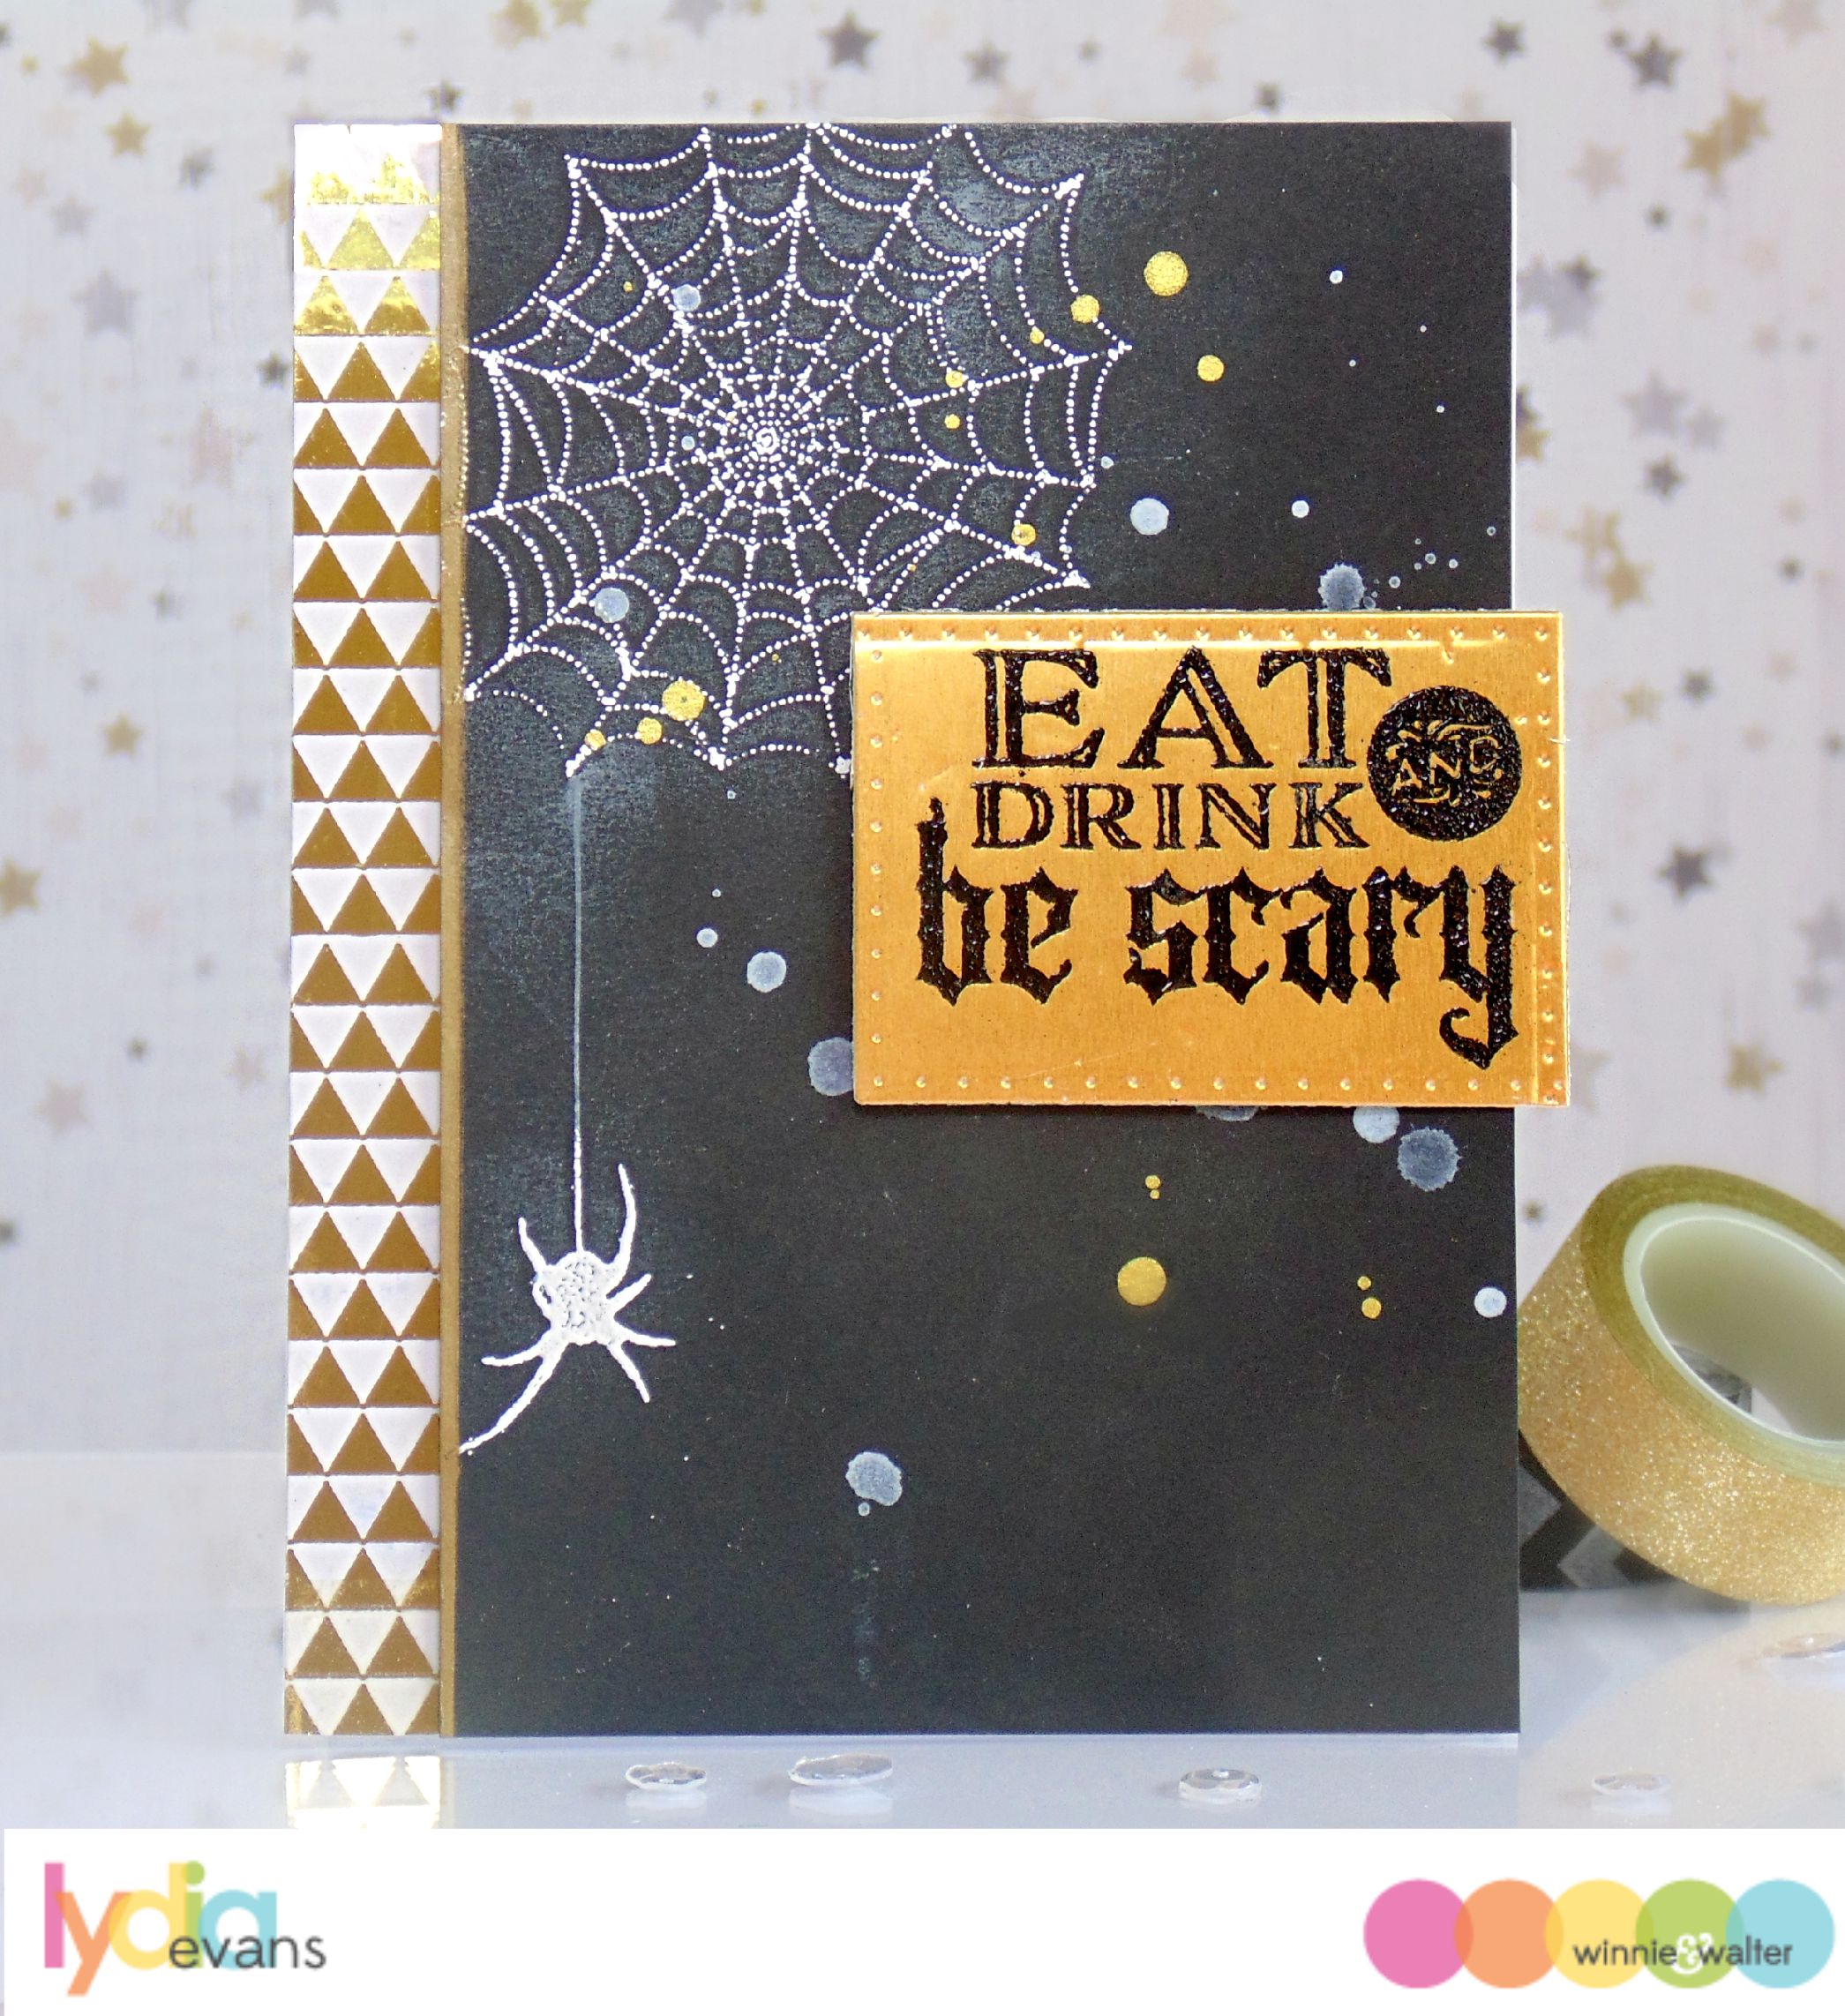
This Awesome House or as a decorative element.  I cut out the smaller rectangle from Essentials: Katharine Cutaways and stamped a border of the bunting in black.  I flicked gold spray onto the panel.  Next I cut out Big Bang Confetti Cutaways from fuchsia and purple cardstock and adhered them sporadically onto the white panel.  I adhered the white panel to a black layer created from the largest rectangle from Essentials: Katharine Cutaways.  All the layers are then adhered to a white card base.  On a strip of golden yellow cardstock I stamped the sentiment and smaller spider and adhered it to the card using dimensional foam adhesive.

Card No. 2

shay_2

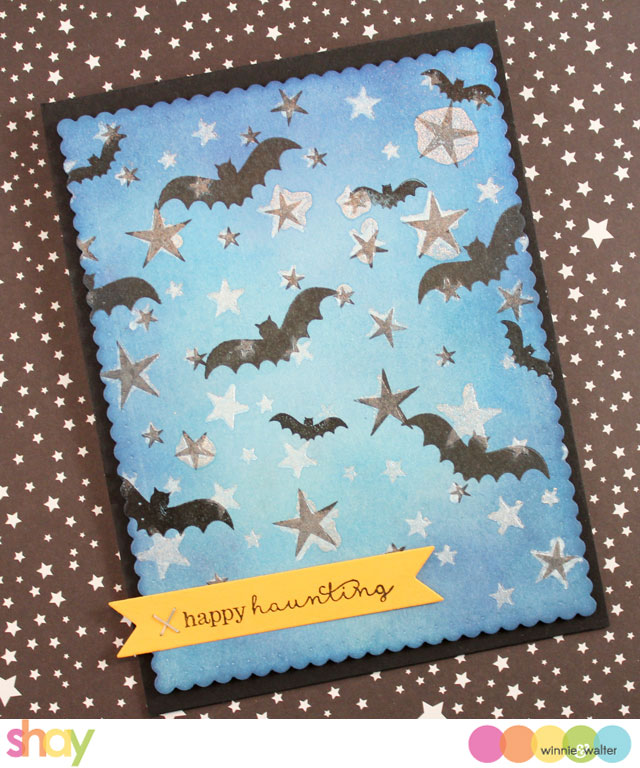
Making backgrounds with Distress Ink has to be one of my all time favorites.  On the piece of white cardstock cut with the larger rectangle from Essentials: Audrey Cutaways I used various blue Distress Inks and an ink blending tool to create the background.  Then using Scenery: Big Bang Classic Star Creative Screenings I sprayed white and shimmer sprays and then ran it through my Cuttlebug to emboss the stars from the stencil for more texture.  I over stamped some of the stars with the stars from Moonlight in black and also stamped the bats from Moonlight.

On the banner cut from Essentials: Katharine Cutaways I stamped the sentiment from Moonlight and attached the banner to the sky panel and black card base with the Tim Holtz Tiny Attacher.

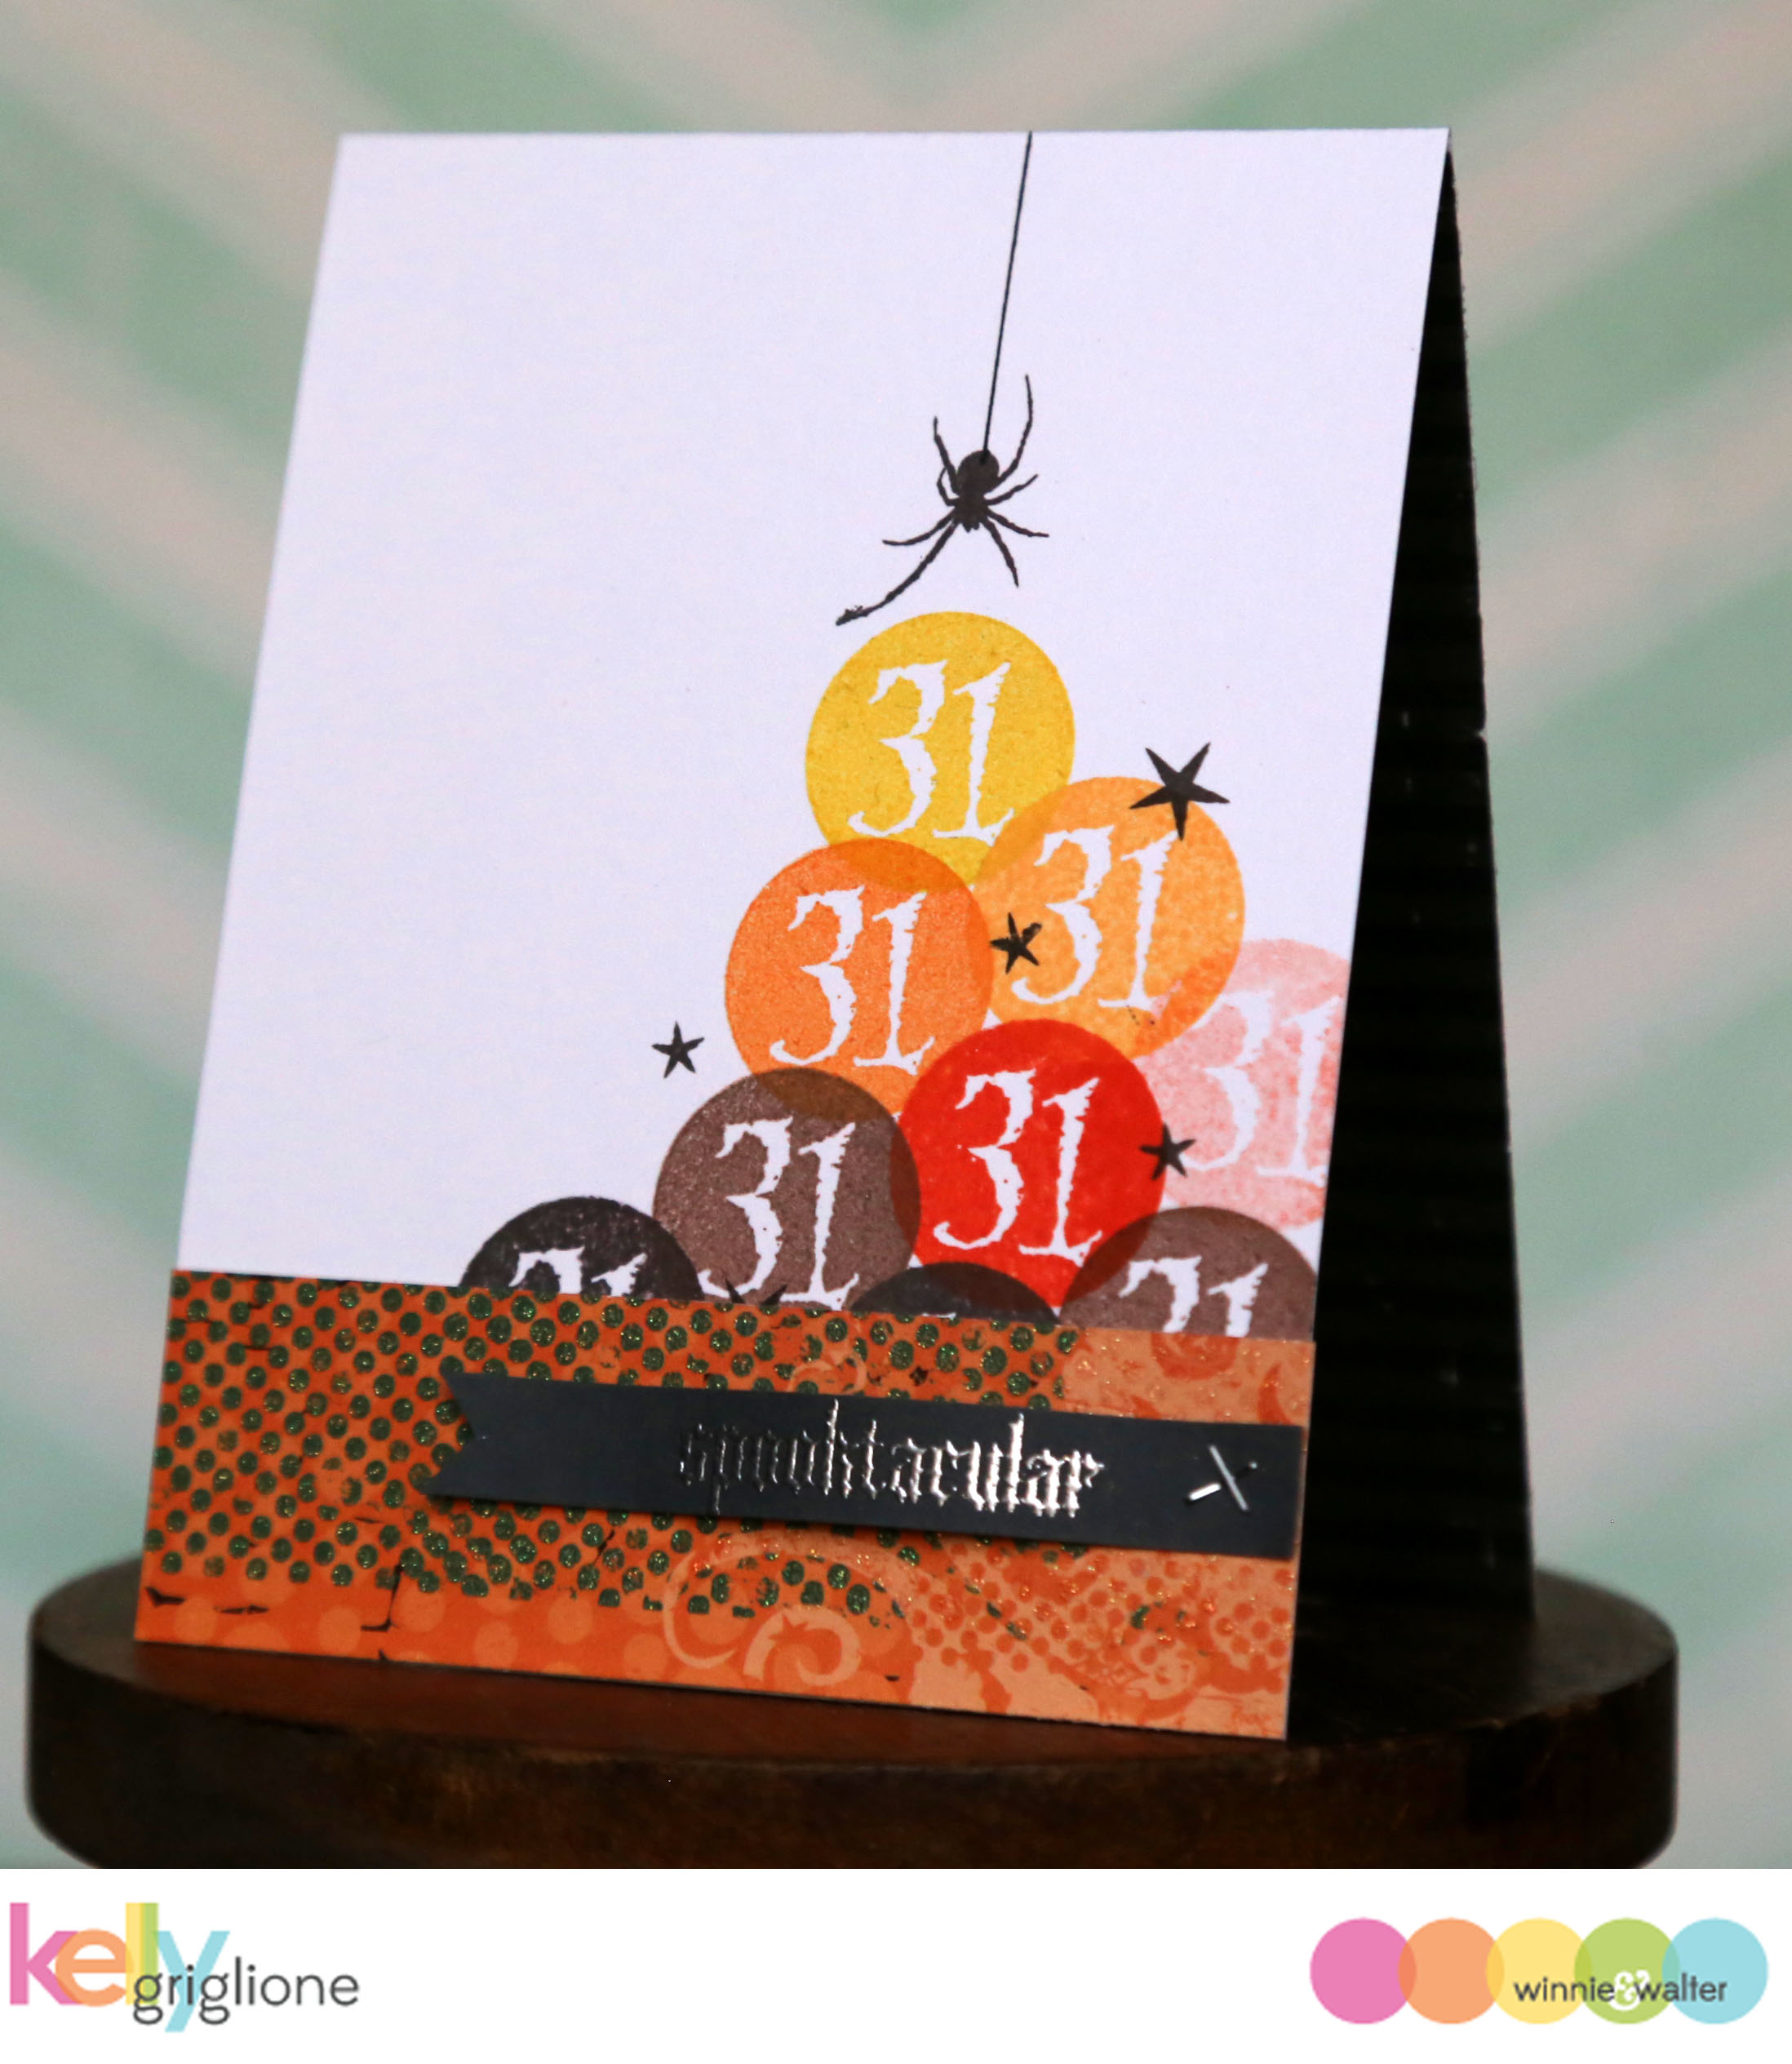
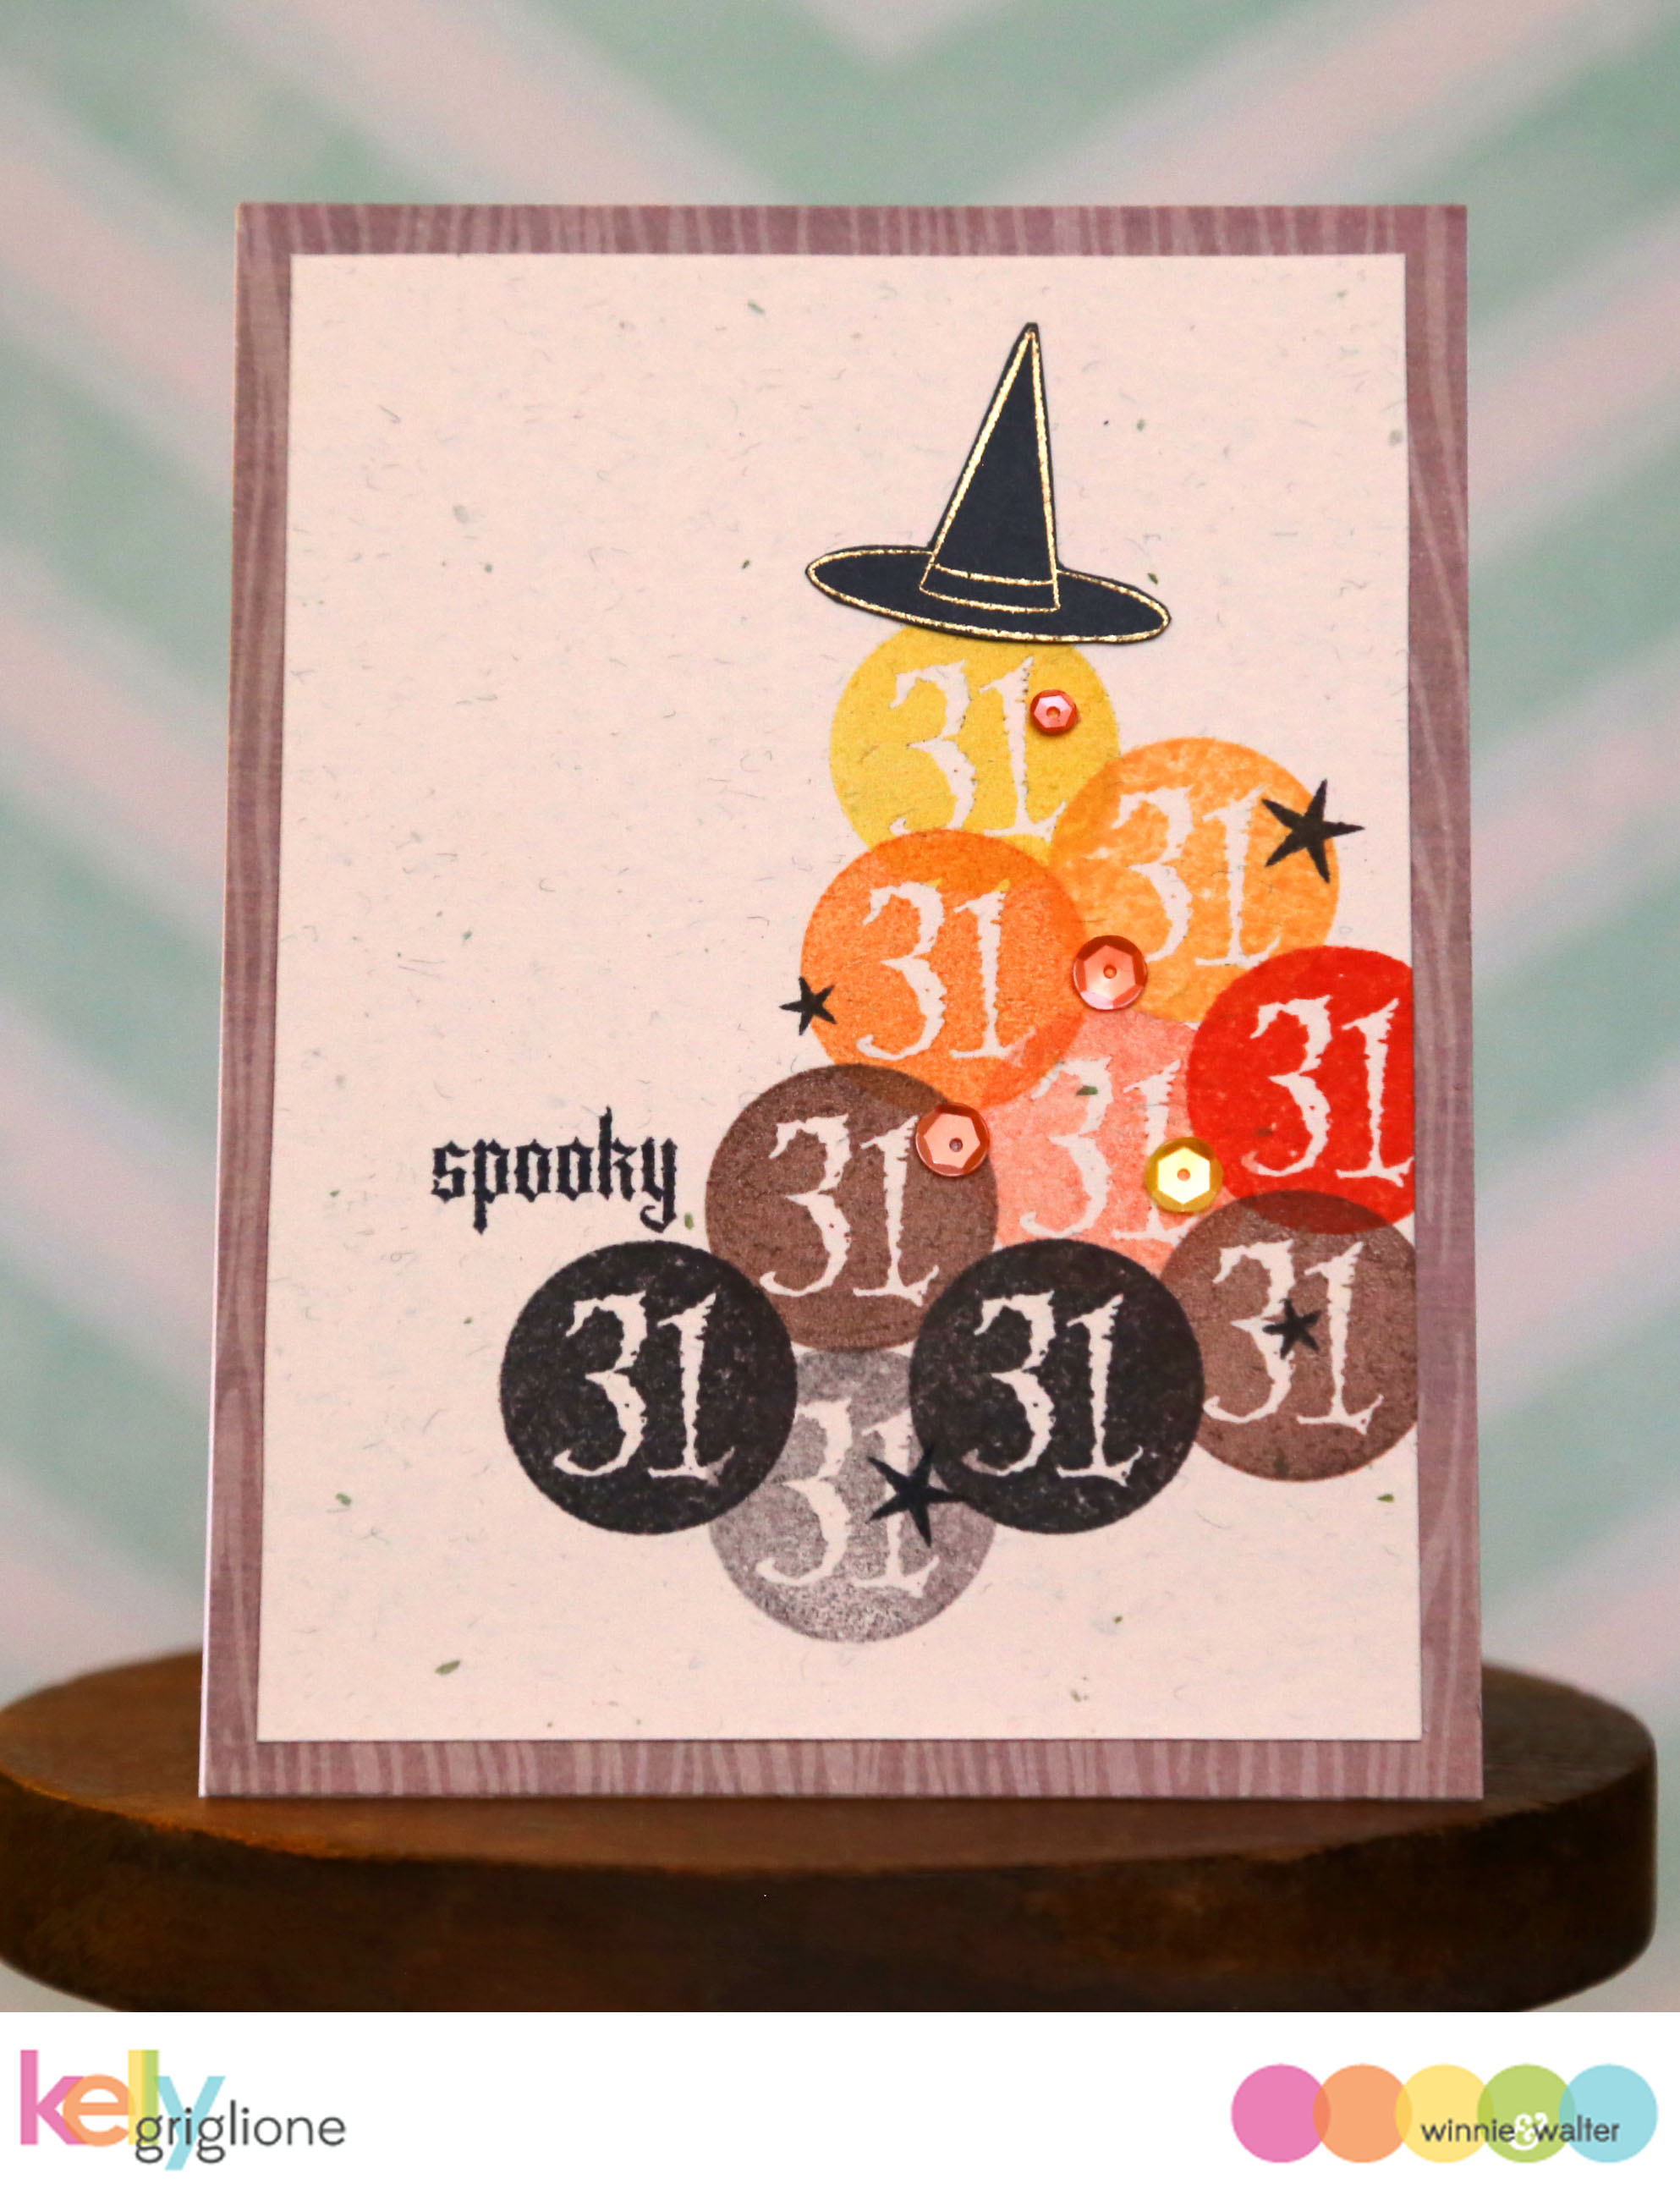
Wait until you see what Kelly, Vanessa and Lydia did with Moonlight!

>>>THE TALENT<<<

kelly_griglione_Spooky Halloween Card w&w Moonlight
kelly_griglione_Winnie and Walter Moonlight Halloween Card
CLICK HERE to see more from Kelly.


rerun5Vanessa
CLICK HERE to see more from Vanessa.

lydia_evans_DSC06301

CLICK HERE to see more from Lydia.

>>>CHALLENGE<<<

Now it's your turn to play along with Rerun!
  1. Create a new project using Moonlight (and/or the coordinating cut files).  An alternative to using Moonlight (and/or the coordinating cut files) is to create a new project using one of the projects featured in this post (or any Rerun post throughout October) as your inspiration.  Make sure you use at least one (1) w&w product (this can include a freebie) in your project.  If you choose the alternative to using Moonlight (and/or the coordinating cut files), please include in your post or project description which project inspired you and how.
  2. Link up your project here by 11:55 p.m. CST on October 31, 2015.  
  3. Enter as many times as you want before the deadline.
  4. This Rerun Challenge may be combined with other challenges found here on the w&w blog or elsewhere.
One project will be randomly chosen to win $25.00 credit to the w&w shop!  The winner will be announced on the Giveaway Winners page or in it's very own post on the w&w blog.


Wednesday, September 30, 2015

Metallic | I Heart You with Lydia Evans

DSC06278v

Hi there, it's Lydia here with you again on the Winnie & Walter ! I'm so excited to be sharing another video with you again today! Again as this months theme is 'Metallic' I wanted to share with you another technique to put some metallic shine into your crafty makes. This time I have focused on craft metal and how you can hand emboss stamped images to create a super 3D effect.

  DSC06278

I have used the heart shaped gem from 'My Precious' and stamped on the back of the craft metal and embossed it from behind to get the heart to really pop! I love the way that the heart jewels catch the light in all different ways, so fun.

  DSC06280

The sentiment is from 'True' and I just think it is so fun to match with those pretty embossed 3D hearts.

  DSC06282

Here's the video on how I created this card....


Here's a direct link:

https://www.youtube.com/watch?v=cBHCyfbKesY

I really hope you enjoyed the video and like my card!

I'll see you again soon!

Hugs, Lydia x

w&wDT_lydiaevans_blog-sig


w&w-supplies


Tuesday, September 29, 2015

Spotlight on Lisa Lahiff...Part Deux!!

spotlight-lisa-lahiff

We are so happy to have Lisa Lahiff back with us for another stupendous post with an emphasis on the metallic!  If you missed learning more about Lisa and seeing her first post full of beautiful and innovative metallic projects CLICK HERE!


Now, it's Lisa's time to sparkle and shine...  


Hello!  It is Lisa back here with you today, and I am so thrilled to have one more day to share some metallic awesomeness with some amazing Winnie and Walter goodies!!!!  Let's dig in...


For this first card I had a lot of fun layering up various patterned papers by My Minds Eye for a bright and eclectic background.  I then went ahead and ran my In a Word Happy cutaway through my machine three times with three different foiled papers.  I love not only the thickness, but by stacking them up slightly to the side of each other, you are able to see all three colors.  I then diecutted the tag from the Essentials:Audrey Cutaways, and stamped the birthday sentiment from The Big the Bold and the Happy Stamp Set.  I finished my card off with some twine tied at the top of the tag, faux stitching down the side of the card and some sequins that came with my Winnie and Walter happy mail!


This next card was created using The Big, the Bold, and the Merry Creative Screenings. I wanted to create a metallic background for my sentiment to really pop in the shaker frame so I started by using reposition-able adhesive on the backs of the "merry" and "christmas" creative screens.  I then used a gold metallic ink and applied it to the entire background with a blending tool.  I carefully removed my screens and had a nice negative of my sentiment.  Next I used the  Essentials:Audrey Cutaways to create my frame with patterned paper, adding various sequins including 4 mm Metallic Gold Cupped Sequins, and 6 mm Sparkling Clear Sequins by Pretty Pink Posh which can be found in the Winnie and Walter Boutique to create my shaker element!  I added a sparkly paper bow to the corner as a finishing touch.


I am so excited to show you this last card as it has a lot of firsts for me on it!  For one the background was diecut with household aluminum foil, which was so fun to try! (Warning make sure you pull the die cut out gently as the foil is very fragile and thin to work with.)  Then I was trying to think of what else I could do with this cut, and how to add some color when embossing popped into my mind.  So that's what I did!  Using the In Bloom: Lola's Bouquet with Joni Andaya Stamp set and a watermark ink pad I embossed and double embossed various images for a fun floral design.  I then stamped and embossing my "hello" sentiment from The Big the Bold and the Happy Stamp Set.  Finally, I propped it up with foam adhesive onto a panel of vellum with foil before adding it to my cardbase.  I wish you could see the beauty of this card in person, the shine of the aluminum and the layers of embossing are just gorgeous!  Anywho, I hope I was able to capture just a little of its beauty for you to envision the real look of it!

I want to end my post with a warm and most sincere thank you to both Shay and Julie for shining the spotlight on me.  I have had an amazing time just playing and having fun with lots of Winnie and Walter products, and I know I will continue to do so for a long time to come.  You both are so welcoming, warm, and encouraging that you make the crafting community a better place.  Many hugs for you both!  I must also thank Winnie and Walter for letting me come on this blog to play!  And finally a heartfelt thank you to you for stopping by and visiting my work, your kind words have been so motivating and appreciated.

Happy Crafting!
Lisa