Saturday, August 13, 2016

August Leading Lady Nina-Marie Trapani | Take Two

Our August Leading Lady, Nina-Marie Trapani, is back for her sensational second performance!  If you missed her smashing debut you must see it...CLICK HERE.  Today see how she adds a personal touch to create phenomenal projects!

Ladies and gentlemen, Nina-Marie....

Hi friends! Welcome back to my second Leading Lady post for Winnie and Walter! Today I will be sharing a card I created featuring hand drawn elements and loose watercoloring.

  Nina-Marie_Trapani_august2016 

I think adding some of our own personal touches to our cards, really makes them stand out and add that "something special" to a design. I do this often by doing something as simple as adding in patterns to outline images, or more detailed like drawing in elements to build/finish off a scene... And this is what I did in today's card! I used a group of super cute birds from the LS Exclusives: So Tweet with Evelin T Designs stamp set from Winnie and Walter and both hand drew/watercolored the tree scene they are set in.

  Winnie and Walter Leading Lady Part Two_2

This may seem a bit daunting, especially if you don't feel comfortable drawing. But trust me, this really is forgiving, easy and FUN! The style of these birds from LS Exclusives: So Tweet with Evelin T Designs really lends to a more "loose" feel and doesn't require you to be super detailed with your drawing; the more "sketchy" your hand drawn elements are, the better! I started off this card by stamping the birds onto Strathmore Bristol paper in Simon Says Stamp Intense Black ink (because this ink is waterproof and I will be watercoloring today). I then used a multiliner pen and sketched out some tree branches around the birds, making sure to keep an odd number to help balance out the design.

Winnie and Walter Leading Lady Part Two_3

I then used my Zig Clean Color markers to watercolor everything in; I've got the colors broken down for you below so that you can reference the color combinations if you are interested.
  • birds: Geranium Red, Wine Red, Blush, Sugared Almond Pink, Yellow, Ochre
  • trees: Beige, Dark Brown, Light Green, Deep Green, Green
  • sky: Shadow Mauve, Light Blue, Green Shadow
When coloring the tree leaves with my Zigs, I applied scribbles of color (one shade at a time) and then blended it out with my water and brush. I would repeat this with each color of green, drying between each layer of color, until the entire leaf cluster was finished. You'll also notice that the coloring on these images is a very artistic, free flowing style... or maybe you'd call it messy! :) I love the look of a looser watercoloring, where the color extends past the outlines of the stamped images. I've done this before with other cards and the finished result is always beautiful! This too is very easy to do and there are a couple ways you can achieve the results.

Winnie and Walter Leading Lady Part Two_1

The most important part of this technique is allowing the water to move your colors wherever it wants. I know this can be a bit nervy for those of us that like to have more control over their coloring. But truly, this is what is going to give you the most natural looking results; if you try to "control" where it goes outside the lines by painting outside the lines intentionally, I find it never feels quite right. So the two methods I love most for loose watercoloring techniques are:
  1. water then color: first spray areas of your image with water, before applying any color down. This will result in the color spreading as you drop it into the wet areas of your image. Depending on the type of watercolor medium you are using, this may be a bit tricker for some images. For the scene I was creating in this card, I skipped this method and used method two, but I wanted to mention this one because I use it and have had great results with it.
  2. color then water: for this method I color my images (inside the lines) first, then take a spray bottle and apply water over my colored images to get the color moving. I usually start off pretty light with the initial sprays of water as you want to stop before your coloring starts to move too much... because then you risk it becoming muddy.
Winnie and Walter Leading Lady Part Two_5
To finish off this card, I used The Big the Bold and the Comfort stamp and die sets from Winnie and Walter to create a sentiment that reads "Prayers, comfort and love". I think the bright, cheery colors paired with the heartfelt sentiment would be sure to lift up the spirits of the recipient. I painted the prayer die cut using the same red Zig markers that I used for the birds, which helped tie it all together in the design. I hope today's card has inspired you to try adding in some hand drawn elements of your own into your card designs... this really is a great way to stretch not only your stamp sets, but also your creative muscles!    

GIVEAWAY!

w&w_30giftcard

Before you go, I want to tell you that Shay was SUPER generous in allowing me to giveaway a $30 gift certificate to one of you, which can be used in the Winnie and Walter store! How cool is that?? BIG thank you to Shay for being so sweet!

To qualify for the giveaway, make sure you leave a comment on any of my Winnie and Walter blog posts (commenting on each Saturday post this month will count as extra chances to win the giveaway). After the last Leading Lady post at the end of the month, I'll draw a random winner from all the collective post comments.
   

PRODUCTS

If you are interested in any of the products used in this post, I have them all linked below. Affiliate links used when possible.

Friday, August 12, 2016

Tone on Tone Stamping with Gayatri

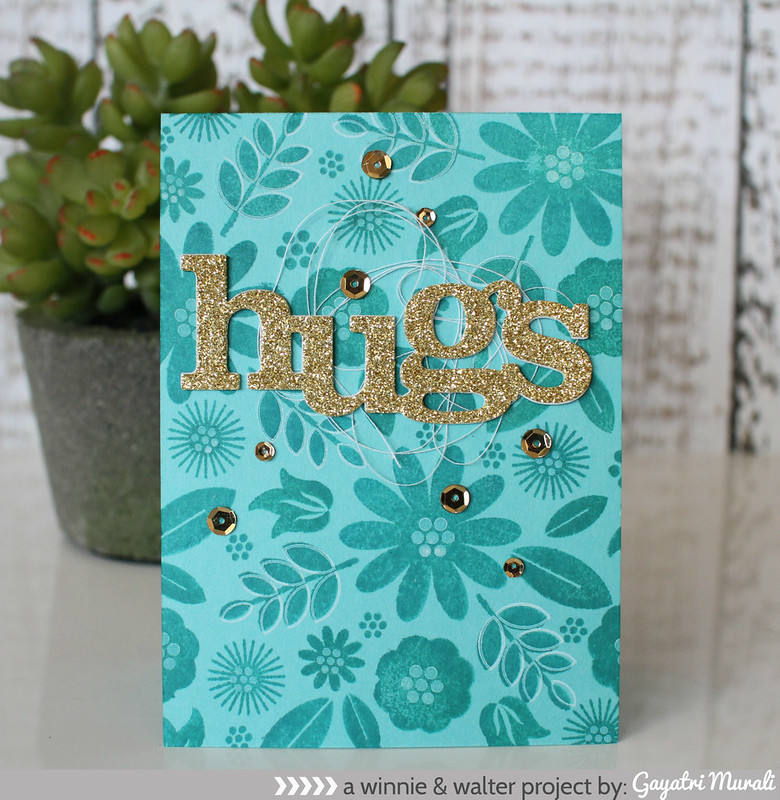
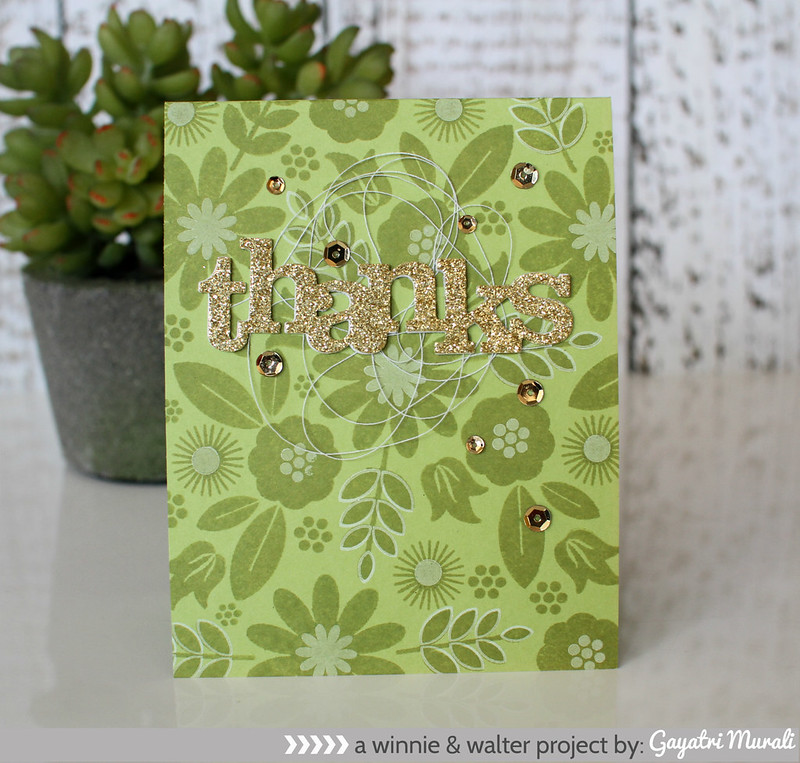
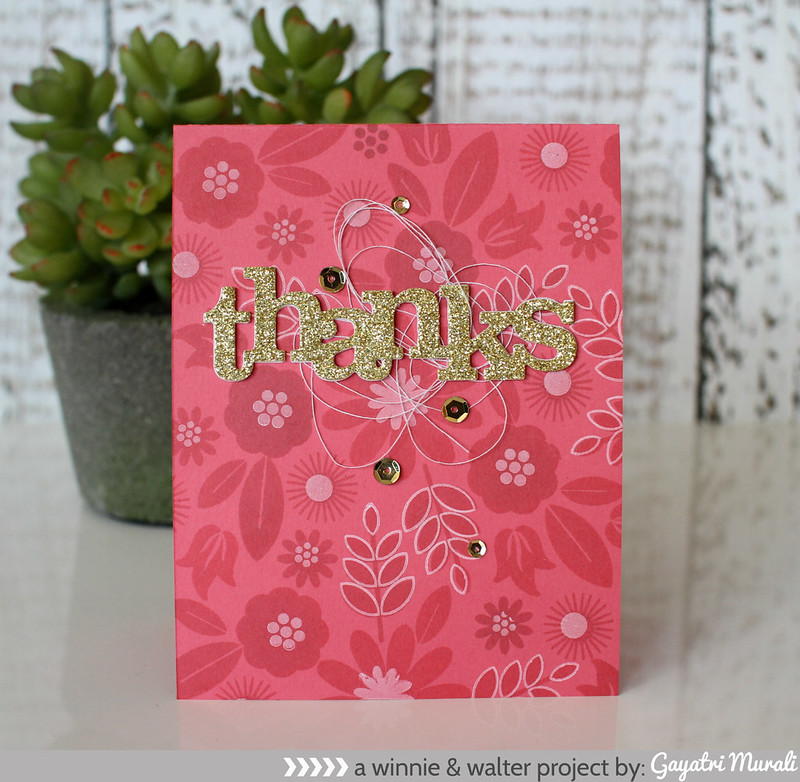
Hey everyone! Welcome back. I am so glad to be back showcasing Winnie & Walter products. I have three cards for you today using tone on tone stamping technique. All three cards follow the same technique just different colours, different stamping layout and sentiment. So I will share all the three cards first and then explain how I made it.

Hugs

Thanks card!

Thanks red card

I picked three bright coloured cardstocks - red, green and blue. I made card base out of the three coloured cardstocks. Then I picked In Bloom: Eva's Favourite Flowers stamp set to stamp on the card fronts. I picked this stamp set because of the solid floral images in the set. Also the set also have outline images and layers for the florals as well. The outline and layer images will work well to add accents to the tone on tone stamping. So here is how I made these cards.

1. I picked the ink colours which were a bit darker shade to the coloured card base. I chose Lipstick Red, Jelly Bean and High Dive SSS inks. As you can see my High Dive ink is a bit dry and so it is blotchy on my blue card. You can overcome this by either choosing a good juicy ink or using MISTI to double stamp the image for even coverage. I chose to share the card to show these things happens to all of us.

2. After stamping the blue card front one stamp at a time with acrylic blocks and not getting good results, I switched to my MISTI. I clustered the images and stamped the green and red card front. Some of them were double stamped to get even coverage. Love the tone on tone stamping. Subtle and beautiful. I let them all dry.

3. Then I die cut the sentiments for the cards. I have used In a Word: Hugs and Thanks cutaways. I die cut them in gold glitter cardstock and a few using white cardstock to stack and glue them with the gold glitter die cut on top for added dimension.

4. I went back the card front to stamp the details on the flowers and leaves using white pigment ink. The white pigment ink is vibrant when stamped on top of the dye ink when dry. Otherwise the colour of the dye ink seeps through the white pigment ink making them a lighter shade of the dye ink. Love the white layering details on the card front.

5. I added some bunched up thread behind the die cut sentiment and adhered on the top centre of the card front.

6. Finally embellished with gold 6mm and 4mm sequins from Pretty Pink Posh.

This technique is simple and easy to mass produce. All you need is solid and detailed layering stamps on the set. So if you are starting you Christmas cards, this is one technique you can use. These are also almost one layer cards. No bulk and easy to mail. If you like to step it up, die cut the card front using one of the rectangle dies from Essentials cutaway and adhere on a card base using craft foam for dimension.

Here are the Winnie & Walter's products I used on my cards:

1. In Bloom: Eva's Favourite Flowers
2. In a Word: Hugs
3. In a Word: Thanks

Hope you like my cards today. Thanks for stopping by today.

My blog signature

w&w-supplies

Thursday, August 11, 2016

The Gossip Column with Taheerah Atchia No. 4 | Hot Gossips + Gossip Queen Announced
Welcome back, fellow Gossipers! We've been so thrilled with the response to the latest issue of The Gossip Column! We continue to be ever thankful all for your kind words, comments, shares, and your enthusiasm for this exciting feature on the w&w blog!

We were bowled over by the quality of each and every entry - you all certainly seemed to embrace the spectrum and use it in a variety of techniques and designs and we were so impressed!!

Just to recap, for this challenge we wanted to see you use the colours of the spectrum in your creations, with extra credit for outside-the-box interpretations and designs! We loved the results - some of the entries were just jaw-dropping!!

We thought long and hard, and finally arrived at our decision for this column's Hot Gossips (runner-ups) and Gossip Queen (winner)!!

Drumroll please... 

lisa_IMG_6714 
Lisa's Creative Niche created a bold, prism-inspired card that totally packed a punch! Her use of the coloured strips of glitter paper (glitter paper!) was just such a clever way to interpret the splitting of light, and the composition brings perfect focus to her sentiment too! I loved the everything about the clever interpretation that went into this card! Lisa this card is definitely Hot Gossip!!

marianne_WWstlEE_ChristmasTree1_MV 
Marianne's amazing card (in fact, trio of cards - you have to check out her post!) involves such a clever technique that it's worth its accolade for that alone! I loved her perfectly watercoloured trees - not at all easy to do with a solid stamp! And the clever kiss-stamping to incorporate flowers just sends me over the edge! Marianne this stunner rightfully makes you Hot Gossip!!

And that brings us to our spectrum-tastic Gossip Queen... 

sabina_flower3-1024x768 
Sabina F.... can we say 'rainbow within a rainbow?! With the clever use of repeat stamping, watercolour and perfect blending this card was already a winner - but to add a rainbow shaker element in the centre is just a brilliant way to represent a double rainbow, and filling it with clear microbeads means that nothing takes away from the design. So very clever and perfectly executed - I was awestruck and could just stare at this card all day! I couldn't help but name her Gossip Queen!!


Lisa and Marianne you both win a $15 credit to the w&w store, and Sabina you walk away with a $30 credit! Congratulations!! Please contact info{at}winniewalter{dot}com to claim your prizes!!

Please join us in congratulating these fantastic ladies and their amazing creations!! Everyone's entries were of such a high standard and you all deserve the plaudits too!! Please do take some time to browse the gallery to see everyone's work - you can find them at the bottom of the last The Gossip Column here.

For all you Gossipers who are keen to get the latest scoop, issue 5 of The Gossip Column will be hot off the press on Friday 2nd September! We'll see you back here to get the exclusive on the latest gossip then!!

'Til then - keep on gossiping!


Taheerah

Wednesday, August 10, 2016

Rerun No. 13 | Kindness with Vanessa
Hey everybody! Vanessa here with a card combining two beautiful stamp sets. I used the pretty flowers from In Bloom: Lola's Bouquet with Joni Andaya to create a background and Kindness with Evelin T Designs to add a matching sentiment.


First, I die-cut a panel from white cardstock with the large rectangle die from Essentials: Katharine Cutaways. Now I stamped my background, masking flowers and leaves to create depth and avoid overlapping images. I covered the finished piece with another rectangle die-cut from vellum and adhered the panel to the black card base. Then I stamped and heat-embossed the sentiment onto a strip of pink cardstock and adhered it. I stamped the "Kindness" with my Misti onto white cardstock, inking the stamp with various inks, and die-cut it with the matching die. Now I die-cut the word from fun foam, layered it with the stamped word and adhered it. Finally, I added matching sequins to the card.


I love all the new dies that match the beautiful stamp sets! I hope you like today's inspiration! Thank you so much for stopping by!

Vanessa

Editor's Note: If you would like to win In Bloom: Lola's Bouquet with Joni Andaya and/or participate in our Rerun Challenge No. 13 focusing upon In Bloom: Lola's Bouquet with Joni Andaya please CLICK HERE.

w&wDT_vanessamenhorn_blog-sig


w&w-supplies

Monday, August 8, 2016

August Color Combo with Heather H.

Good morning! Heather here stopping by this morning to share a card using a color combo from Pinterest - something I have been having lots of fun with lately! Color combos used to stress me out for some reason, so it is kind of funny that I have developed a love of them recently! Without further ado - here is my card for today:


And here is the color combo that I was inspired by:


As I was flipping through my Winnie and Walter supplies, I came across my Lulu Fringe Cutaway die and realized it had been a long time since I had used it, so that was where I started for my inspiration. I die cut it 3 times in white cardstock, then applied some distress inks in an ombre effect. Once I finished that, I tore along the bottom edge to remove one of the solid portions so that the fringe hung free - I love the rough look that the tearing accomplished!


I layered those onto my cardbase with some strong tape, then die cut the thanks word from The Big, the Bold, and the You Cutaways and attached it with a bit of machine stitching along the bottom. Finished off with some various sizes of clear sparkling sequins, and then used the same distress inks to mix water and add some splatters, just because it felt like it needed a little something more!


What do you think? Do you enjoy using color combos? Does this one inspire you? If you decide to use it to create something - I'd love to see what you make! Leave a link in the comments and I'll come visit you!

Thanks for stopping by - have a wonderful day!

w&wDT_heatherhoffman_blog-sig 2

w&w-supplies


Saturday, August 6, 2016

August Leading Lady Nina-Marie Trapani | Take One
Nina-Marie_Trapani_august2016

Today we are thrilled to introduce our August Leading Lady, Nina-Marie Trapani.   Nina-Marie is an accomplished illustrator, designer and artist whose impeccably crafted projects blow us away and we know you will be just as amazed and inspired.  

Over the next few Saturdays in Nina-Marie will be leading us on a journey of her own design and imagining.  Make sure to visit her bl
og, Nina-Marie Design
, to see more from her and for a chance to win a giveaway! 

Please give Nina-Marie a big round of applause to welcome her as she steps onto the stage for her first performance as our August Leading Lady!    

Hello friends! Welcome to my first Leading Lady guest post for Winnie and Walter!

Friday, August 5, 2016

Rerun No. 13 | In Bloom: Lola's Bouquet with Joni Andaya (Challenge + Giveaway + Sale!)

w&w_rerun_logo

Welcome lovelies to our next monthly Rerun!

Each Rerun will provide plenty of inspiration focusing upon a featured product, a month-long sale on the featured product and a challenge (with a prize!) and *all-new* giveaway.  You will not want to miss out!

w&w_InBloomLola'sBouquetJoni_6x8stamp_webprv

For our thirteenth Rerun we are concentrating on In Bloom: Lola's Bouquet with Joni Andaya.  This set is bursting with possibilities with multi-step stamping, one layer and coloring opportunities and with its new coordinating cutaways what can be done is practically limitless.

Now on to the cards!

Shay

In Bloom: Lola's Bouquet with Joni Andaya really is a remarkable set and I am so happy with the versatility and options that Joni Andaya created when she illustrated the set.  I am thrilled we finally released the coordinating cutaways to increase the joys of crafting with this jewel of a set!

shay_IMG_4026

I cut out several flowers and leaves from pale pink, golden yellow and teal card stock using In Bloom: Lola's Bouquet with Joni Andaya Cutaways and then stamped over them with coordinating stamps in slightly deeper inks.  I arranged the flowers and started gluing them together.  Once I had the cluster put together I added foam dimensional adhesive to the back of the flowers.  I cut out "celebrate" from grey card stock from The Big, the Bold and Party Cutaways and adhered "celebrate" onto the flower cluster and used the Zig Wink of Stella Clear Brush Marker to add a little shimmer on the word.  I cut out the smaller rectangle panel from Essentials: Audrey Cutaways from white card stock.  I adhered the flower cluster to the white panel and then adhered them all to grey card base using foam dimensional adhesive.

That's it from me...wait until you see what Gayatri, Heather H., Kelly, Keren and Lydia did with In Bloom: Lola's Bouquet with Joni Andaya!

>>>THE TALENT<<<

gayatri_Enjoy your birthday CLICK HERE to see more from Gayatri.

heatherh_Cards-8-2-16-036
CLICK HERE to see more from Heather H.

kelly_Floral Birthday Card winnie and walter stamps_web 
CLICK HERE to see more from Kelly.

keren_IMG_6647 
CLICK HERE to see more from Keren.

lydia_DSC00179 
CLICK HERE to see more from Lydia.

>>>CHALLENGE<<<

Now it's your turn to play along with Rerun!
  1. Create a new project using In Bloom: Lola's Bouquet with Joni Andaya (and/or coordinating cutaways and/or the coordinating cut files).  An alternative to using In Bloom: Lola's Bouquet with Joni Andaya (and/or coordinating cutaways and/or the coordinating cut files) is to create a new project using one of the projects featured in this post (or any Rerun post throughout August) as your inspiration.  Make sure you use at least one (1) w&w product (this can include a freebie) in your project.  If you choose the alternative to using In Bloom: Lola's Bouquet with Joni Andaya (and/or coordinating cutaways and/or the coordinating cut files), please include in your post or project description which project inspired you and how.
  2. Link up your project here by 11:55 p.m. CST on August 31, 2016.  
  3. Enter as many times as you want before the deadline.
  4. This Rerun Challenge may be combined with other challenges found here on the w&w blog or elsewhere.
One project will be randomly chosen to win $25.00 credit to the w&w shop!  The winner will be announced on the Giveaway Winners page or in it's very own post on the w&w blog.
>>>GIVEAWAY<<<

Please comment on this post (make sure to include your email address in your comment) by 11:59 p.m. CST on August 31, 2016 for a chance to win your very own In Bloom: Lola's Bouquet with Joni Andaya stamp set!


EDITED TO ADD:
Winners will be announced Friday, September 23, 2016.

Thursday, August 4, 2016

Essentials by Ellen August Mix It Up Challenge with w&w

banner-MIX-it 

Hello lovelies!

It's Shay here with a project (or seven) for Essentials by Ellen August Mix It Up Challenge using Essentials by Ellen products + Winnie & Walter products.

CLICK HERE to read how you can enter the challenge for a chance to win a $50 gift certificate to Ellen Hutson LLC!


50 Store Credit


If you want to learn more about the projects I created grab your favorite beverage and get comfy as there are several images and I am long-winded.

If you joined us for Share the Love Week featuring Essentials by Ellen by Ellen Hutson LLC you know I love Essentials by Ellen products so to be able to play along with the Mix it Up Challenge using Essentials by Ellen products with w&w products was a dream come true.  I know I am not alone for being head over heels for the Essentials by Ellen Clear Stamps, Mondo Hydrangea ...seriously hydrangeas are one of my very, very favorite flowers to begin with and Julie Ebersole's blown up version is a delight to craft with so I decided to use that stamp set.

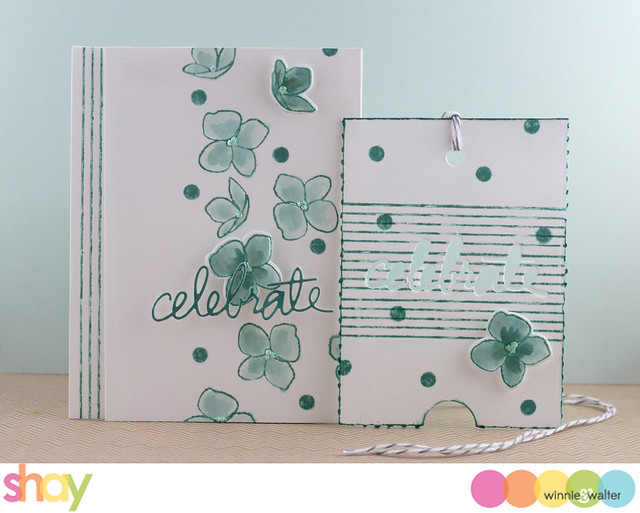
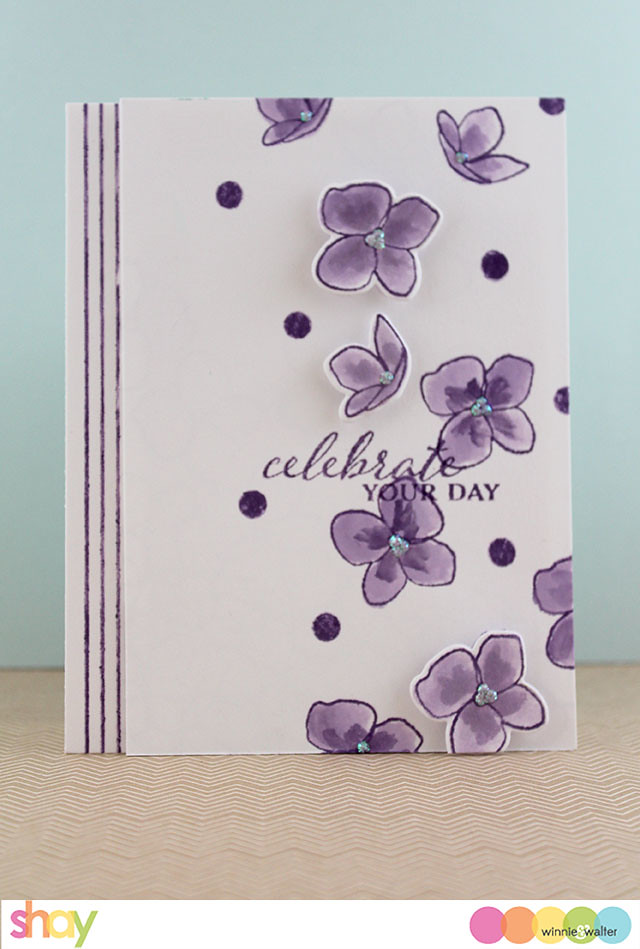
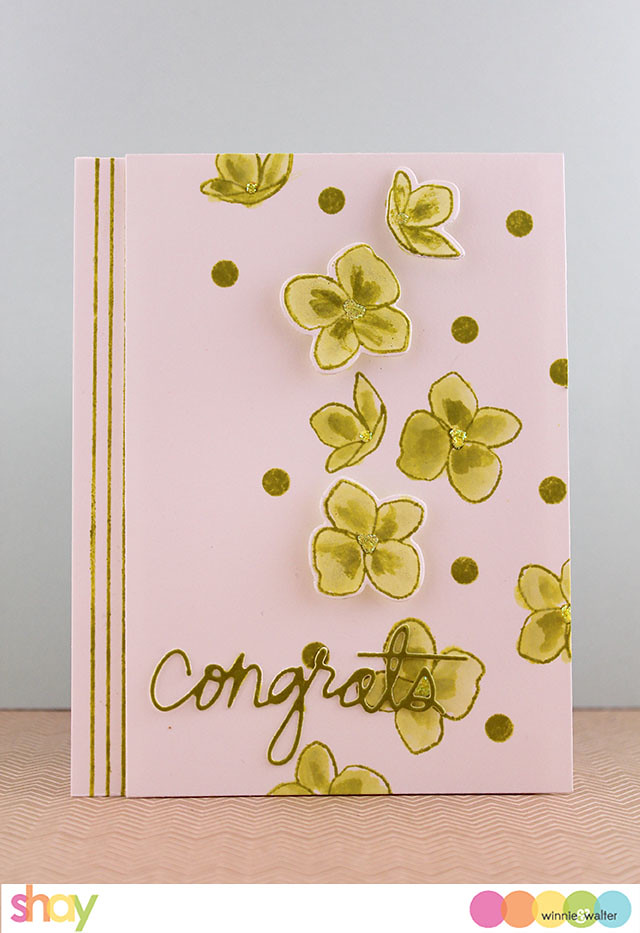
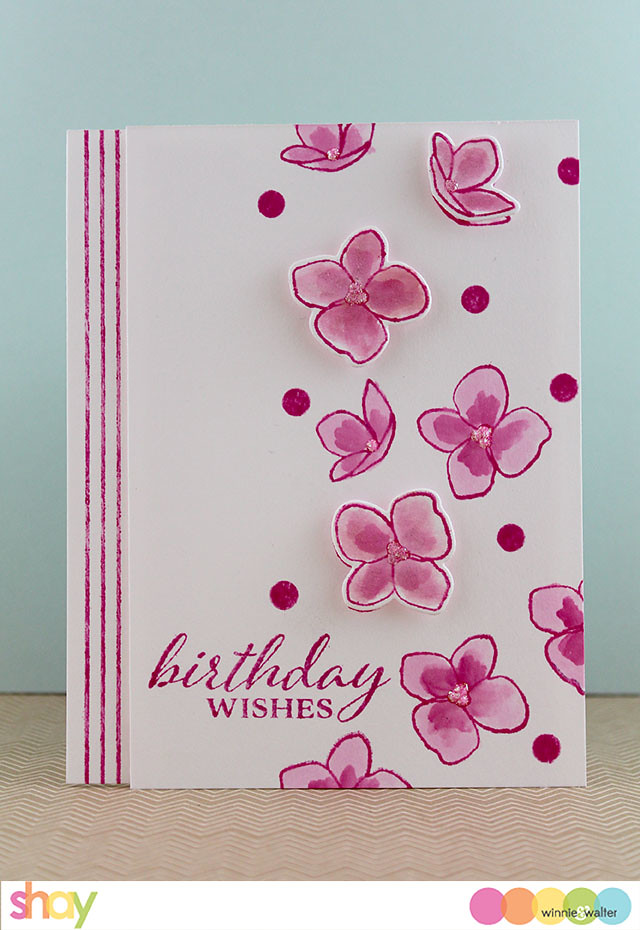
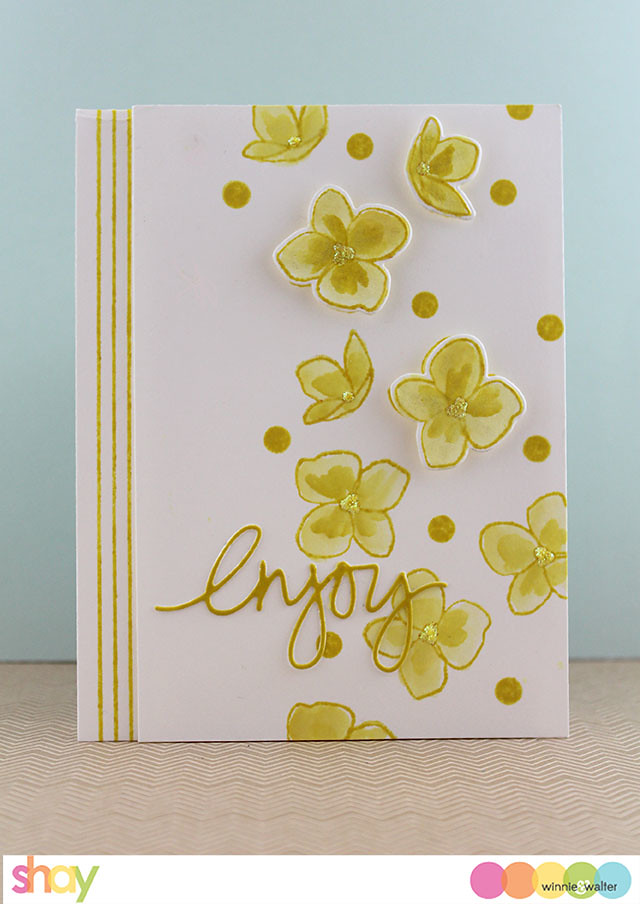
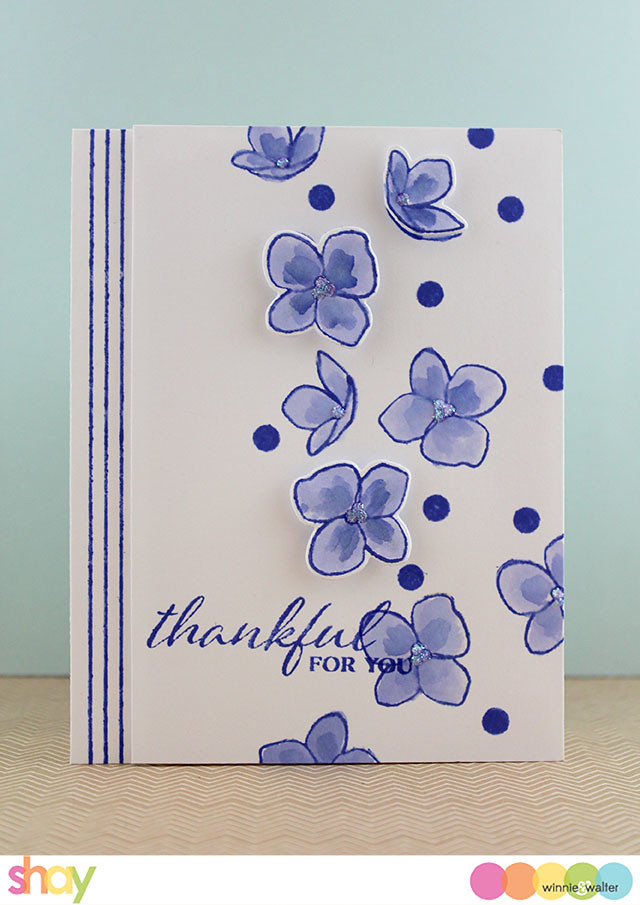
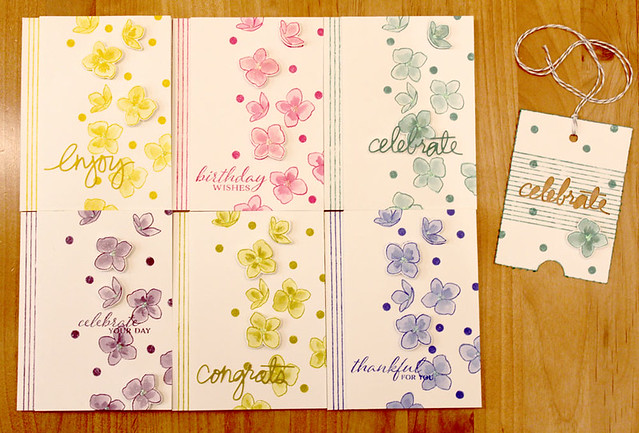
For my project I went with something I love to do: a collection of cards using the same design while changing up the color/sentiment per card.  As a bonus I also created a coordinating tag.  I had the tag match the evergreen bough card as I tied the tag onto a birthday gift to a friend and also gave her the matching card...the evergreen bough color actually blended in perfectly with the bag.

I love to see all of these cards together and also individually as although they are very similar by changing up the color and sentiment each has their own personality as well.  Plus now I have 6 cards + a tag in my stash without having to spend agonizing time on the design of each card.  Another idea is packaging up all the cards together to give as a gift.

Here they all are together (the individual photos will give you a better look at each of them):

ellen_mix_it_up_challenge_w

In evergreen bough with tag:
shay_IMG_4015

In dusty concord:
shay_IMG_4017

In crushed olive:
shay_IMG_4024

In picked raspberry:
shay_IMG_4022

In mustard seed:
shay_IMG_4018

In blueprint sketch:
shay_IMG_4020

Now for some simple steps of what I did per card:

1. On 6 separate panels of white cardstock I stamped the hydrangea petals from Essentials by Ellen Clear Stamps, Mondo Hydrangea in each of the Tim Holtz Distress Inks by Ranger (evergreen bough, dusty concord, crushed olive, picked raspberry, mustard seed and blueprint sketch) using a very similar pattern.  For Distress Ink I usually begin by inking up the stamp with Versamark for more even coverage of the Distress Ink.
2. I stamped 3 of each full petals and 1 of the folded petals in each color on a piece of separate white card stock.  After Step No. 3 below, I used Essentials by Ellen Designer Dies, Mondo Hydrangea by Julie Ebersole to die cut out the flowers.
3. Using a waterbrush and the Distress Ink I colored in each petal and then added Stickles (crystal) to the centers.  Set this aside to dry overnight or several hours.
4.  I added some dots randomly using the largest single solid dot stamp from Scenery: Big Bang Confetti.
5.  For some of the sentiments I used word dies from Essentials by Ellen Designer Dies, Zipper Panel by Julie Ebersole cut from white cardstock and for the stamped sentiments I used A Tree for All Seasons.  On the word die cuts I inked them up directly using the Distress Ink pad and let them dry before I adhered them to the floral panels.
6. I added the die cut petals on the panel using foam dimensional adhesive.  Over each petal I colored over it with Zig Wink of Stella Clear Brush Tip Marker.
7. On a white A2 card base on the left-hand side I stamped the stripes from Scenery: Stripes in each color.  I attached the floral panel to the card base with foam dimensional adhesive.

For the tag:

1. I cut out the Essentials by Ellen Designer Dies, Zipper Panel by Julie Ebersole and then carefully tore (at dashed lines) and cut out (at top score line) the center panel surrounded by the dashes and score line.  I cut out the "celebrate" from the center of the tag (I used the positive on the evergreen bough card).
2. Over the negative congrats I stamped the stripes from Scenery: Stripes 3 times in Tim Holtz Distress Ink by Ranger in evergreen bough.
3. I added one of the die cut hydrangea petal using dimensional foam adhesive.
4. I added evergreen bough ink to the edges.
5. I punched a hole at the top middle tag and tied the twine through the hole.

I would love to see what you create for the Essentials by Ellen August Mix It Up Challenge (you must use both Essentials by Ellen and Winnie & Walter products in your project)!

To get more information about how you can play along with the August Mix it Up Challenge and win a $50 gift certificate to Ellen Hutson LLC CLICK HERE!

Happy creating!

Wednesday, August 3, 2016

Winner of Rerun No. 12 Challenge | Sparkle

Hello lovelies!

It is that time to announce the random winner of our Rerun No. 12 Challenge | Sparkle, but first let's celebrate *all* of the lovely entries!  

Thankfully it is chance rather w&w that has to pick a winner! :-)

Rerun No 12 Collage Entries

Many thanks to: June Swart, Greta H, Maryam, Crystal Thompson, Greta H, Carol, Maryam and Rose J for taking on the Rerun Challenge and making such fabulous projects!  

The randomly chosen winner of $25 credit to the w&w shop is No. 2!

great_h_W&W Rerun July

Greta H please email us at info {at} winniewalter {dot} com to claim your prize.

If you were unable to play along last month, we have a whole new Rerun Challenge running all this month!  To learn more on how you can join in on Rerun No. 13 | In Bloom: Lola's Bouquet with Joni Andaya check back on Friday!