Saturday, December 30, 2017

December Leading Lady Kimberly Rendino | Take Five

As December and 2017 comes to an end we sadly must bid au revoir to our delightful December Leading Lady, Kimberly Rendino.    The last five weeks with Kimberly have been full of incredible inspiration, awesome projects and amazing artistry.  Kimberly showed her keen skills, cleverness and creativity week after week.  I feel so very blessed Kimberly shared her talents with us this month and capped this wonderful year of leading ladies.

If you missed her smashing debut you must see it CLICK HERE 
or her sensational second performance where she makes magic without getting inky CLICK HERE or her triumphant third performance with a festive and fun concentration on sequins CLICK HERE or her fantastic fourth performance that's full of a dizzying array of terrific tags CLICK HERE.  

Lucky for us all we have her final command performance today.  

Hello again!   I'm back for my final performance as Leading Lady - I can't tell you how exciting this month has been!  I've loved every minute of creating with my awesome winnie & walter goodies.  Thanks so much, Shay, for inviting me to create with your wonderful products!


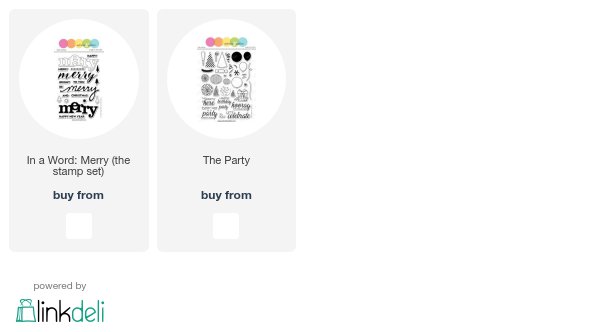
I broke out one of my older winnie & walter favorites, The Party to create a simple New Year's card.   I stamped the streamers and party horns with Delicata gold & silver inks.   They pop on the black cardstock!  These inks stay wet for a bit, so I let them dry for a few minutes, then lightly brushed over everything, which left a fine dusting of sparkles over the entire card.   The sentiment, from In a Word: Merry, was heat embossed in silver and popped up on the card with foam tape.


A few scattered sequins finished off the panel, which was then adhered to some shiny gold paper I found in my stash!

Thank you so much for hanging out with me this month on the winnie & walter blog!  I'd like to wish everyone a very healthy and happy New Year!   Take care, crafty friends!


Before you go, don't forget to leave a comment over on my blog, Kimplete Kreativity, for a chance to win a gift card from winnie & walter!  


w&w-supplies

Saturday, December 23, 2017

December Leading Lady Kimberly Rendino | Take Four

Our December Leading Lady Kimberly Rendino is back for her fantastic fourth performance!  If you missed her smashing debut you must see it...CLICK HERE or her sensational second performance where she makes magic without getting inky...CLICK HERE or her triumphant third performance with a festive and fun concentration on sequins...CLICK HERE.   

Today Kimberly showcases a dizzying array of delightful tags that are perfect for this time of year when you are finishing up those last minute gift wrapping marathons (hey I have been there!) or if you are on track this year and done with your gift wrapping to help give you ideas for next year.

We now present Kimberly....


 Hello, hello everyone! I'm excited to be back on the winnie & walter blog today -  Happy Christmas Eve-Eve (ha ha!).   I hope all of your holiday preparations are complete and you are able to sit back and enjoy the holidays....but if you are like me, you are still busy, cleaning the house, baking cookies, and.....you guessed it - creating gift tags!   Today I've got a few tags to share with you - and the best part is they were all quick and easy to make!


First up, I created a plaid background using the new Scenery: Ticking Stripe Creative Screenings.  I sponged on Distress Ink in a dark shade and then rotated the stencil and inked again with a more vibrant shade.   I die cut the tags using Tagged: Holiday Cheer cutaways, and embellished with stamped and fussy cut holly and Dec. 25 images from Happy Christmas.


These next tags were stamped with the detailed tag image from Tagged: Holiday Cheer and die cut, again with the Tagged: Holiday Cheer cutaways.   I embellished these tags with Copic colored images from the super adorable Winter Wishes with Evelin T Designs, cut out with the coordinating cutaways.   They were adhered with foam tape and offset just a bit.  The sentiments are from the Tagged: Holiday Cheer stamp set.


Finally, I stamped several of the detailed circle tag images from Tagged: Holiday Cheer with Versamark ink and heat embossed with glitter embossing powder.   I die cut trees (from In a Word: Merry Coordinating Cutaways) from the center of each tag.   I used those trees on the next tag, popping them up with foam tape and adding a sentiment from Tagged: Holiday Cheer.

I hope these quick & easy tags have inspired you to create some last minute tags yourself!   And if not.....there's always next year, lol!!


Be sure to head over to my blog, Kimplete Kreativity, for a chance to win a gift card to w&w, generously provided by Shay! 

See you again next week for my final performance as December's Leading Lady! Happy Holidays! 

w&w-supplies

Wednesday, December 20, 2017

Merry Christmas with Kelly


Hello Folks! Kelly here from Notable Nest to share a colorful plaid Christmas card that I made with cutaways and a stamp.
 

The base of the plaid is made with two of the creative screenings from the latest November release, Scenery: Ticking Stripe Creative Screening and Scenery: Rugby Stripe Creative Screening. The ticking stripe is going horizontally across the card with lime and aqua ink, and the rugby stripe is going vertically across the card with a light pink ink. Finally, the 5 thin vertical lines come from a stamp in the Scenery: Stripes set. This is a Christmas card, but I think without the sentiments it could also be a great base for a baby card.


Speaking of sentiments, I was so excited to see In a Word: Merry come out with several different versions of the word "merry." Not only is there the stamp set, but there's also a set of In a Word: Merry Coordinating Cutaways! For this "merry," I embossed it in gold and then cut out two additional "merry's" from my husband's comic book backing boards. They are thin enough to cut well, but much heavier than 110lb paper so the layers build easily.


I wanted to have another element besides just the text, so I grabbed a poinsettia and a few sprigs of greens from In Bloom: Debra's Poinsettia's with Lydia Evans and the corresponding cutaways.


Finally, the sentiment is completed with "christmas" from In a Word: Merry (the Stamp Set) going vertically on the side of the card. Usually I would put "christmas" horizontally below "merry," but I like that this is a little bit different. Plus it repeats the line/plaid design.

Thanks so much for looking! For all those who celebrate, I would like to wish you a warm Christmas filled with love and happiness!

-Kelly


w&wDT_kellygriglione_blog-sig

w&w-supplies

Tuesday, December 19, 2017

Advent Calendar Extravaganza with Taheerah Atchia

Hello there lovelies!  It's Shay here joining in on a very special event.

Advent Calendar Extravaganza
Advent-Calendar-Extravaganza-2017 

Advent Calendar Extravaganza is -the- festive event of the season! This ‘hop with a twist’ was dreamed up by Taheerah Atchia and features surprise destinations each day! Joining in the fun with Taheerah are ONE HUNDRED special guests - each serving up some fantastic Christmas inspiration! Just like an Advent Calendar, you’ll never know where you’re going to be visiting next until you ‘open the door’!

And that’s not all! With 25 *amazing* sponsors taking part as guests as well, your crafty wish list is bound to get a boost with a chance to win a prize EVERY SINGLE DAY!!

Now on to my cards....

shay_IMG_4252

I was inspired by some pear ribbon being used for wrapping gifts to create this duet of cards.  I pulled out In Bloom: Frenchy's Festive Florals with Angelica Suarez and inked it up with red ink before spritzing water and using a dry brush to move the water and color.  I stamped a strip of white cardstock measuring 4.25 x 11 inches.  I then stamped the pear with green inks using the same method.  I added the stem to each pear.  I stamped in the leaf in green and pine cones in brown.  Then I used a gold paint pen to outline and then add a few details to the pears.  I aggressively flicked and dropped gold color shine all over.  After the gold dried, I cut the sheet in half and then cut them out using the largest rectangle from Essentials: Katharine Cutaways.

On a piece of white cardstock I stamped "joy" twice from the same stamp set using Versamark and heat embossed gold embossing powder and then cut them each out from the coordinating cutaways.  I cut a strip of red cardstock and cut it in half and stamped the supporting sentiments from the same stamp set using Versamark and then heat embossed the sentiments in gold.  I attached the sentiments to the patterned cardstock and then to two kraft A2 card bases.

shay_IMG_4253 shay_IMG_4254

I have a bonus project for you today.

shay_IMG_4244

My mom decided she wanted to use cowbells to decorate the lights on either side of the front door and she thought had the bright idea of me using the In a Word Cutaways to cut the words out of magnets.  So I ran 6 different holiday words (In a Word: Believe Cutaway, In a Word: Bright Cutaway, In a Word: Joy Cutaway, In a Word: Love Cutaway, In a Word: Merry Cutaway and In a Word: Peace Cutaway) through my Cuttlebug using extra magnets I had which we provide with our cutaways.  A bonus is that they are white on one side.  They are fairly thick magnetic sheets so I had to run it through several times and at times I had to carefully pull the words away from the sheet of magnetic as they did not completely cut all the way through so be patient if that is the case for you.  The I just stuck a word on each bell.  All in all fun and easy (at least my part as I did not do the wrapping of the rope).

That's it from me, but there is so much more to see from Taheerah this month.

Join in the fun every day at taheerah-atchia.com to see what special surprises await behind the door!

It’s not a party without a prize - and with prizes every day there are several chances to win! Today’s prize is generously supplied by us (Winnie & Walter) so you’ll definitely want to win! Simply leave a comment on this post - then head back to taheerah-atchia.com and leave a comment there too! You must leave a comment on Taheerah’s blog as well as mine in order to be eligible to win! Don’t forget to grab the other surprise destinations from Taheerah’s blog and head over to them to leave comments there as well to improve your odds even more! You have until 23:59 EST on 31st December 2017 to enter.


Don’t forget Advent Calendar Extravaganza runs from 1st-25th December inclusive so make sure you visit taheerah-atchia.com every day for fabulous inspiration and amazing prizes every single time! Merry Christmas!

Happy, merry crafting,
Shay.

Monday, December 18, 2017

One Panel, Two Cards with Lydia {Video}

Hello there everyone and happy Monday! Today I have two cards to share using the same stamped and die cut panel, I have to say I love a technique that you can get two cards out of one panel!


To start I took a 4 1/4" x 5 1/2" white cardstock panel and stamped a full floral background using Victoria's Very Merry Flowers Stamp Set. I used a soft, spring like colour palette to show that these floral images are not just for Christmas and can be used to whole year through.


Once my stamping was complete I then cut the panel using a few of the phrases from Birthday Tiles Cutaways- I just love this set and keep going back to it again and again! When die cutting the words from the panel I tried to keep as many of them in place as this helped out in the next step...


I then glued down the words onto a card base (the video below shows how I did it) and then glued the negative panel onto another card base and ta-da ! Two cards from one panel!

For a step by step on how I made these cards please check out the video below or over on YouTube:


Thanks so much for stopping by!

Hugs, Lydia


w&wDT_lydiaevans_blog-sig 2

w&w-supplies

Saturday, December 16, 2017

December Leading Lady Kimberly Rendino | Take Three

Our December Leading Lady Kimberly Rendino is back for her triumphant third performance!  If you missed her smashing debut you must see it...CLICK HERE or her sensational second performance where she makes magic without getting inky...CLICK HERE.   The cards today are so festive and fun and concentrate on a product I think most of us are wild about!

Without further adoKimberly....


Hello there!   We are getting so close to the holidays - can you believe Christmas is right around the corner?!   I've got a few more holiday cards to share with all of you today - and the focus this time is on sequins, and how they can enhance just about any project!   Oh, how I love sequins....they are just as sparkly and less messy than glitter, lol!


First up, a shaker card of course!   I used the Essentials: Audrey Cutaways to create my shaker frame.   I filled it with a variety of sequins and before putting it all together, I stamped and heat embossed 'Be' from In a Word: Merry (the stamp set) in gold. 


Once the shaker was adhered to my kraft card base, I added the remaining details - the scripty merry from In A Word: Merry Coordinating Cutaways cut from gold glitter paper, and the poinsettia, leaves and greenery from In Bloom: Debra's Poinsettia.   These were stamped on kraft paper (the poinsettia with white pigment ink and Gold Delicata ink for the details) and then die cut.  To add even more sparkle and shine, I added some tiny gold sequins to the center of the poinsettia!


Next up is a card using the gingerbread house from Sweet Holiday with Evelin T Designs. I had fun creating a scene for the gingerbread house - I added some hand cut snowy hills with a touch of Stickles glitter, and sponged on some Distress Ink behind where the gingerbread house would be placed.   I colored the house with Copic markers and added more Stickles for shine.   Small 4 mm. sequins are the perfect size to add embellishment to the roofline and a single black sequin serves as the doorknob!


That's all for me today - I hope you've been inspired to use sequins as accents on your cards!  Remember, I'm giving away a $30 w&w gift card over on my blog, Kimplete Kreativity.   Head over there and leave a comment on any of my Leading Lady posts for a chance to win!  See you back here on the w&w blog next Saturday!


w&w-supplies

Wednesday, December 13, 2017

Noel with Vanessa

Hi everyone! Vanessa here and today I have a plaid Christmas card set to share.

I love the new Creative Screenings, the are so fun to play with. I used the Scenery: Ticking Stripe stencil and created plaid backgrounds for this card set:


To create my backgrounds, I adhered the stencil over a panel of white cardstock and inked it with an ink blending tool. Then I turned the stencil 90° and applied a darker shade of the color to the panel. After I had removed the stencil, I adhered the plaid paper to the card base.

Now I stamped various leaves and the poinsettia from In Bloom: Debra's Poinsettia with Lydia Evans, die-cut everything with the matching dies and adhered the images. I die-cut the In a Word: Noel Cutaway using gold foiled cardstock and adhered the words to the cards. Finally, I added enamel dots to my set.


I hope you like today's project! Thanks for stopping by!


w&wDT_vanessamenhorn_blog-sig

w&w-supplies

Monday, December 11, 2017

December Color Combo with Heather H. (Challenge)

Good morning! Heather here stopping by this morning to share a new Color Combo Challenge with you! Thanks again to everyone who has played along so far - make sure and look for winners and a few featured players at the bottom of this post! I have a cool wintery scene card to share with you today!


Here is my color inspiration for this month - I fell in love with the pretty wintery colors and had to use it:


I began by creating an ink blended background. I used some Post-It Tape along the bottom to mask off the white area to mimic snow, then used 3 colors of Distress Oxides to blend the background. I added some splashes of water and some thinned down white paint for a more snowy effect, then removed my masks along the bottom.


Next, I colored up the adorable skiing polar bear from Winter Wishes with Evelin T Designs, and die cut with the Coordinating Dies. I heat embossed a sentiment from the same stamp set in white on a strip of black cardstock, then hand trimmed it down to a banner shape. I adhered both of these with foam adhesive for a bit of dimension, then mounted the entire panel on a pale gray card base.


Now - I have a few favorites from the last Color Challenge to feature! I know this is a super busy time of the year, so thanks to all those that made time to play along - you are all stars!!! 

First up we have this darling little card from Trina - I adore how she used the adorable little birdie to take the place of the "o" in "noel", and the textured snow on the background is fabulous!


Next up, this clean, simple, and rustic card by Laury! I LOVE how she captured the rustic feel of the inspiration photo - and even the deer came into play! 


And last but not least - isn't this card by Janis absolutely LOVELY? Great capture of the inspiration colors but with a perfect elegant twist to it! 


>>>RANDOMLY CHOSEN WINNERS<<<

laury55_11 2017a
No. 3 | Laury55

Laury entered with another lovely card this time with a dreamy, artistic background for her deer and sentiment.

And since we had so many gorgeous, colorful entries (and because I just feel like it and one the perks of being the boss at w&w is I can do these things on a whim!) I randomly chose one of the Heather's favorite cards featured above to also win as well!

No. 4 | Trina P.
Trina's card is a perfect balance of clean, simple, clever and adorable!   

Laury and Trina, please email us at info {at} winniewalter {dot} com with the subject "November Color Combo Challenge Winner" to claim your prize.

>>>CHALLENGE<<<

New challenge will post on the second Monday of each Month, and will end on the Friday before the next challenge begins to allow time to pick a winner and some favorite entries to feature.

Now it's your turn to play along!
  1. Create a new project using the December Color Combo. 
  2. Use at least one (1) winnie & walter product.  This can include Cutaways (dies), Creative Screenings (stencils/masks), printable/digital items, cut files and/or stamp sets.  Remember we offer freebies in our shop.  Our freebies can be used to create your project(s) for this challenge.
  3. Link up your project below using the InLinkz Link-up by 11:55 p.m. CST on Friday, January 5, 2018.  
  4. Enter as many times as you want before the deadline.
  5. This December Color Combo Challenge may be combined with other challenges found here on the w&w blog or elsewhere. 
One randomly selected entry will receive a $25 gift certificate to Winnie and Walter. YAY!!! I can't wait to see your entries! 


Thanks for stopping by - have a wonderful day!


w&wDT_heatherhoffman_blog-sig 2


w&w-supplies