Saturday, September 29, 2018

September Leading Lady Maryam Shalaby | Take Five (Video)

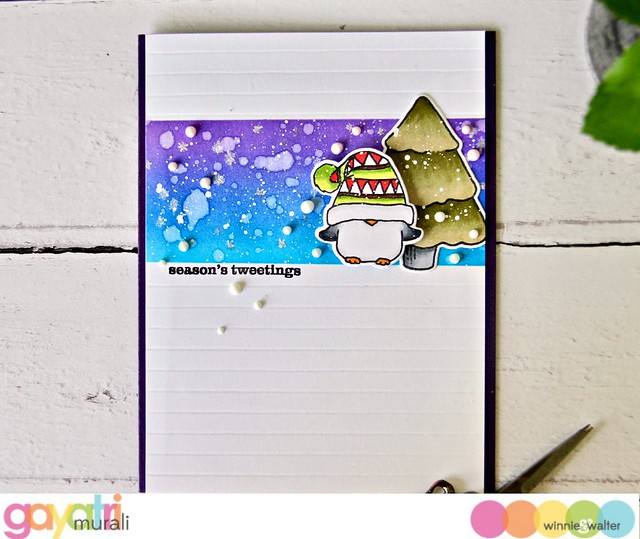
As September ends we sadly must bid au revoir to our stellar September Leading Lady Maryam Shalaby .   The last few weeks with Maryam have been a revelation of delightful techniques and startling skill.  Maryam has showcased her stunning talent and astounding creativity week after week.  I feel so honored Maryam shared her talents with us this month and made this month something special.

If you missed her smashing debut you must see it...CLICK HERE or ethereal and enchanting cards from her sensational second performance CLICK HERE or incredible inky masterpieces from her triumphant third performance CLICK HERE or her fantastic fourth performance sure to warm your heart CLICK HERE!  Today's projects are full of beautify and skill!

Lucky for us all we have her final command performance today.  


Hello everyone . I really can't believe it is the end of September and I am sadly posting my last post as being leading lady for winnie and walter blog . I enjoyed being with you every week for this whole month , which encouraged me to create these projects . Thank you Shay for this great opportunity to show how much I love winnie and walter products. And thank you all who read my post and left me a kind comments.


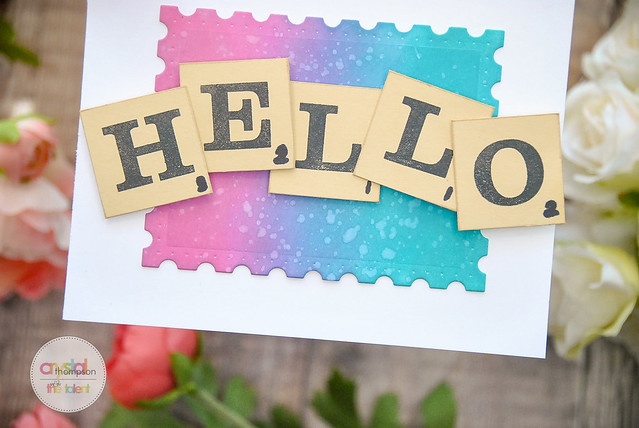
In today post I would like to share with you two simple mixed media creation i made using some winnie and walter product .I was and still amazed by how we can mix colors and some of the materials we had to get an amazing creation . Where is the magic and how these professional mixed media maker are able to mix these unrelated things to have these wow projects . As I am still in the learning stage so I made what I can call it a " CAS mixed media creation " so simple and clean project using some handy materials. For first one , I clear C A S mixed media tag , and it turned out
so pretty .
 

Here is some tips how I made this tag ..

* I used a heavy kraft tag to be able to hold the fabric above.

** I coated the kraft with double layer of white gesso, then I glued the fabric ( it was from old table runner ) . Then I added extra generous amounts of the gesso over the fabric.


*** I used a spray colors ( pink, purple, turquoise and yellow) over the fabric and I spray over them to get blended, then I used the brush because its easier to blend for a specific areas.

**** I used w& w creative screening Scenery: Big Bang Circle Creative Screening with silver glitter embossing past to add these effect over the background.

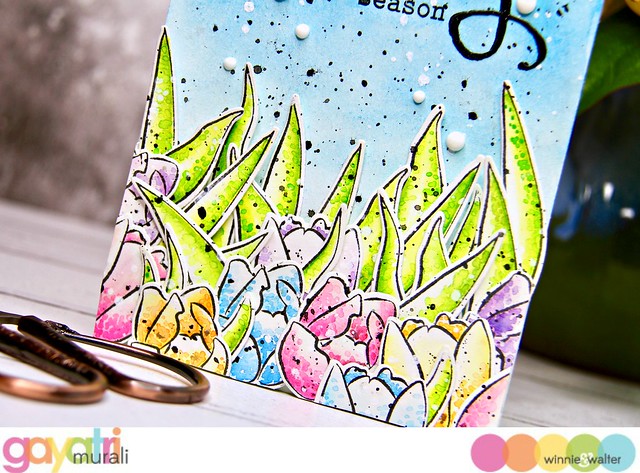
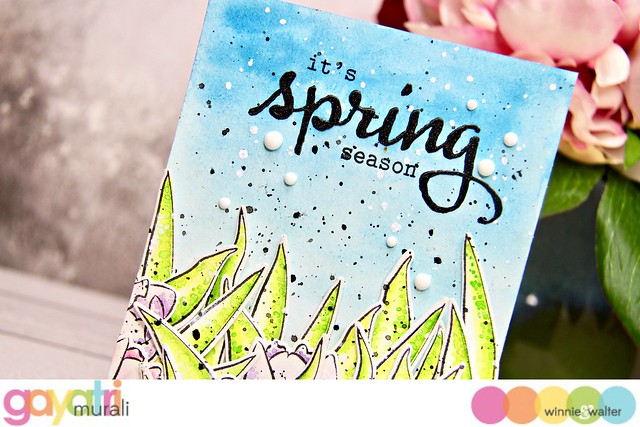
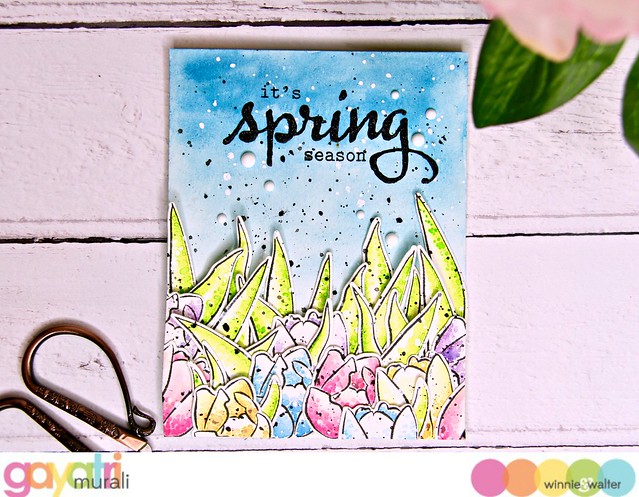
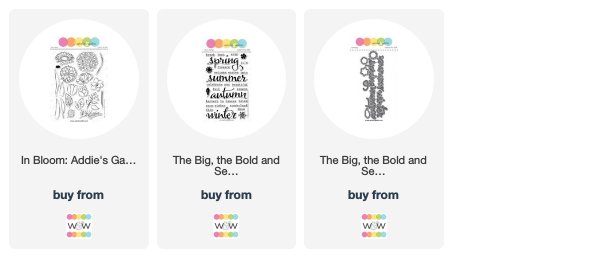
*****I die cut this heart from vellum using w&w True Dotty Heart Cutaways , and I stamped the flowers and leaves with some layering ink using w&w In Bloom Ashlee's Rosie Posies with Lydia Evans stamp set and w& w In Bloom: Ashlee's Rosie Posies with Lydia Evans Cutaways . I tried to arrange the flower like a cascade of falling flowers and leaves .


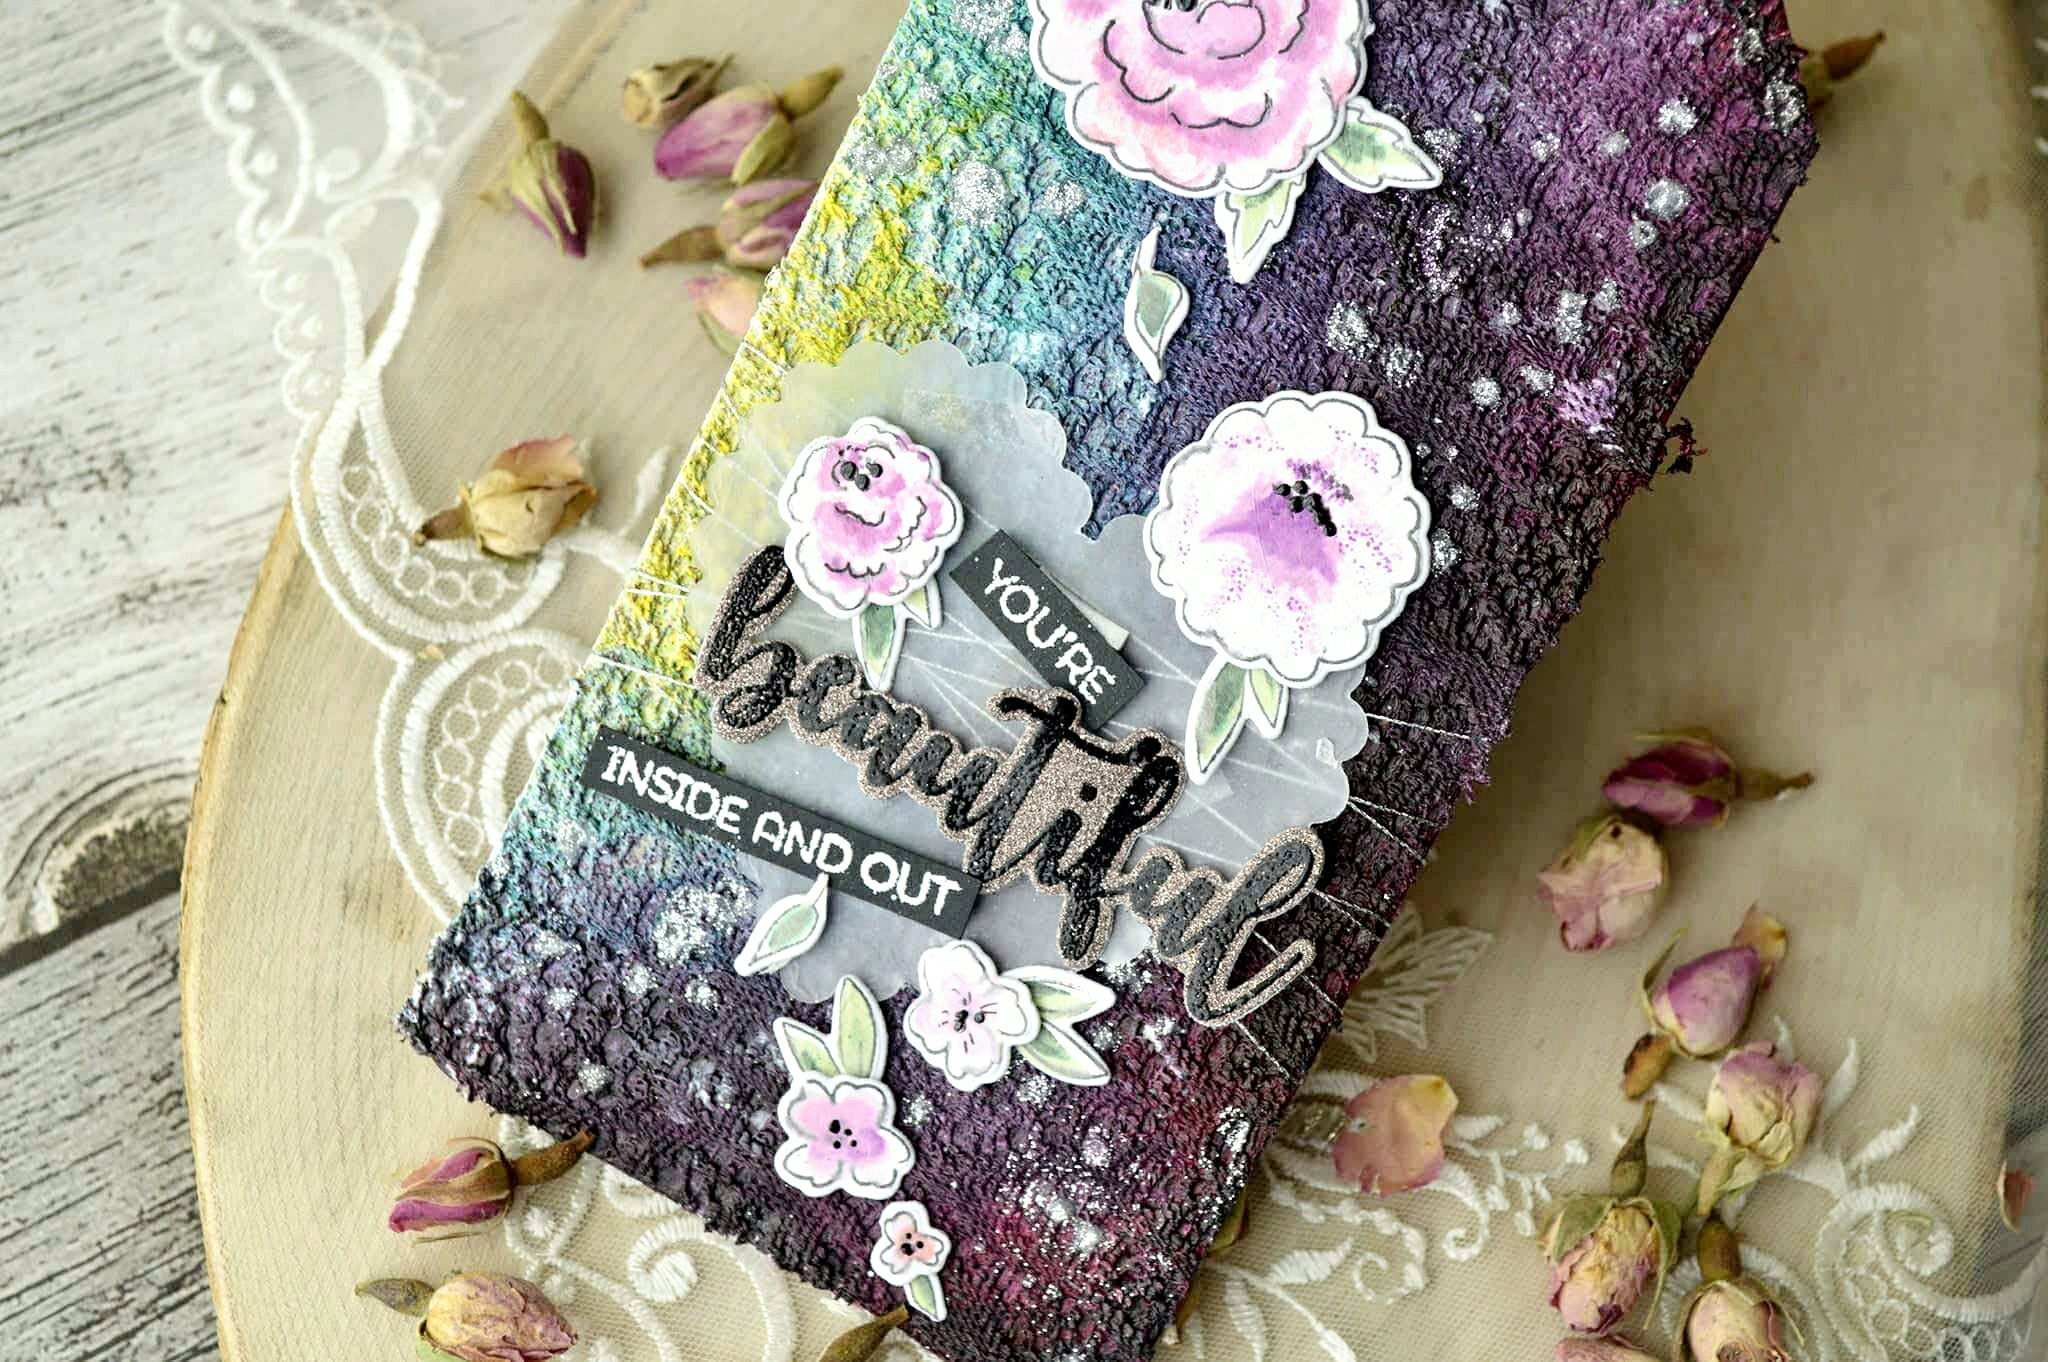
*****I like this sentiment from the same stamp set and there matching die cut . So I added to the tag. I didn't want to add more embellishments or dimensions so I left simple and clean like this . Here is the link for my youtube video https://m.youtube.com/watch?feature=youtu.be&v=uGjMW1qDJ2c or you can watch it here:


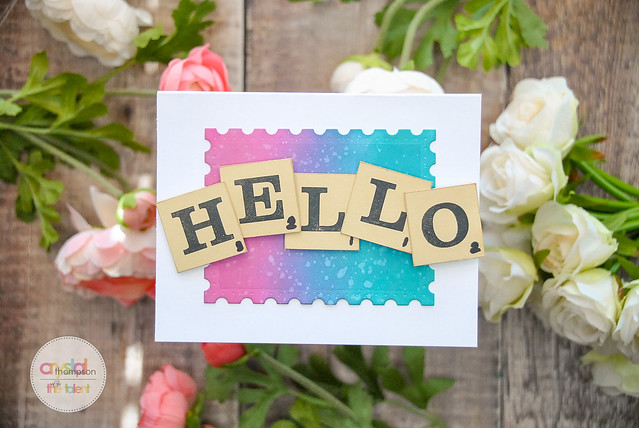
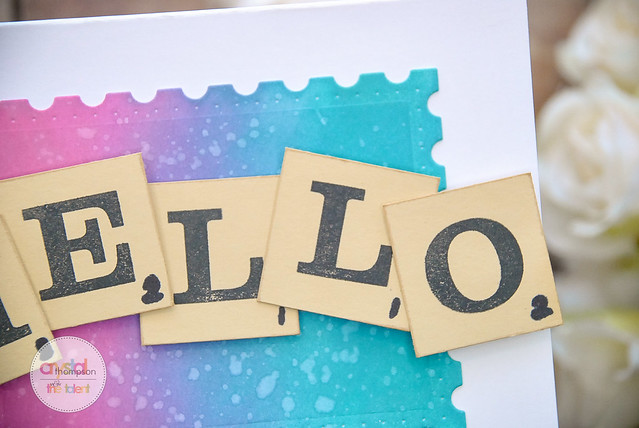
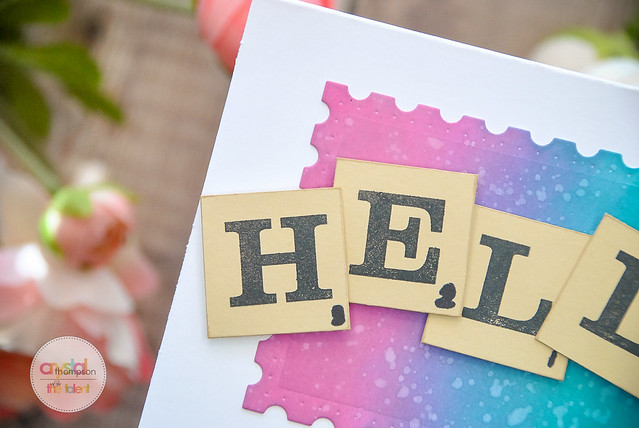
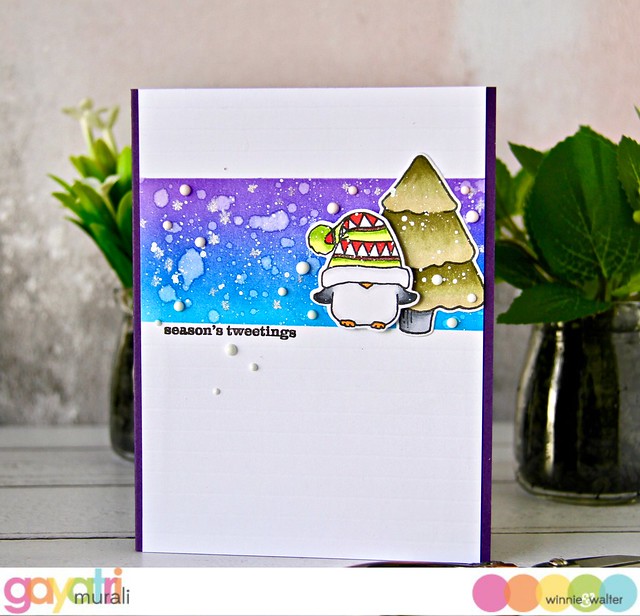
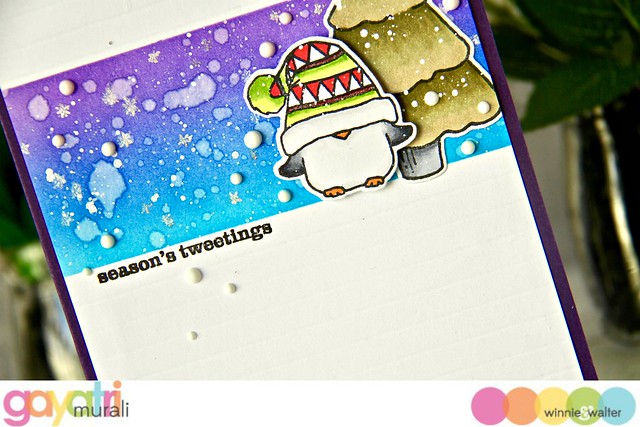
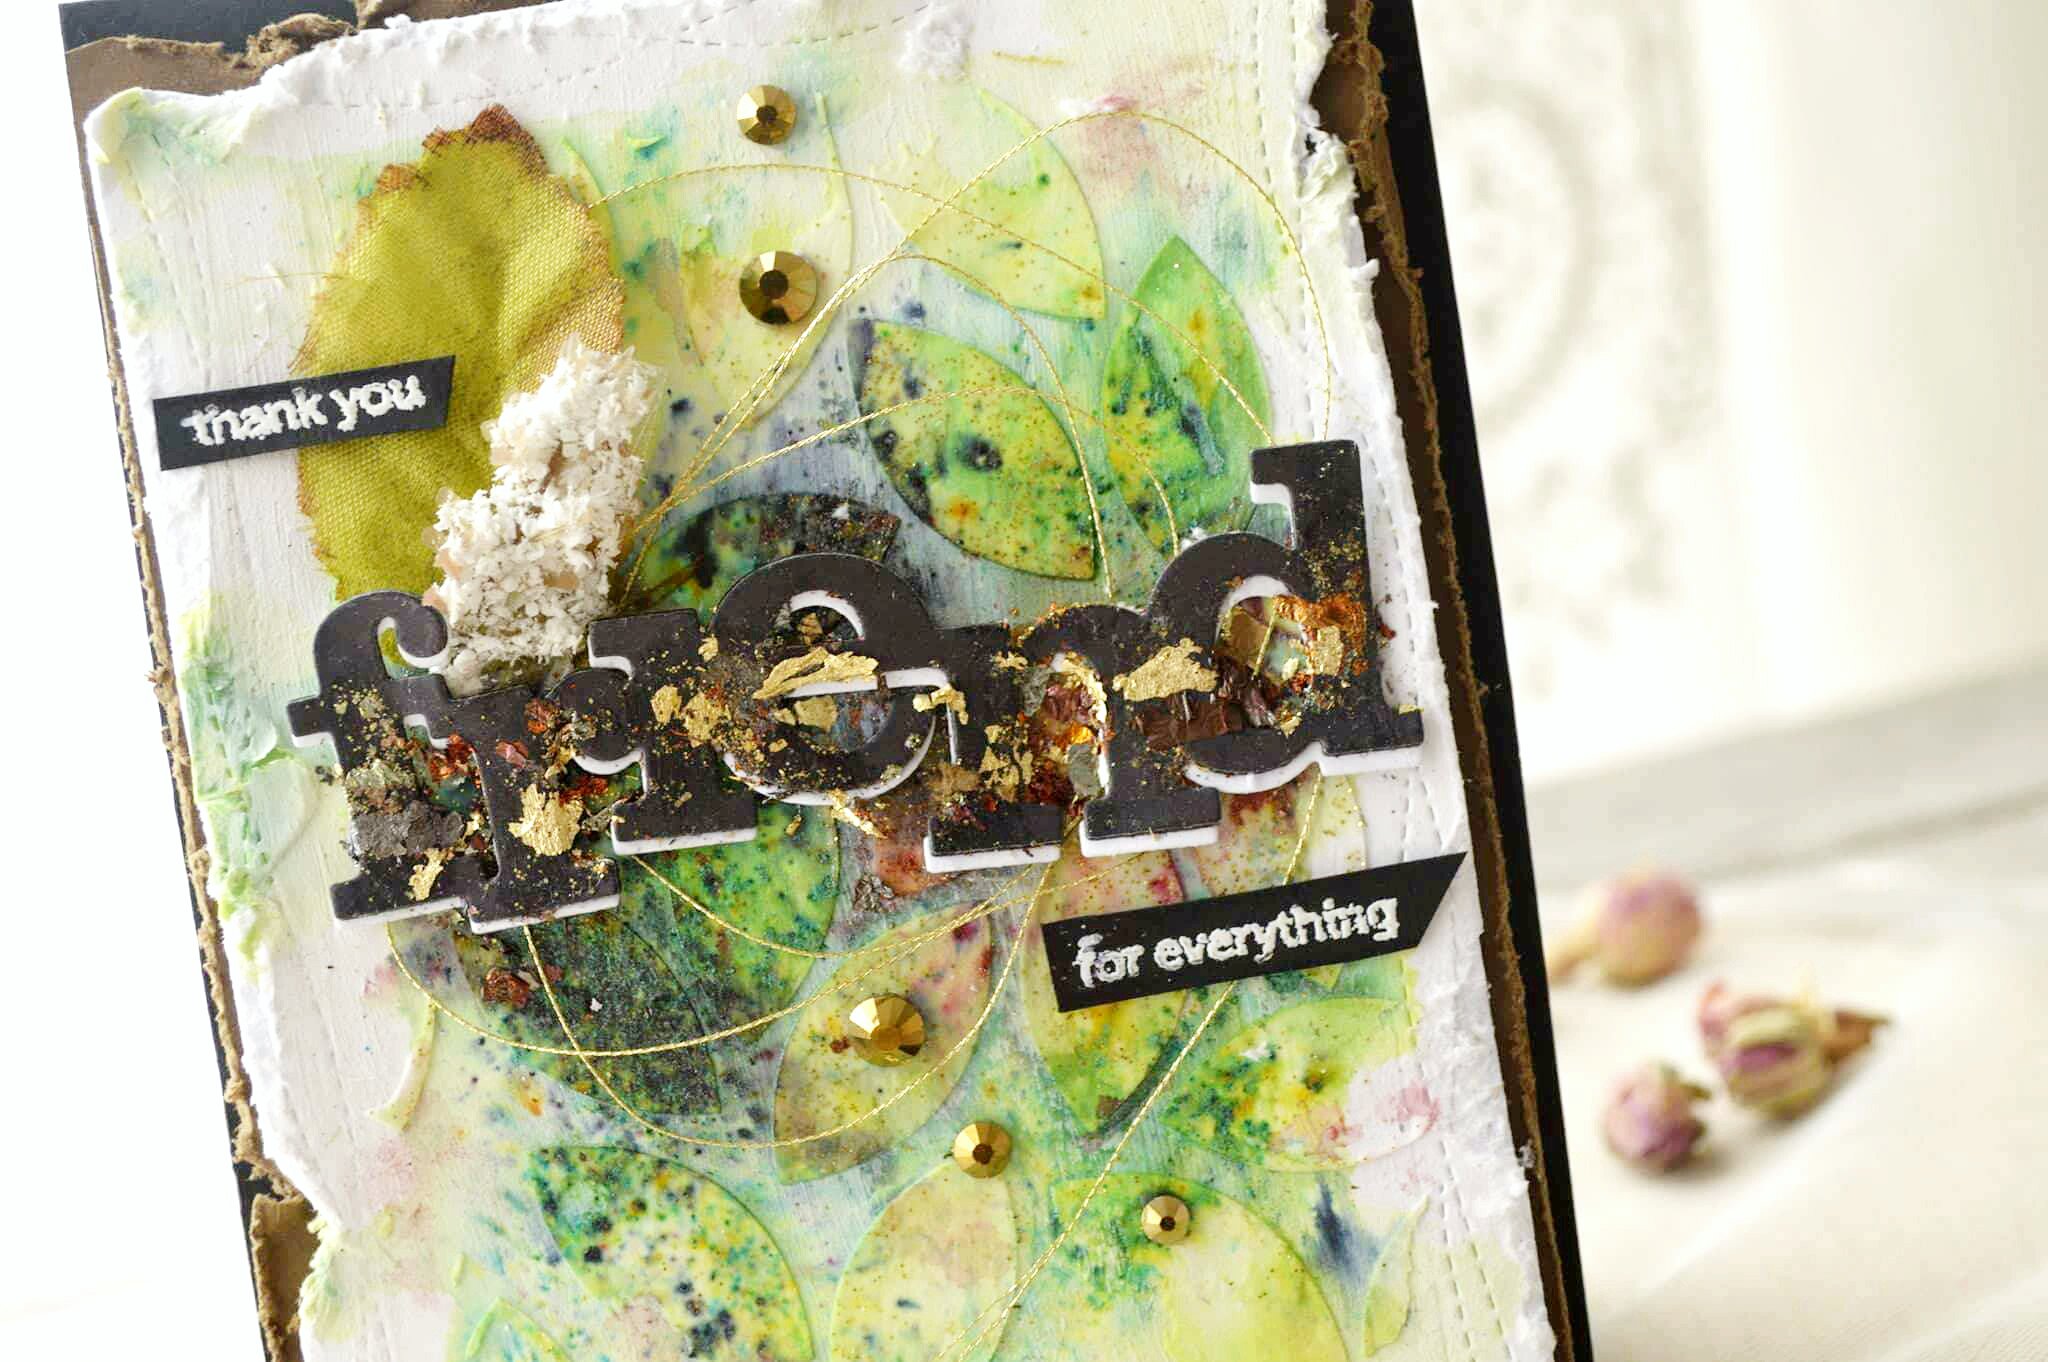
For my second project. It's kind of CAS mixed media card. In this card I used mainly the stencil to create this back ground .after mixing some colors and adding few materials it turned out to this gorgeous card.


* I used a heavy water color paper and I double coated it with gesso .

** I used white texture embossing past over the w & w creative screening Scenery: The Leaf Effect Creative Screening and I emboss the background particularly. Then used a thin film of gold glitter embossing past in some area.


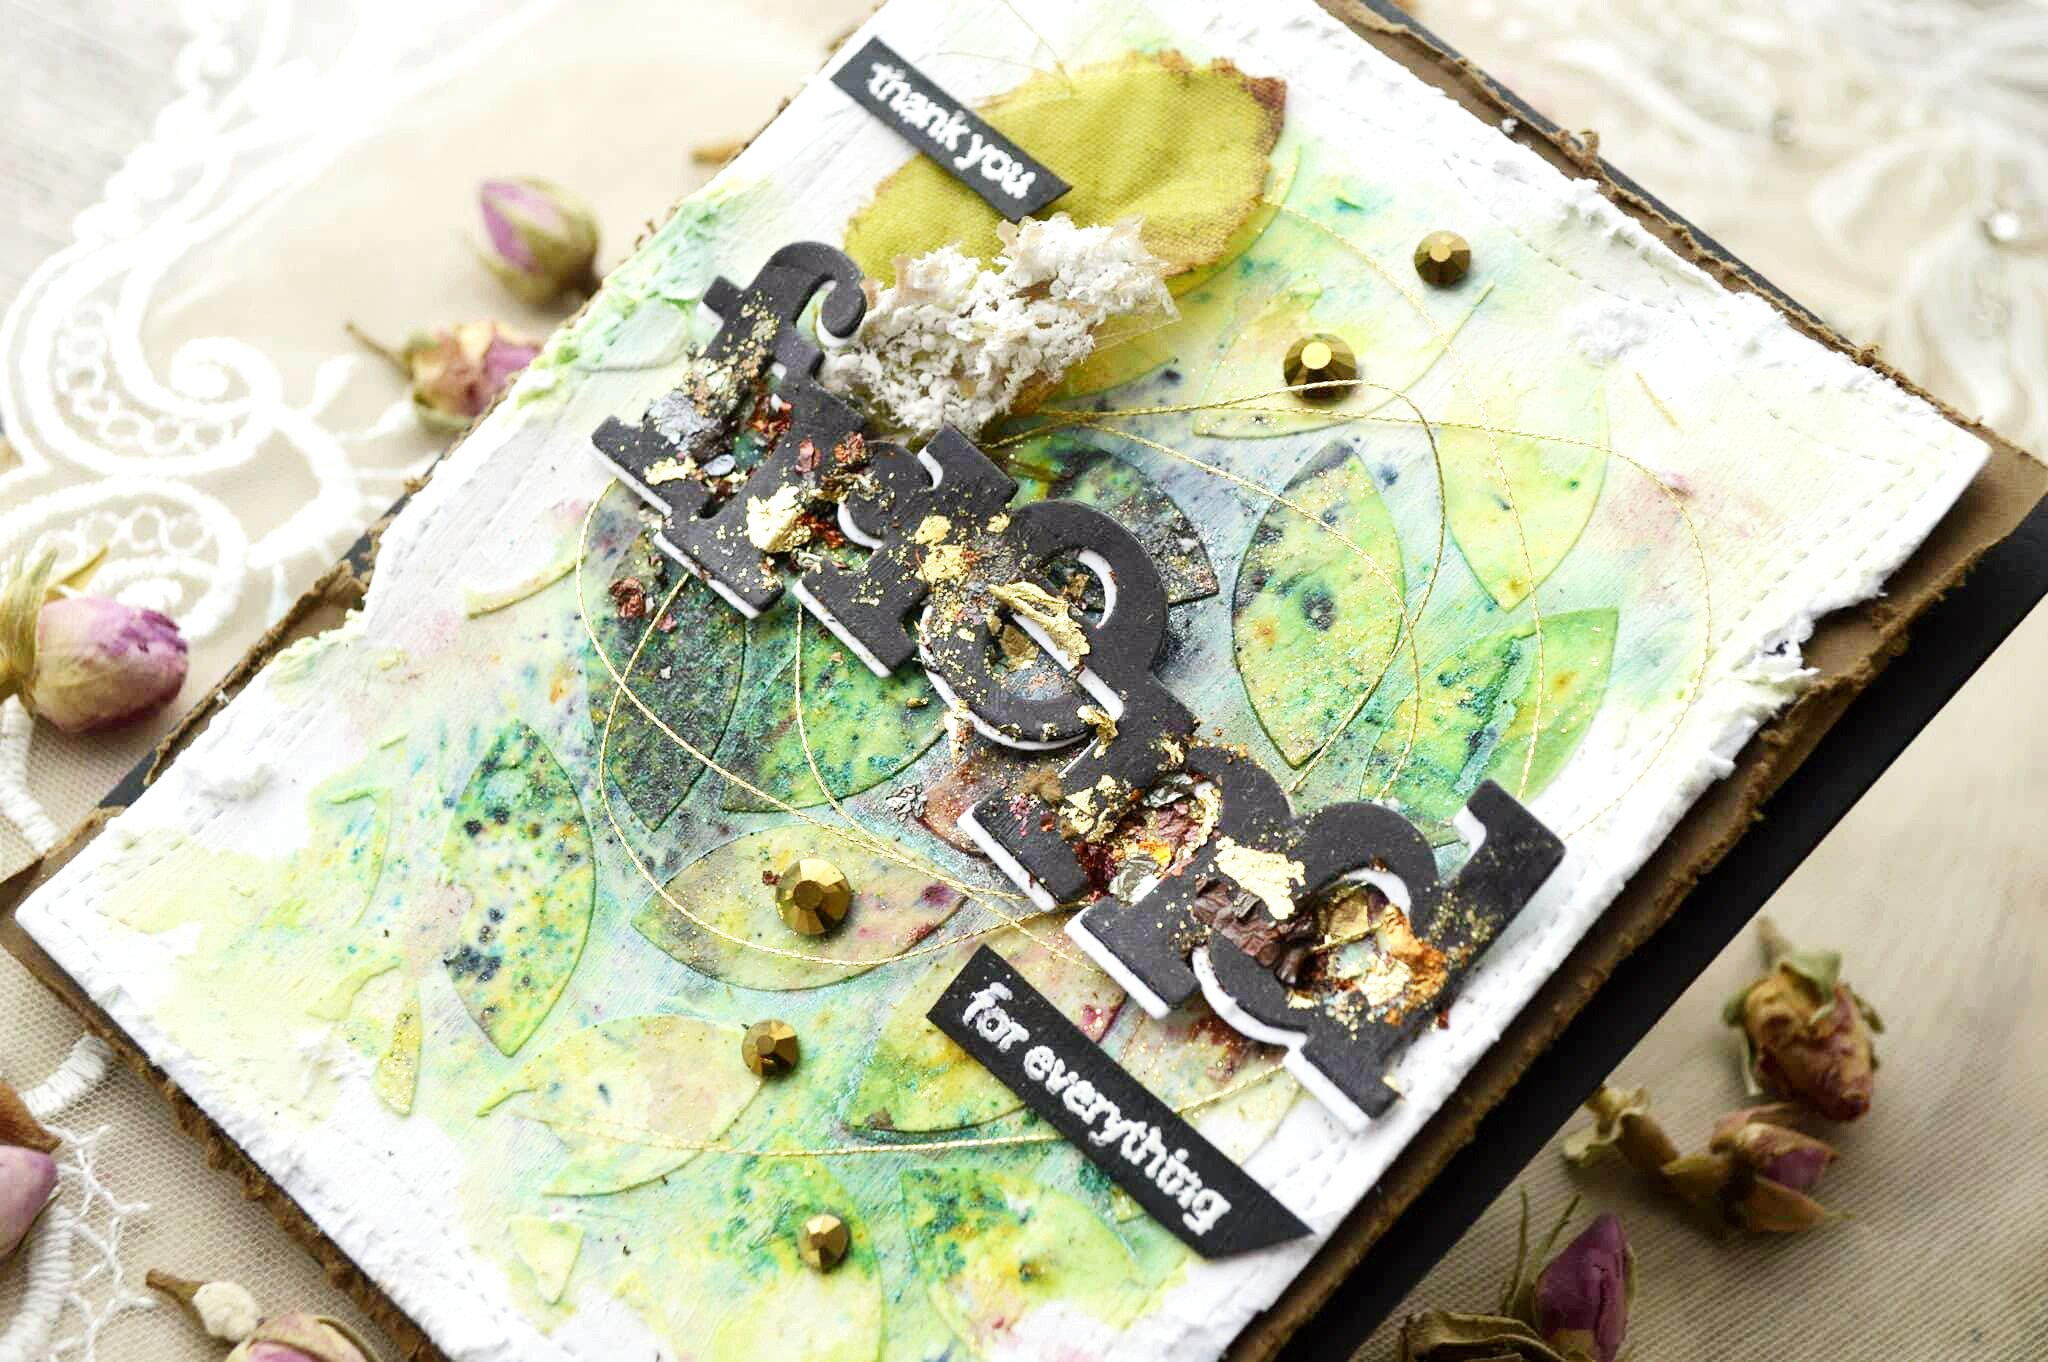
*** I used some of lindy's gang magical powder green, blue, brown red, and black Over this leafy background.

**** some extra tips I learned for applying the pigmented powder , we should spray the paper with a little water before adding the powder . When we used any colored powder , we should use a clean dry brushes and use a separate brush with every color to avoid contamination of the colors.


***** I die cut the w&w In a Word: Friend Cutaway with black card stock and I mounted it over the same die cut using white card stock.

****** I placed a gold thread in the back and added a leave from the flower that I used to photograph my cards . Then I used gliding flacks in the middle of friend die cut.

   
******* I added some metallic copper gems .then I distress the edges and I placed it over a copper distressed paper then I mounted them all over a back heavy card stock. I finished my project today. I hope you like them and get inspired to try some of mixed media techniques.


If you kindly leave me a comment telling me if you like mixed media art and from your opinion what is the magic in the mixed media ( For me the creative mind of the crafter and the gesso having that secret) . And If you like to win a 30 $ gift card provide by the sweetest shay to winnie and walter store please leave a comment in any of the five winnie and Walter leading lady post on my blog , I will choose a winner on the early October on my blog . At the end thanks a lot Shay it was a pleasure to be a leading lady for this month, thanks all who encouraged me to create these project and left a sweet words . See you again in the coming winnie and walter challenges as I like to participate in to them , I hope you will join us there.

Have a good crafting time,
My best wishes Maryam.

w&w-supplies

Friday, September 28, 2018

Rerun No. 34 | Typecast: Cary -- Gameboard Greetings with Crystal (Video)

Happy Friday lovelies!

First, we are extending the deadline on this month's Rerun challenge and giveaway until the end of Monday, October 8, 2018...so you have plenty of time to play including thru World Cardmaking Day (and weekend!!).  For more details on this month's Rerun go HERE.

Crystal Thompson- September Carytypecast (4 of 7)

Now, to inspire you further to participate in this month's Rerun Crystal has this awesomely creative card and video!!


Crystal Thompson- September Carytypecast (5 of 7) Crystal Thompson- September Carytypecast (6 of 7) Crystal Thompson- September Carytypecast (7 of 7)

Love Crystal's card and I hope you do too!

Remember you still have time to play along with the challenge and/or enter to win this stamp set.  All the details can be found HERE!

Have an incredible day!

Shay.


w&w-supplies

Wednesday, September 26, 2018

Season's Tweetings with Gayatri

Hello everyone,

Gayatri here with the last card for the month of September. I have a Christmas card to share with you. Its a easy and quick card to make.

gayatri_W&W Season's Tweeting card1

I masked the card front panel leaving about 3 inches gap on the top half. Then I sponged Wilted Violet, Blueprint Sketch and Mermaid Lagoon distress inks on the gap. Then I spattered some clean clear water for texture. I also spattered copic opaque white before I removed the masks. I left eh panel to dry while I worked on the Christmas elements.

gayatri_W&W Season's Tweeting card closeup1

For the Christmas element, I chose the cut bird and tree from Season’s Tweetings with Evelin T Designs. I stamped, coloured with copic markers and die cut using the coordinating cutaway. 

Then back to the panel, I trimmed the panel to 4” x 5.25” in size. Then scored the rest of the panel  to every quarter of an inch to added texture and interest to the card. Then I glued the tree on the right side of the sponged area and the bird image next to it using the foam adhesive. 

gayatri_W&W Season's Tweeting card closeup

Then I added some stars using Sakura sparkle jelly roll pen all around the sponged area and stamped the sentiment from the same stamp set in black below the sponged area on the left. Finally I added a few white Nuvo enamel dots to finish off the card. I mounted this panel on to a purple card base. The purple on either side of the panel ties in with the purple on the sponged area.

gayatri_W&W Season's Tweeting card flat

All the w&w supplies used to make this card are listed below. Hope you like my card for today. Please share and tag if you make one inspired by this project.

My blog signature
w&w-supplies

Saturday, September 22, 2018

September Leading Lady Maryam Shalaby | Take Four (Video)

Our September Leading Lady, Maryam Shalaby is back for her triumphant third performance!  If you missed her smashing debut you must see it...CLICK HERE or ethereal and enchanting cards from her sensational second performance CLICK HERE or incredible inky masterpieces from her triumphant third performance CLICK HERE!  Today's projects are sure to warm your heart!

We now present Maryam...


Hello, everyone Today I am posting these simple mini gift tags idea as my 4th post as a September leading lady at winnie and walter blog. I wanted to share who easy and fast you can wrap your treat gift to give it a nice personal touch.

One of my favorite thing to make in the craft field is making gift tags. So couldn't resist sharing these ideas with you.

Usually I have one of a simple gift on my bag in case I need it to give to some kind person , usually we meet them in our daily activities and I feel that I would appreciate there kindness . Or give every now and then some to my kids teachers , our neighbors or close people who surrounding us , wishing them a good day or telling them that I appreciate them.


For me a small chocolate treat with a coffee or tea bag is my favorite combination, I found that this Warm Wishes to You stamp set stamp and there matching die cut Warm Wishes to You Cutaways from winnie and walter my favorite to add a little sentiment without sending a big card or tag to these mini gifts.

For my first idea ..

I made this cup tag . This one was the simple one to make , if you are short in time and you want a simple one.


* First I stamped the mug image from winnie and walter Warm Wishes to You stamp set with festive berries and seedless preserve distress ink , then I applied some of water over them to have this fauxy look .

**Then I stamped it over a heavy glossy card stock , then I dried it with heating tool .

***I die cut it with matching die cutting winnie and walter Warm Wishes to You Cutaways then I cut this coffee part too with gold foam over it .

****I added some gold at the end , then I attached to the little treat with white ribbon . For my second tag idea I did the same idea as the first one with some differences..


*I attached to cube that hold the treats inside (For this cube I used 1.5 inches dimensions ) .I liked the added touches of this steamed heart with the silver glitter foam .

** I made this extra mini circular tag using the smaller steams heart from the winnie and walter Warm Wishes to You stamp set.

You can follow with me by watching how I made them on this video:  https://youtu.be/FWJ00XXVtrw 


For the 3rd idea


I used the same faux technique over a glossy card stock but I made the liquid part as a vellum shaker .
* I used a white foam die cut from the same as a middle layer with glue from the both sides .


* * as an extra personalized touch I designed this ribbon . I used two of the borders die cut from winnie and walter Georgette Border Cutaways in this wrapping fabric to create this elegant ribbon .


For my 4th one . I made this fluid shaker tag , i like this fun idea.


* I die cut a tag for the base layer

 ** I used a kind of small ziplock to hold the liquid inside . I put some of transparent gel with some brown gel food colors and some gold glittery powder. Then I secured the bag well over the base tag layer.


*** I used a pattern paper as a outer layer for this tag . Die cut the part of the coffee matched the place that I am going to place the mug die cut over

 ****I added this gold steam heart on the top . After I made the tags and I photographed them . I found this piece of die cut edges I made few days ago using the same 2 die cut over a brown felt , So I attached to the base of the tag I found it give it more warmer look. Did you see the bubble on the photo ..

 
These are the simple easy tags that I liked to share them with you, nothing fancy but they are so perfect to make for my busy days to add a personal touch to the mini kindness gift .


Thanks For stopping by , please if you could leave a comment on my blog maryam's craft on any of winnie and walter leading lady post so you will be eligible for a 30 $ gift card from the sweet Shay the owner of to winnie and Walter store .

Wish you a Happy weekend,
Maryam


w&w-supplies

Friday, September 21, 2018

It's Spring Season with Gayatri

Hello everyone. Gayatri with you today.  Last post of mine I shared a fall card since you all in northern hemisphere are in the autumn season. Today I am sharing a spring card because I and several others in the southern hemisphere are in the spring season. After a few months of heavy rain, cold, windy and no sun whatsoever, its is awesome to see the sun out, warmth and lots of flowers around. To celebrate the season, I made this card.

gayatri_its Spring Season! #2

I did some messy watercolour on the gorgeous tulip and leaves images from In Bloom: Addie’s Garden stamp set. I stamped the images on watercolour paper using Simon’s intense black ink. This ink is great for watercolouring. Then I used Zig clean clear brush pens to add the first two layers of the watercoloring on the images. Then I used the Migello Mission watercolours to add texture to the images. I let the watercolours dry. Then spattered with black and white Altenew spray and left the panels to dry. Once dry, I used the coordinating cutaways to die cut the images.

gayatri_its Spring Season! closeup1

For the background, I did a blue ombre watercolour, dried it and spattered with black and white Altenew spray. After the panel is completely dry, I adhered the die cut tulips and leaves on the bottom of the background panel using glue and foam adhesive for dimension. 

gayatri_its Spring Season! closeup2
gayatri_its Spring Season! closeup3

For the sentiment I die cut the Spring using The Big, the Bold and Seasons Cutaway using black glitter cardstock. This is my main sentiment. The secondary sentiment is from The Big, the Bold and Seasons stamp set which I simply stamped on top and bottom of the main sentiment die cut. Finally a few white Nuvo crystal drops to finish off the card.

gayatri_its Spring Season! flat1


Hope you like my messy watercoloring and a very colourful spring card. All w&w supplies used to make this card below. Thank you very much for visiting today. 

My blog signature

w&w-supplies