Monday, July 30, 2018

Rerun No. 32 | Mini Scenery: Madison-- Soft Background with Crystal (Video)

crystal_Madison- Soft Background

Crystal has an awesome new video for you today creating a soft background featuring our July Rerun stamp set Mini Scenery: Madison!


Some close ups:

crystal_madison-sb-4 crystal_madison-sb-3

And the full card once more:

crystal_madison- sb-2

What a delightful background and card, right?

Remember you have time to play along with the challenge and/or enter to win this stamp set.  All the details can be found HERE!

Have an incredible day!

Shay.


w&w-supplies

Saturday, July 28, 2018

July Leading Lady Caren Bartholomew | Take Four

As July ends we sadly must bid au revoir to our jubilant July Leading Lady Caren Bartholomew.   The last four weeks with Caren have been a bounty of amazing projects featuring a wide range of techniques, styles and stupendous skill.  Caren has showcased her keen talent and adeptness and creativity week after week.  I feel so very blessed Caren shared her talents with us this month and made this month something special.

If you missed her smashing debut you must see it...CLICK HERE or how she shook it up during her sensational second performance CLICK HERE or her for her utterly irresistible cards from her triumphant third performance CLICK HERE!  Today's cards are so adorable and so clever!  

Lucky for us all we have her final command performance today.  

Hi everyone! It's my final week of my Leading Lady reign at Winnie and Walter. I want to give a big thanks to Shay for giving me this opportunity and all who have left such encouraging comments on each post.
 

 I've saved my favorites for this week! I created two one layer cards (this was difficult for me) with lots of masking and Copic coloring. At the beginning of June, I owned one Copic marker with no intention of buying anymore. Then I took a Copic class, only because a friend of mine was teaching it. Needless to say, I now own quite a few Copic markers. I still have so much to learn on how to use these, but I'm super happy on how these turned out. For my first card, I stamped several of the dogs from the Dog-gone Cute with Evelin T Designs stamp set. I did some masking to get the dogs all lined up. I then painstakingly colored them with Copic markers. I stamped the Happy Birthday sentiment from Happy Dance with Evelin T Designs to finish the card.


For the second card, I did the exact same thing except with cats from the Purrfect with Evelin T Designs stamp set.


For each card, I first stamped out how I wanted them laid out on a scrap piece of paper (top of the photo below).


Then I started stamping and masking! When masking, you want to stamp the ones you want in the foreground first.


I've thoroughly enjoyed being a Leading Lady and working with such wonderful products at Winnie and Walter. Thanks again for the love the past three weeks. Head over to my blog for a chance to win a $30 gift card from Winnie and Walter on my blog. Leave a comment on my blog post by 8/4 and I will draw a random winner.


w&w-supplies

Friday, July 27, 2018

Happy Birthday with Gayatri

Hey everyone, Welcome! This is Gayatri with you. My last project for July here. I have a floral card to share with you today. I also created a bokeh background for the floral cluster. Here is the card for you.

gayatri_W&W July card #3a

If you are following me on Instagram, you will know I am sharing distress ink blends each day. The background I used here is blend #4. The colours I have used on this background are Dusty Concord, Seedless Preserve, Ripe Persimmon, Carved Pumpkin and Mustard Seed Distress inks.  Then I used W&W’s Scenery: Bigger Bang Confetti stamp set (limited edition) to stamp solid circles on the background using white pigment ink to create bokeh background. Since the background is colourful and busy, I want to keep the focal point simple and clean. So I white heat embossed the images from In Bloom Addie’s Garden stamp set on heavy weight vellum. Then used the coordinating cutaway to die cut them and glue to form a floral cluster. I adhered this cluster on the middle of the background panel.

For the sentiment, I die cut In a Word: Happy cutaway in black and gold glitter. I glued them slightly off set to make the gold glitter as the drop shadow for the black die cut. I know its not traditional. Usually its black die cut that is the drop shadow. I adhered the Happy sentiment on the middle of the floral cluster. The secondary sentiment is white heat embossed on a strip fo white cardstock and sponged with Carved Pumpkin distress ink. I adhered this below the large die cut sentiment using foam adhesive. Finally to finish off some sparkle from jewels.

Here are couple of closeups of the card.

gayatri_W&W July card #3 closeup1 gayatri_W&W July card #3 closeup

Love the card. The colours are a bit unusual for a birthday card. But if you have a friend who has birthday that falls on Halloween, here it the birthday card inspiration. :) Hope you are inspired by my project. All supplies used to make this card below.

gayatri_W&W July card #3 flat

Thank you very much for stopping by. Have a lovely day!

My blog signature

w&w-supplies

Wednesday, July 25, 2018

Rerun No. 32 | Mini Scenery: Madison-- Watercolor Scallops with Crystal (Video)

crystal_Madison- watercolor scallop

Crystal has an awesome new video for you today creating watercolor scallops featuring our July Rerun stamp set Mini Scenery: Madison!


Here are some lovely close ups:

crystal_madison-watercolor sca-3 crystal_madison-watercolor scallop2

Are you as in love with how this turned out as I am?

Remember you have time to play along with the challenge and/or enter to win this stamp set.  All the details can be found HERE!

Have an incredible day!

Shay.


w&w-supplies

Saturday, July 21, 2018

July Leading Lady Caren Bartholomew | Take Three

Our July Leading Lady Caren Bartholomew is back for her triumphant third performance!  If you missed her smashing debut you must see it...CLICK HERE or how she shook it up during her sensational second performance CLICK HERE.   You will not be able to resist her cards today ;-)!

Without further ado, Caren...

Hi everyone! Welcome back to week 3 of my Leading Lady reign at Winnie and Walter. Thank you for all the wonderful comments on my first two posts.
 

For week three, I used the emboss resist technique to create cards using the great Winnie and Walter products. This technique is designed to leave the stamped image white while adding color to the background. The stamped image will “resist” the ink (thus the name).

  caren_Photo Jul 18, 8 02 05 PM

For my first card, I stamped the cascading hearts from the stamp set Scenery: Seeing Hearts in embossing ink, covered it in white embossing powder, and heat set it. I think inked up that panel using 3 shades of pink Distress ink. As you can see the hearts "resisted" the ink. I did the same thing with the You So Much sentiment from In a Word: Love stamp set. I thought the panel need a little more pizzazz, so I used on of the dies from Georgette Borders to add some detail to the bottom of the panel. I used the Love die from In a Word: Love Coordinating Cutaways (have I mentioned I adore this die!) I die cut it three times and layered them together. The top layer is in silver glitter paper. I adhered them to the card base to finish the card.

  caren_Photo Jul 18, 8 01 35 PM

For the second card, I embossed the sentiment on a scalloped circle, then layered three shades of distress ink on it. The back panel uses the same three shades of ink with a stencil. I water colored the bunny using distress inks and fussy cut it out and layered all the pieces onto a gray card base. The sentiment and bunny are from the Party On with Evelin T Designs stamp set. I added a few clear Nuvo drops to finish the card. Thanks again for the love last week, join me next week for the big finally and a chance to win a $30 gift card from Winnie and Walter on my blog.


w&w-supplies
 

Tuesday, July 17, 2018

Winner of Blog Hop for The Daily Marker 30 Day Coloring Challenge!

Hello lovelies!

A big thank you to each who participated and commented (as well as for your patience) on our post for the Blog Hop for The Daily Marker 30 Day Coloring Challenge and at last we are announcing the winner!

Jen | No. 97

Jen, please contact us at info {at} winniewalter {dot} com to claim your $30.00 credit to the w&w shop.

Thank you all and have a terrific Tuesday!

Shay.

Monday, July 16, 2018

Two Versions: Warm + Cool with Gayatri

Oh Hello everyone, Gayatri with you today. Hope you had a lovely weekend. I certainly had a relaxing weekend. Got back into craft after a minor finger injury. So I have a set of cards to share with you just using W&W’s Cutaways. 

gayatri_W&W July Cards #2a gayatri_W&W July Cards #2b

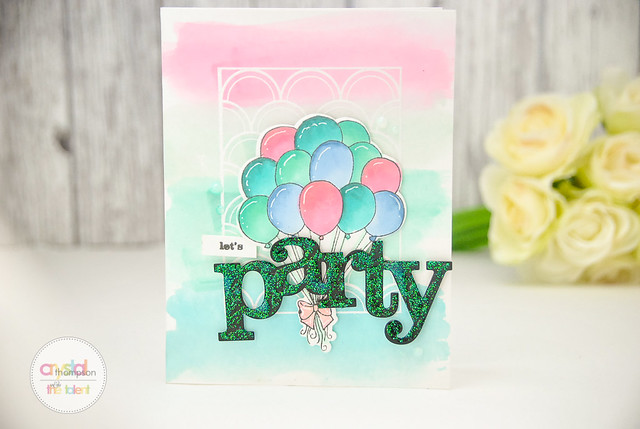
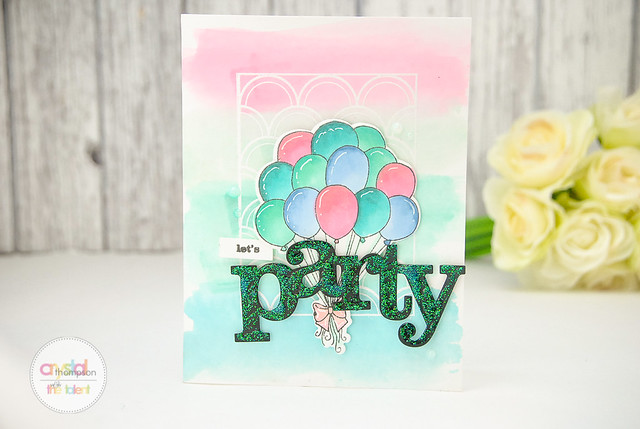
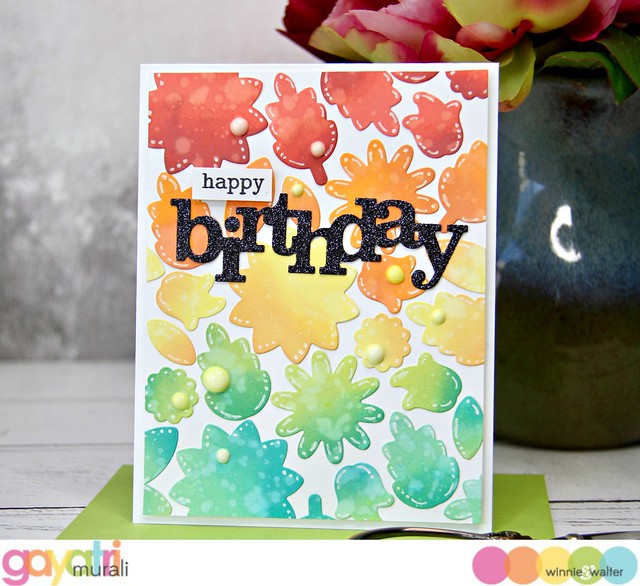
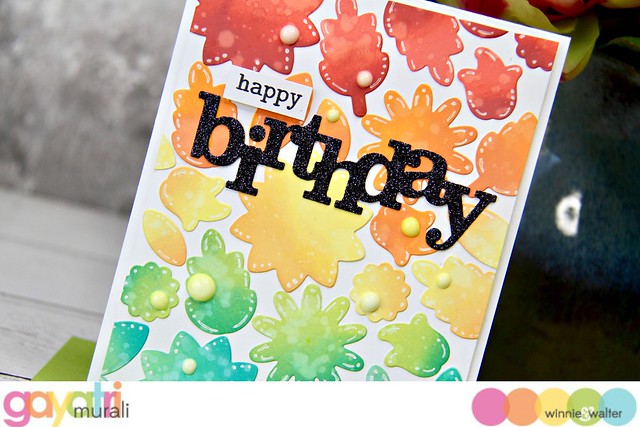
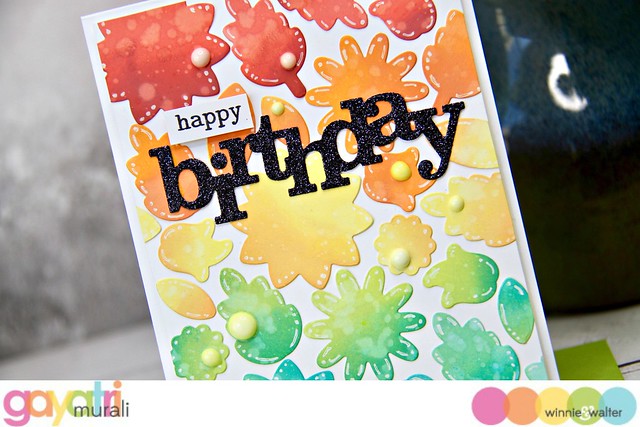
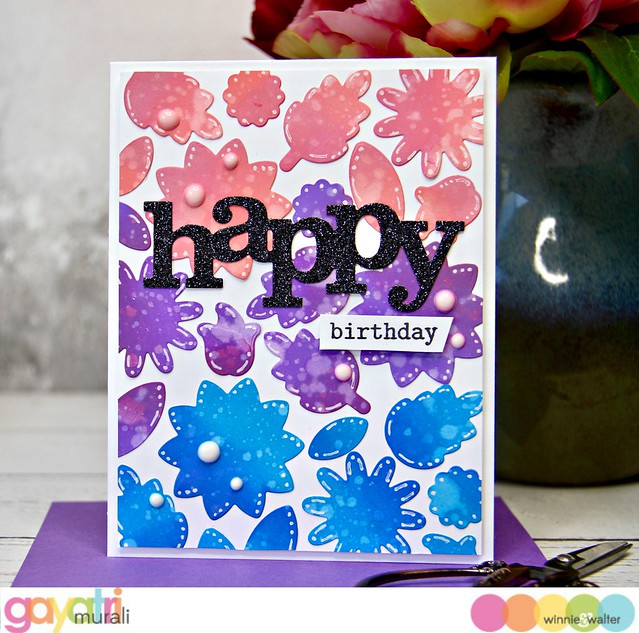
I actually started with the intention of making just one card. I got carried away and made lots of elements that I ended up making two cards and plenty of die cuts left over as well. I love the large floral dies from the In Bloom: Eva’s Favorite Flowers Cutaways. I wanted to use the dies on its own and spruce the die cuts to create colourful background.

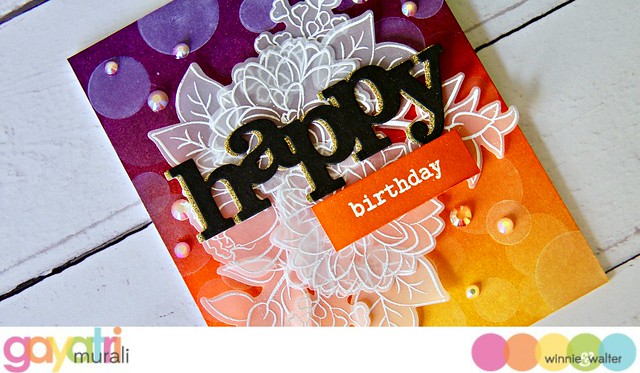
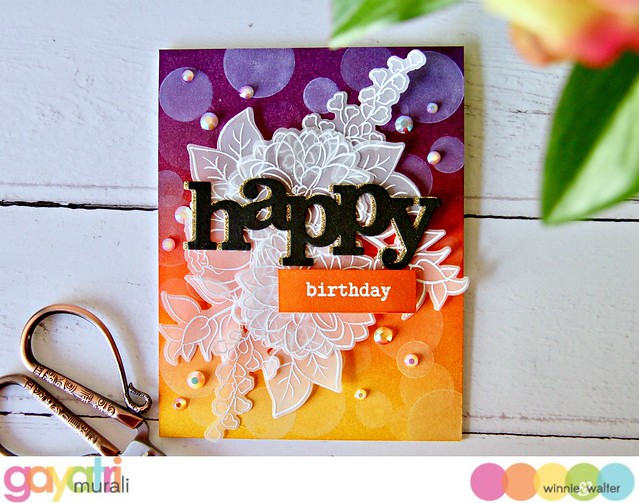
So I sponged four white panels with Worn Lipstick, Abandoned Coral, Carved Pumpkin, Squeezed Lemonade, Salty Ocean and Wilted Violet distress oxide inks. So each panel has two colours each. Then I used just a few of the dies from In Bloom: Eva’s Favorite Flowers cutaways to die cut through all the panels. I now have six coloured sets of the same die cuts to use. 

To spruce them, I sponged a darker colour of each colour to one side of each die cut to add a bit of depth. The colours I used are Candied Apple, Picked Raspberry, Lucky Clover, Mustard Seed, Spiced Marmalade, Blueprint Sketch and Seedless Preserve distress oxide inks. Then used white gel pen to add details to each of the die cut.

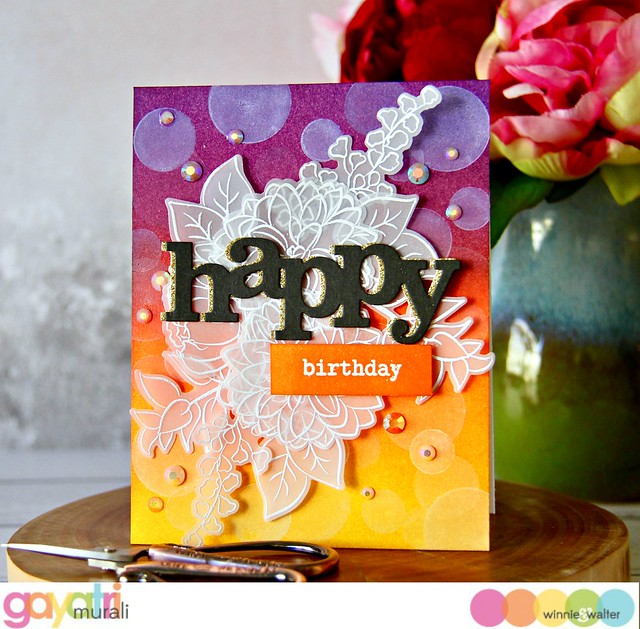
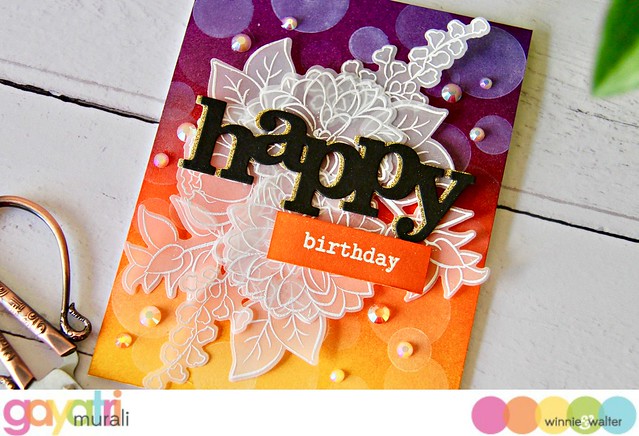
Then I glued the die cuts on to two white panels trimmed to 4”x5.25”. On one panel I used all the warm coloured die cuts and on the other I used all the cool coloured die cuts. So I have two panels to make two cards. I adhered the panel on white card base using foam adhesives.

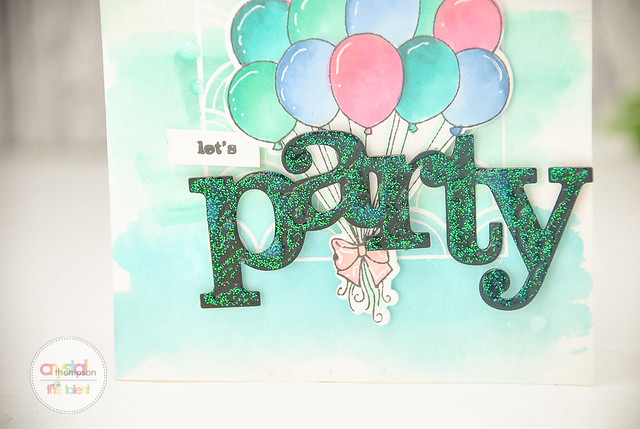
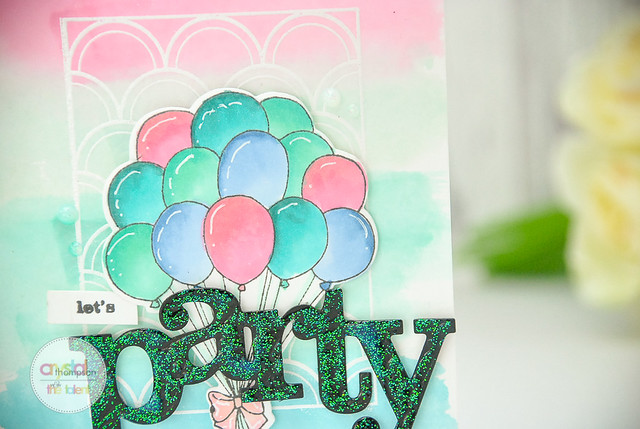
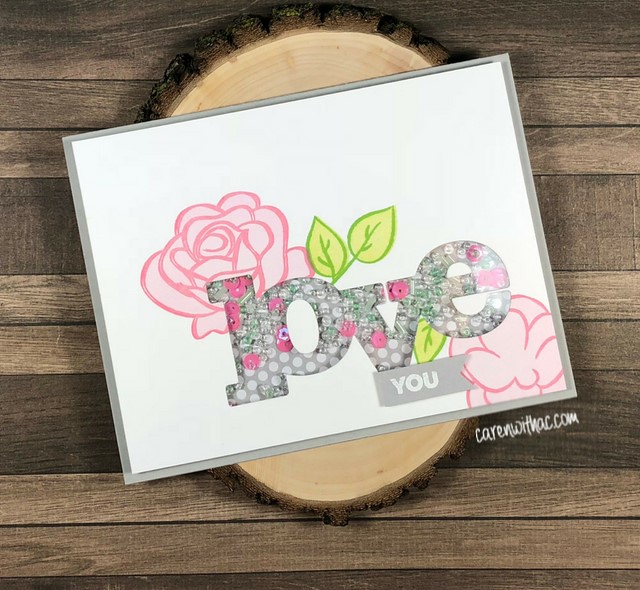
For the sentiment I used In a Word: Happy and Birthday Cutaways. I die cut them using black glitter cardstock and adhered directly on the background panels. The secondary sentiment is from the The Big, the Bold and Party stamp set. I stamped them using black ink on a white strip of cardstock, trimmed and adhered using foam adhesives. Finally, I added white Nuvo Crystal Drops to finish up the cards. The white drops picked up some colour from the die cuts on the edges. It looks so cool. I love it. 

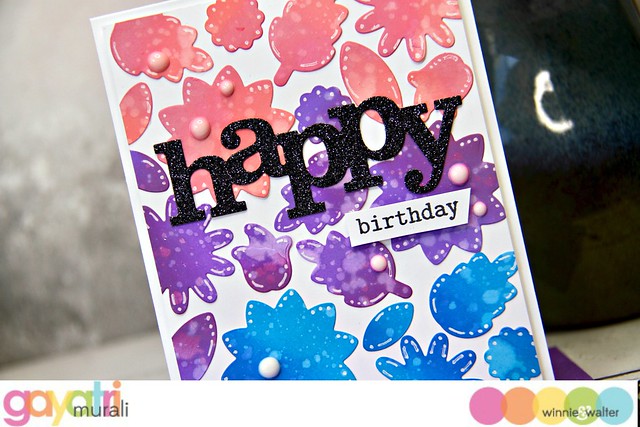
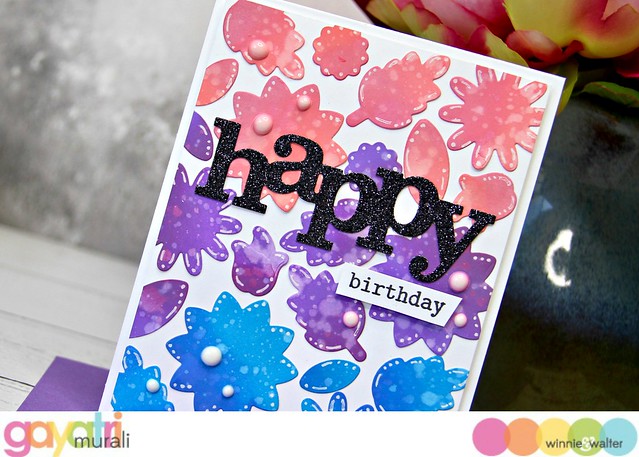
Here are the photos of the cards individually and closeups.

gayatri_W&W July card #2 warm gayatri_W&W July card #2 warm closeup1 gayatri_W&W July card #2 warm closeup

gayatri_W&W July card #2 cool gayatri_W&W July card #2 cool closeup1 gayatri_W&W July card #2 cool closeup

No stamping at all. Just using Cutaways to make a set of two cards. Something different to try right? If you make a card using this technique, share it on social media and tag us. All w&w supplies used to make this card are listed below.

Thanks so much for stopping by today.

My blog signature

w&w-supplies

Saturday, July 14, 2018

July Leading Lady Caren Bartholomew | Take Two

Our July Leading Lady Caren Bartholomew is back for her sensational second performance!  If you missed her smashing debut you must see it...CLICK HERE.   Today's cards will shake you out of any creative funk and get you inspired!

Ladies and gentlemen, Caren...

Hi everyone! It's week two for me as a Leading Lady here at Winnie and Walter. Thank for all the sweet comments and birthday wishes. It's not until the end of the month, but I like to celebrate all month long!
 

For week two, I'm sharing shaker cards I created with the great Winnie and Walter products. I absolutely love shaker cards, they are so much fun to create and recipients love them (especially my nephews.)

  caren_WWLL_Week2_1

For my first card, I die cut the scalloped heart from True Dotty Heart Cutaways from a piece of patterned paper. I adhered acetate to the backside of the patterned paper and added some foam tape to raise the card. I added flat heart confetti for the shaker part of the card. The bear and party hat are from the Happy Dance with Evelin T Designs stamp set. I did some masking to add the hat to the bear, colored the image with Copics, then cut it out on using my Silhouette Cameo. This set also has coordinating dies (I didn't use them because of the masking). I was going to add the sentiment, which is from Welcome to the Family with Evelin T Designs, directly to the patterned paper. I didn't like how that looked so I cut a panel of blue card stock out and used the scallop border die from Georgette Borders. I heat embossed the Happy Birthday sentiment, added a few enamel dots that coordinated with the paper, and added a white dashed accent line with a white gel pen.

  caren_WWLL_Week2_2

I love the way my second card turned out. I love flowers on cards, but for some reason, I don't make many cards using flowers. I used one of the Love dies from In a Word: Love Coordinating Cutaways and used the negative space for the shaker part of this. I stamped the flowers and leaves from the The Big, the Bold and Extras stamp set. I added acetate and added a double layer of foam tape to the back of the card panel. I doubled the foam tape because I added beads for the shaker feature and wanted to make sure they would move around. To complete the sentiment, I stamped "YOU" from In a Word: Love stamp set and heat embossed using white embossing powder. Thanks again for the love last week, the products from Winnie and Walter make it easy to make such cute cards. At the end of the month, there will be a giveaway of a $30 gift card from Winnie and Walter here on my blog.


I'll see you next week, thanks for joining me!


w&w-supplies