Monday, April 30, 2018

Bold Stripes Background with Crystal (Video) + Giveaway

Hello there lovelies!

First, I have been rather remiss in properly introducing our new Video Publicist, Crystal Thompson. I have had the pleasure of hanging out with Crystal and she is a joy to be around: warm; funny; friendly; creative; and helpful.  She was our Leading Lady back in June 2017.  I love her can-do attitude, zest for life, confidence and keen interest in creativity including the business side of it.

She joined The Talent back in January and has been adding videos to our YouTube channel every month since.  I hope you enjoy them and let us know if there are any particular tutorials you are interested in seeing in the future.   

I wanted to you learn a bit more about Crystal here and then see her awesome latest video.  Continue reading till the end to get the details about the giveaway.

>>>ABOUT CRYSTAL<<<

1. Favorite snack(s) while creating: Is a glass of wine considered a snack? lol. If not, raw baby carrots are my usual go to. 
2. Color combo I can’t get enough of: Mint, pink and gold! 
3. On my desk/table right now is: A crafty mess, my full planner and kid toys. 
4. I excel at: I don't know if I "excel" at anything. But I certainly feel I make lots of friends easily. 
5. When I craft I: watch tv/movies; listen to music; listen to the voices in my head; and/or prefer silence: I put on my headphones to tune out the 4+ kids and listen to audio books on my phone. I enjoy a good mystery. 
6. My favorite crafting companion: I like to craft alone, it's probably because I do not get time to myself without an interruption. 
7. Don’t you dare take this away from me: My phone! I use it for music, audio books, remote to the tv, my books, the pattern for my knitting. Yikes! 
8. My favorite crafting holiday/event: I love creating for Christmas. There are so many possibilities for color combos, I love the weather that totally makes it acceptable to spend the day creating since "the weather outside is frightful". 
9. My pictures are mostly of: The kids! Or as we like to call them "the muffin people". 
10. When I grow up I want to be:  An Olympic gymnast, who doesn't want to do back-flips on a balance beam, am I right?! 
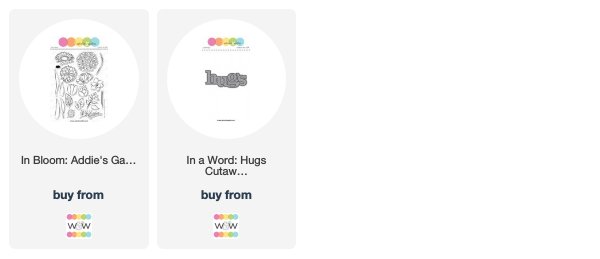
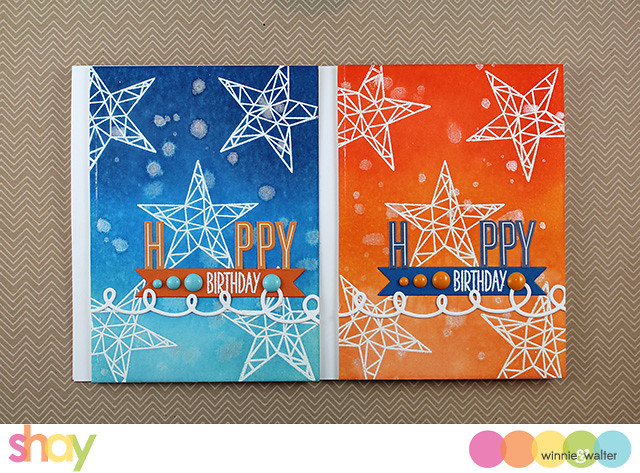
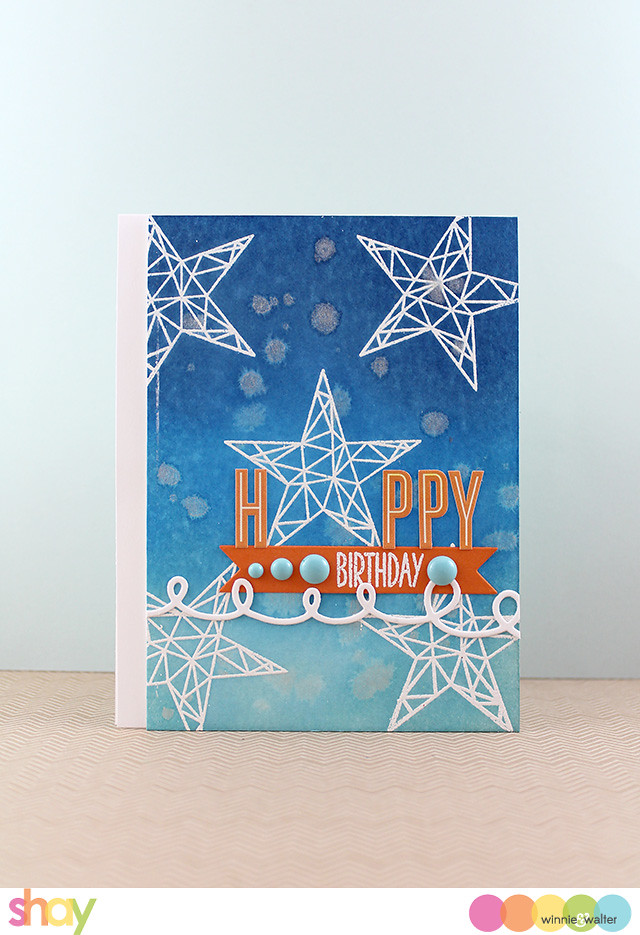
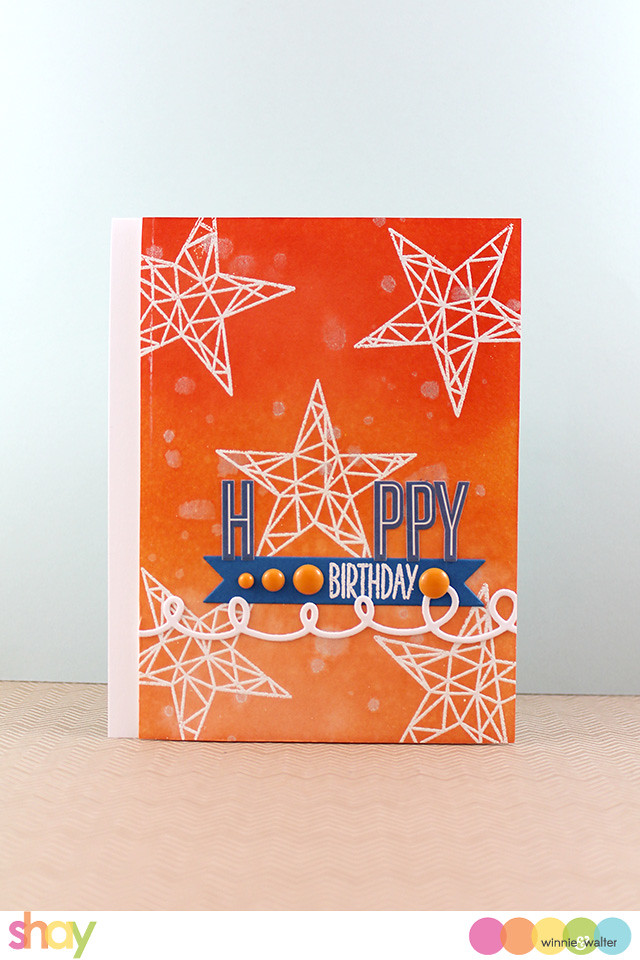
>>>NEW VIDEO<<<


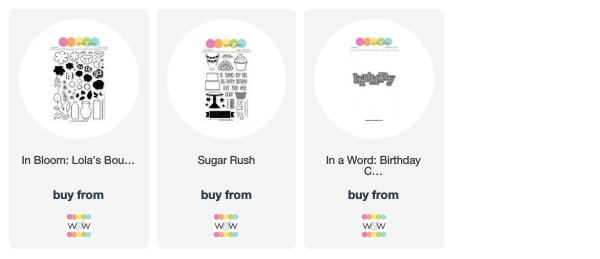
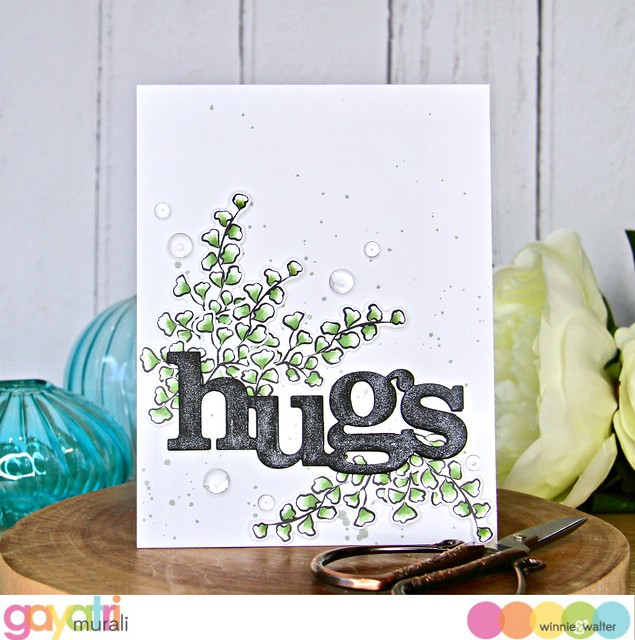
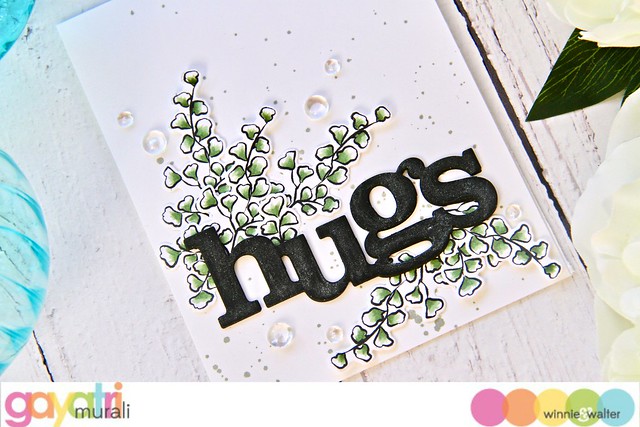
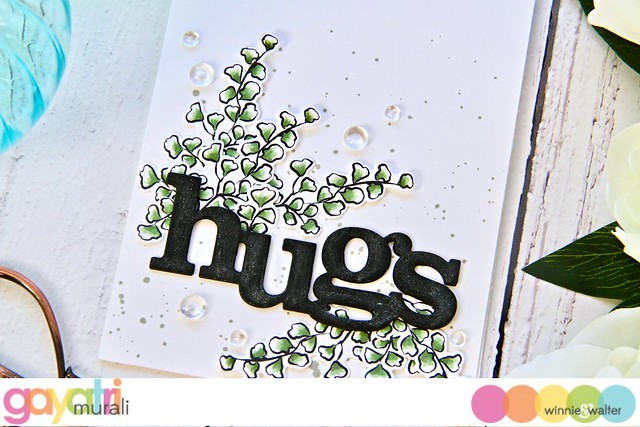
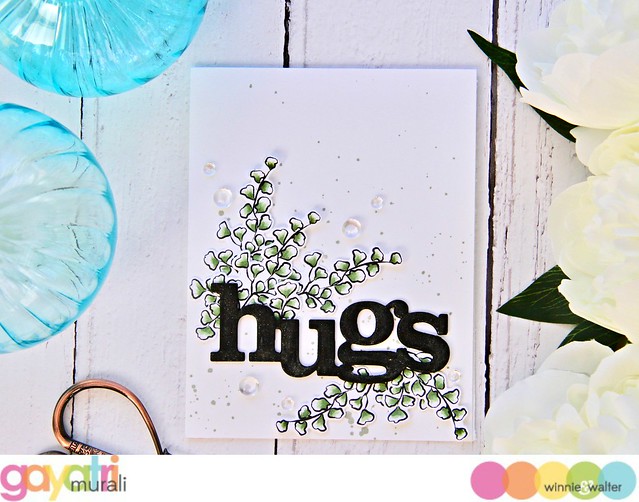
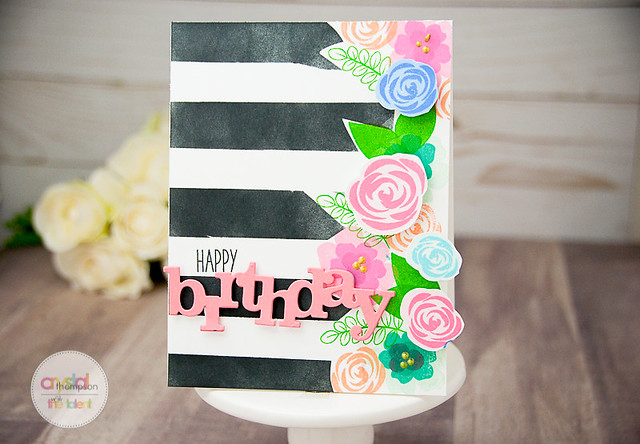
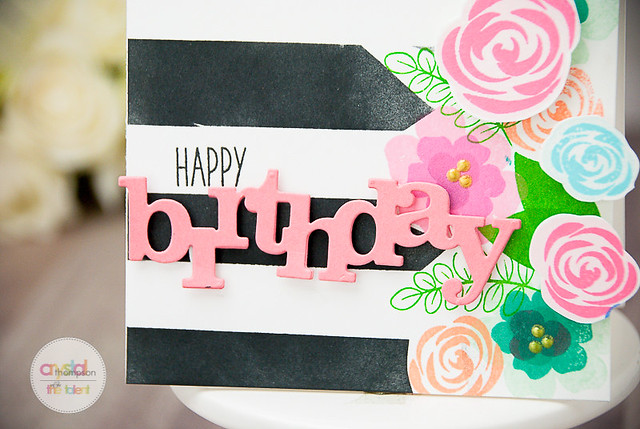
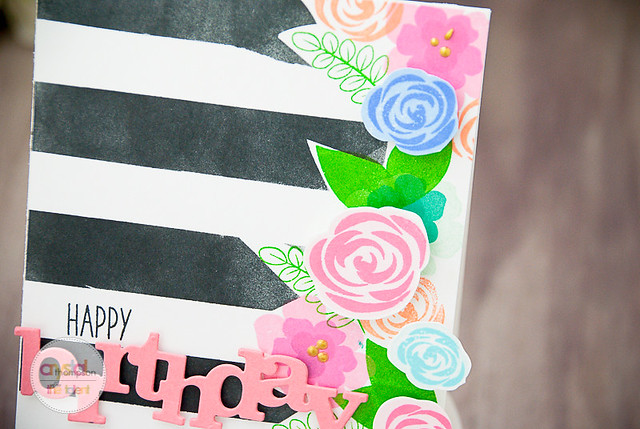
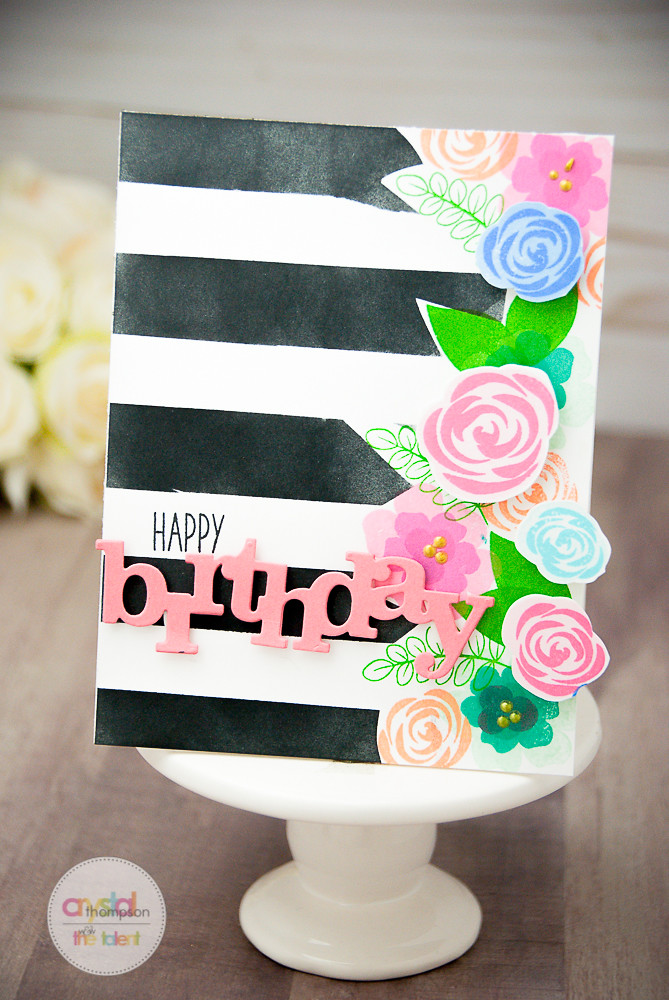
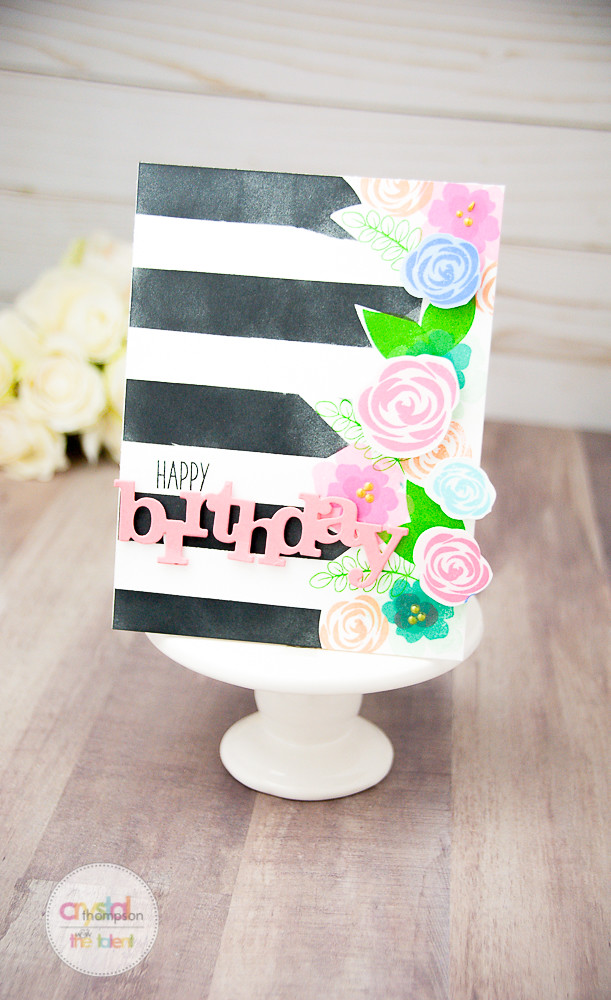
Here are some photos of Crystal's beautiful card to further inspire you:

Winnie Walter 4-20 (1 of 5) Winnie Walter 4-20 (2 of 5) Winnie Walter 4-20 (3 of 5) Winnie Walter 4-20 (4 of 5) Winnie Walter 4-20 (5 of 5)

>>>GIVEAWAY<<<

As a belated celebration of Crystal joining The Talent we are doing a giveaway of a $50.00 gift certificate!

Here are the rules:

1. Go watch Crystal's latest w&w video and comment on it.
2. Subscribe to our YouTube channel (if you haven't already).
3. Come back here and comment with your name and email address.
4. If you share about this giveaway on social media you can comment again on this post for an additional entry.
5. You have until Monday, May 7, 2018 until 11:59 p.m. CST to enter.

Good luck and happy creating!
Shay.


w&w-supplies

Saturday, April 28, 2018

April Leading Lady Deepti Aggarwal | Take Four

As April comes to an end we must sadly bid adieu to our amazing April Leading Lady Deepti Aggarwal.   The last few weeks with Deepti have been bursting with color, creativity, skill and artistry.  Week after week I have been delighted with the depth and scope of Deepti's talent showcased so spectacularly in her incredible cards.  I feel so very fortunate Deepti shared her talents with us this month and made this month something special.

If you missed her smashing debut you must see it...CLICK HERE or her sensational second performance with an amazing array of cards featuring a single stamp set CLICK HERE or her triumphant third performance with a terrific trio of cleverly colorful cards CLICK HERE!

Lucky for us all we have her final command performance today.  


Deept_Aggarwal_april2018

Hello Everyone...I'm back  and can't believe this is my last post as Leading Lady...Looks like April flies away so fast for me. But I really enjoyed each and every minute of creating with my awesome winnie and walter goodies.Thank you so much Shay, for this wonderful opportunity!!  For my final performance, I've decided to go with my love for "Critters".. If given a choice, then anytime, I'll chose critter over a floral...yes.. That's me..😉 If you'll  see my craft stash or my Instagram feed, 80% of them will be critters...😁 I think enough of talking..Let's see my first card..


To make this card, I took white card stock and die cut the rectangles randomly using Essentials: Lana Cutaways. Then, I took another white card stock and distress inked the background and splattered it with water to add some interest. Meanwhile I stamped  and water coloured these cute critters from  Dog-gone Cute with Evelin T Designs and die cut with Dog-gone Cute with Evelin T Designs Cutaways. After that I stamped the sentiment from same stamp set and adhered  this panel to inked card stock with foam tape to give it some dimension. Then I glued all the critters using foam tape and mounted this panel on white note card to complete it. Here is the close up.


For my second project, I created this night scene using faber castell gelatos where I masked the moon. Once satisfied, I splattered it with white gesso and doodled some stars  and die cut it panel using Essentials: Lana Cutaways. Meanwhile, I stamped and water coloured this cute couple from Dog-gone Cute with Evelin T Designs  and  die cut it with Dog-gone Cute with Evelin T Designs Cutaways. Adhered this to the background with foam tape for some dimension. 


After that I stamped the sentiment from In a Word: Love (the stamp set) and Sentimental: Love. Added some red heart embellishments to finish it.


For my final card, I went off the page..I really wanted to try this technique and I'm glad, finally I did..To make this, I took water colour card stock and partially die cut this cute kitties using Purrfect with Evelin T Designs Cutaways. Then I stamped it with coordinating stamps from Purrfect with Evelin T Designs stamp set and water coloured it. Coloured the base with green and then stamped the sentiment from same stamp set.


After that I adhered this on white note card to complete it.. Here is the close up..


Here is the pic of all these cards together.. I really enjoyed playing with these cute critters..I hope I've given you some inspiration to take out your cute critters stamp and play with it.


Thank you so much for stopping by!! If you'd like a chance to win a $30 gift certificate to Winnie & walter , leave a comment on all of Leading Lady posts on my blog by 30th April. I will randomly draw a winner from all of the comments and announce the winner on my blog on 4th May. Have a wonderful weekend!!


Hugsxx Deepti Aggarwal


w&w-supplies

Friday, April 27, 2018

April Documentarian Jen Gallacher | Take Two

It is time for the second and final project post by our April Documentarian, Jen Gallacher.  

Don't miss out on her introduction HERE or her first gorgeously layered layout HERE.  

It has been such a privilege to have Jen as our Documentarian this month.  Her keen use of color, patterns, layering and exceptional skill at balancing her layouts are so inspiring!.  I hope you will try some of her techniques on your memory keeping projects or even on other crafting projects.   

Today's layout is not only beautiful, but so very artfully executed!  

Once again, Jen....


Stamping on a layout is a great way to add dimension and customized designs to a scrapbooking page. In this layout, I'll share some tips and tricks for using a stamp set to create a beautiful layout that features a wreath and diagonal design. Keep reading for some tips and to shop the beautiful stamps and dies from Winnie and Walter. Want to get your hands on some of these amazing products? Be sure to leave a comment on this blog post HERE for your chance to win a $30 Gift Certificate. All entries are due by April 30th, 2018 to qualify for the drawing. 

How to Stamp on a Layout:

* Use stamping inks in the same color but in different tones. For the strawberries, I stamped a lighter red for the middle of the berry and then used a cherry red to stamp the seeds in the berries.THIS layered stamp set makes quick work of the details for this page.

* Use the corresponding die set to quickly cut out all of your stamped images.


* Layout out the shape of your wreath first. Then I go back and adhere each piece with glue dots or strong adhesive.


* Stamp your title and journaling in bright colors. I used green and yellow for the title and then stamped the journaling with bright, red ink.


* Create your own patterned paper. Repeatedly stamp an image onto cardstock to create a polka dot, stripe or random pattern. This way you can ensure you get the exact pattern you want to coordinate with the rest of your embellishments like the berries on this page.

Here's another look at this layout. Be sure to pin your favorite images for inspiration later!


w&w-supplies 

Thursday, April 26, 2018

Hugs with Gayatri

Hey Y'all! Gayatri here. This is my last project for the month of April. Hope you have been enjoying my projects this month.This is a clean and simple card.

gayatri_Hugs Card1

I stamped this foliage image from In Bloom: Addie's Garden stamp set five times using copic safe black ink and coloured the images using copic markers in muted green. Then used the coordinating cutaway to die cut them all out.
Sentiment is In a Word: Hugs Cutaway die cut three times using black cardstock. Then stacked and glued and brushed with Wink of Stella clear shimmer pen.

To assemble the card, I spattered some Iced Spruce and Forest Moss distress ink on the card front. Then adhered the sentiment die cut on the bottom centre of the card front. Then tucked the foliage on the top left of the sentiment and bottom right of the sentiment as shown. Finally embellished with clear droplets.

Here are some closeups of the card.

gayatri_Hugs card closeup gayatri_Hugs Card closeup1

Hope you are inspired by the simplicity of this card. All the supplies used to make this card are listed below. 

gayatri_Hugs Card flat1

Thank you so much for stopping by. Have a lovely day!

My blog signature

w&w-supplies

Monday, April 23, 2018

2018 Mega Sponsor Spring Blog Hop


Hi there lovelies!  It's Shay here and today is the big day! 


We are excited to be part of this exciting event. We have partnered with 17 other stamp and papercraft companies to do a special blog hop and will be giving away 18 prizes to 18 lucky winners!


Blog hop begins today, April 23 12 noon EST
Ends Friday, May 4 12 midnight EST
Winners announced: Friday May 11, 12 noon EST


Here's how you enter:


1) Follow this blog and each participating sponsor in the hop
2) Comment at each blog stop


You should have come from the remarkable Reverse Confetti, but if you are lost here is the full blog hop list:

Now on to the projects we have to share with you.

I made a couple of birthday cards perfect for boys.

  shay_IMG_3729

I first stamped the stars from True in Versamark ink on two panels of white cardstock making sure to place one star in the middle and then heat embossed them with white embossing powder.  I used some blue and orange Distress Inks and a ink blending tool to create the ombre effect on each panel and made sure to rub off any color clinging to the embossed stars.   I cut out the double sided notched strip from Essentials: Katharine Cutaways from orange and blue cardstock.  I stamped "birthday" from Sugar Rush using Versamark and white embossing powder on the strip.  I attached the strip under the middle star and added the sticker letters with the star standing in as an "a".  Twice I cut out the swirly lines in white from Goldie Trim Cutaways and attached those under the strips.

I realized I wanted the colored panels to not be as wide so I cut them but you will see there is a white line one each of the upper left hand side of each panel.  I recommend perhaps placing a piece of plain paper over the embossed paper for trimming so you don't have the same problem.  I then attached each panel to an A2 white card base with foam dimensional adhesive.  I splattered some shine spray on the panels and enamel dots to finish off the cards.

  shay_IMG_3724 shay_IMG_3727

Your next stop is the incredible IOS Stamps!


Thank you so much for joining us!

Have fun hopping,
Shay.

Saturday, April 21, 2018

April Leading Lady Deepti Aggarwal | Take Three

Our April Leading Lady Deepti Aggarwal is back for her triumphant third performance!  If you missed her smashing debut you must see it...CLICK HERE or her sensational second performance with an amazing array of cards featuring a single stamp set CLICK HERE.   I really love today's theme and her terrific trio of cleverly colorful cards!

Without further ado, Deepti...

Deept_Aggarwal_april2018

Hello Everyone!! I am thrilled to be back with my third performance. Thank you so much for all your love..I've really enjoyed reading all your comments here and at my blog..😍.. Today, I 'm sharing couple of cards using my favourite colour theme..Any Guesses.??? Yes.. It's Rainbow... and I've coupled it with floral coz it's SPRING .....😁.. Here is my first card...To make this, I took A2 size white water colour card stock and stamped the swirl roses from Dotty About You with Lydia Evans using rainbow coloured distress ink. Then I stamped the tiny flowers and leaves from In Bloom: Ashlee's Rosie Posies with Lydia Evans with same distress inks. After that I took wet brush and spread the distress ink to fill colours in flower and leaves and splattered it with black colour.


Once satisfied, I die cut out some of the swirl roses using coordinating dies from Dotty About You with Lydia Evans Cutaways. Adhered this panel on white note card, glued the die cut  roses at their respective places using foam tape for some dimension. Then I die cut love word from In a Word: Love Coordinating Cutaways on black card stock and layered it with another love die cut for which I used gold glitter foam sheet. Adhered this layered word die cut to middle of the wreath and then stamped the "you"sentiment from In a Word: Love (the stamp set).Finally added some gold sequins to complete it. Here is the close up..


For my next card, I created washed water coloured rainbow background and splattered it with black colour. Then I die cut the borders using scalloped border dies from Georgette Border Cutaways. Adhered this water coloured panel on white note card and I've given some space while adhering the border to add some interest.. After that I die cut swirl roses on white card stock from Dotty About You with Lydia Evans Cutaways and further trimmed it to make different sizes..


Arranged these swirl roses on my card stock and glued it with foam tape to give it some dimension,. After that I die cut 'you' from same cutaway using both the 'you' dies and gold heat embossed the top layer and adhered it to black base layer with foam tape. Adhered this layered 'you' on the swirl roses and then added rest of the sentiment from Dotty About You with Lydia Evans on white paper strip. Completed this by adding some gold nuvo drops.


And here is my final card, to make this.. I stamped roses from In Bloom: Ashlee's Rosie Posies with Lydia Evans stamp set with rainbow coloured distress inks and inked the background with same distress ink colour. Once satisfied, I splattered it with some water and die cut it using Essentials: Lana Cutaways. After that I stamped the sentiment from same stamp set.


Then I die cut the word 'beautiful' using  In Bloom: Ashlee's Rosie Posies with Lydia Evans Cutaways and adhered it with some foam tape to the base card . Covered it with glossy accent and added some rainbow sequins to complete it.


Here is the pic of all of these together.. I hope I've inspired you to create your own rainbow card..


Thank you so much for joining me today on Winnie&Walter blog !! Don't forget to head over to my blog and leave a comment on all of my Leading Lady posts for a chance to win a $30 gift certificate, generously provided by Shay!!


See you again next week for my final performance as April's Leading Lady!! Till then, Happy Crafting!!

Hugsxx
Deepti Aggarwal


w&w-supplies

Friday, April 20, 2018

April Documentarian Jen Gallacher | Take One

It is time for the first project post by our April Documentarian, Jen GallacherDon't miss out on her introduction from last Friday==> CLICK HERE.  I am so thrilled with the gorgeous layout she created and I have already learned so much!

Ladies and gentleman, Jen....


Have you tried using stamps on your scrapbooking layouts? Stamping for scrapbooking is an easy way to fully customize your scrapbooking layouts. I was super excited to use several die and stamp sets from Winnie and Walter to create this beautiful layout. Keep reading for some instructions on how I created this layout. Be sure to pin your favorite images for inspiration later!

How to Add Stamps to a Scrapbooking Layout:

Step 1: Use a stencil, a foam applicator, and yellow stamping to create a diagonal pattern on white cardstock.


Step 2: Using a variety of yellows and greens, stamp and die cut flowers, leaves, and a title for the layout.


Step 3: Use the stamp rectangle shape dies to die cut two different sizes of photo frames from green cardstock. This will require the use of a manual die cut machine.


Step 4: Using the manual die cut machine, cut a variety of shapes from purple patterned paper and black patterned paper.


Here's a look at the finished layout. You can see I added some additional embellishments, and journaling to make this page really pop. But most of my items are die cut, stenciled or stamped items from Winnie and Walter. What's so amazing about these types of projects is that I can continue to use these items for future projects. Now that's stretching your supplies.


w&w-supplies