Showing posts with label shona chambers. Show all posts

Saturday, December 31, 2016

December Leading Lady Shona Chambers | Take Five

December and 2016 will ending in a few short hours which sadly means it is our last Saturday with our dazzling and delightful Leading Lady, Shona Chambers.  The last five weeks with Shona have been a revelation in fabulous design, thoughtful touches and sweet simplicity.  Each festive post has been a great joy to behold and really made this December all the more merry and bright for her holiday cheer and creativity.  I feel so fortunate for Shona sharing her talents and self this month!

If you missed her smashing debut you must see it CLICK HERE or her sensational second performance focusing upon beautiful backgrounds CLICK HERE or triumphant third performance full of stunning shimmer and shine CLICK HERE or her fabulous-filled-with-heat fourth performance CLICK HERE.

Lucky for us all we have her final command performance today.  

Hi there everybody!! I hope you all had a wonderful Christmas and holiday time with your family and friends, were spoilt rotten and are now a few pounds heavier like myself!!!

I can't believe it's time for my fifth and final post as the Winnie and Walter - December Leading Lady. I've had so much fun this month showcasing their wonderful new release products and using older ones that are favourites from my own stash. I've really enjoyed myself and this is a bittersweet post for me. 

Shona_Chambers_december2016


Thank you so much to all of you for popping in for a visit each weekend to see what I've come up with and being so supportive with your wonderful comments. And of course a huge thank you to Shay for giving me this massive opportunity to be a part of the Winnie and Walter team for a few weeks. It really has been a dream come true!!

Right, I better get on to showing you a few cards (which is what you came to see....) before I need to reach for my tissues again!! I have one more lot of Christmas cards to show you and this time I've gone for a theme that many of you dread.....one-layer cards!! These are sometimes the hardest cards to make, trying to create interest without all the bulk but once you get the hang of it, the possibilities are endless! 

shona_week5_image002

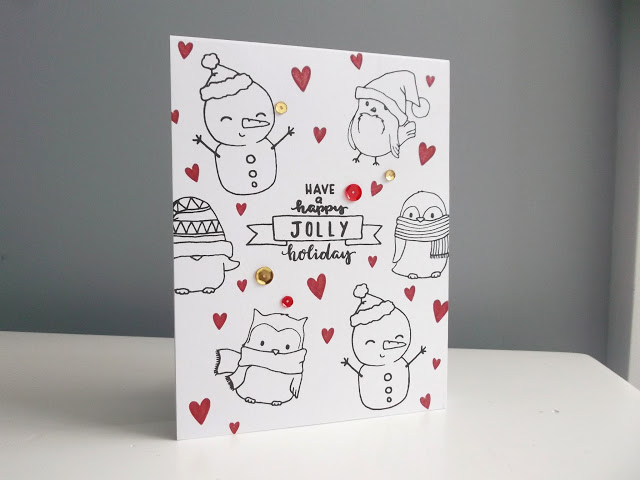
For this first card I wanted to include many of the cute Christmas characters from the new release. The owl and birdie with hat are from Happy Owlidays with Evelin T Designs. The snowman, penguins and sentiment are from Season's Tweetings with Evelin T Designs.  I used my MISTI to arrange all the stamps on the card front at the same time and stamp all with black ink. I then randomly stamped the hearts 'Sending You with Evelin T Designs' (to be released early in 2017) in red ink, gave them all a quick coating of Wink of Stella, and glued on some sequins from Neat and Tangled. 

shona_week5_image003
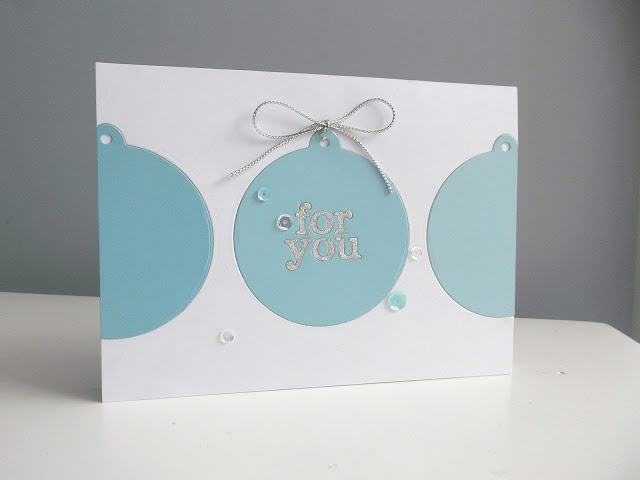
For my second card I decided to include some 'inlaid die-cutting' which is a brilliant one-layer technique to master!! I cut a panel of white card stock the same size as the card front and die-cut the Christmas bauble from Essentials: Carly Cutaways three times. I grabbed some blue paint chips in shades that created an 'ombre' effect and cut the bauble from each one. For the middle bauble I die-cut the 'for you' (from the same cutaways set) and also from some silver glitter card stock.

Now the fun part! I adhered the die-cut panel to the card front and inlaid each coloured bauble, making sure the top part of the middle one wasn't stuck down. I then used my Quickie Glue Pen to inlay the 'for you' pieces and tied a piece of silver metallic twine to the top. And of course I had to finish it off with some sequins from Pretty Pink Posh.

shona_week5_image004
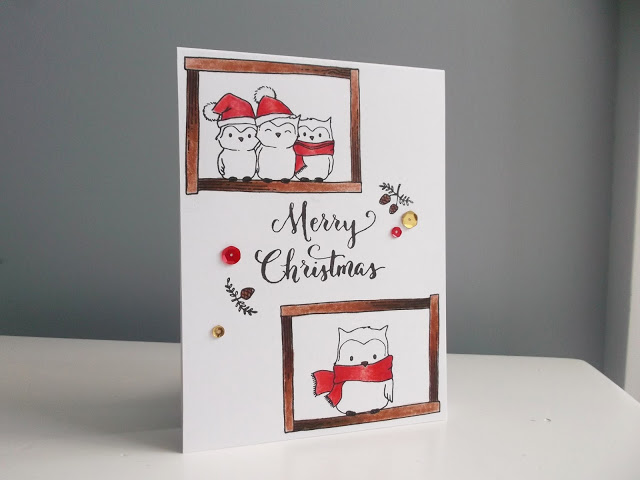
With this card I wanted to show how you can create dimension and interest by colouring your images. Not that my colouring skills are all that great but you get the idea! I started by stamping the frames (from Framed with Evelin T Designs) using my MISTI. I used it again to stamp the owls (from Happy Owlidays with Evelin T Designs) as it helped line up their feet with the edge of the frames. While there I stamped the sentiment and pine-cone sprigs from Merry and Bright with Evelin T Designs

Now all I had to do was sit down and relax somewhere and colour this in using my favourite Faber Castell pencils. I decided to only do some, what I call, 'Spotlight' colouring of the hats and scarves, and save the brown colouring for the frames. This is where I could add the most dimension with shading. A few sequins from Neat and Tangled gave it a bit of shine!

shona_week5_image005

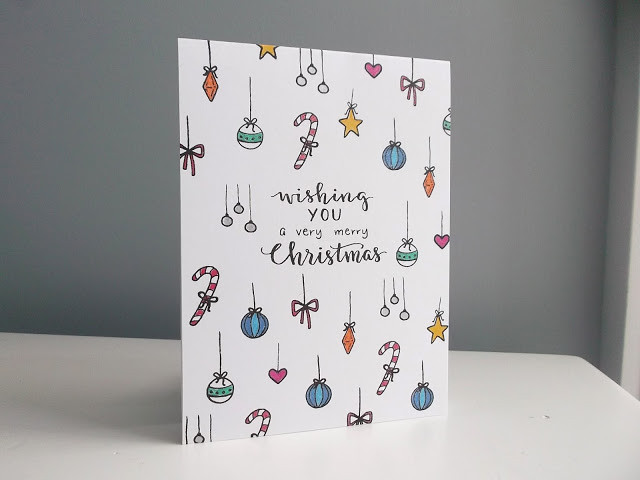
As usual I saved one of my favourites for last! This is one of those designs where you could colour it however you like, making many of them with different colour combo's. I used my MISTI to stamp the sentiment in the middle and then all the ornaments around the outside in groups. All of these images are from Happy Owlidays with Evelin T Designs. To colour these in, I used glitter gel pens from Kaisercraft. Wish I could capture the shimmer of these colours in the photo!

Well, I'm afraid that's it! That's my last Leading Lady card but you will still see me around Blogland and Instagram using my Winnie and Walter products for all sorts of cards. And don't forget to pop over to my blog Twine Around to leave a comment on my Leading Lady posts for a chance to win a $30 Winnie and Walter gift card!!


w&w_30giftcard


Thanks again everyone for your support and feedback. And huge hugs to Shay and Evelin for creating such an amazing new release, it made creating my cards so easy!!

Take care and Happy New Year!!
Shona


w&w-supplies

Saturday, December 24, 2016

December Leading Lady Shona Chambers | Take Four

Our December Leading Lady, Shona Chambers, is back for her her fantastic fourth performance!  If you missed her smashing debut you must see it CLICK HERE or her sensational second performance focusing upon beautiful backgrounds CLICK HERE or triumphant third performance full of stunning shimmer and shine CLICK HERE.  Hailing from New Zealand, Shona is about to heat up your Christmas with her gorgeous cards today!

And now we present Shona....

Hello there everyone and thank you so much for stopping by for my fourth Leading Lady post!! The time-zone difference makes it a bit tricky as when this post is published its 2am December 25th for me (New Zealand is the first country to start each day) so Merry Christmas to everyone in my area of the world. To the rest of you, I'm sure your right in the middle of wrapping, cooking, cleaning and cooking again, so I really appreciate you visiting me today!!

Shona_Chambers_december2016


I'm still completely in Christmas mode for this post, with my theme this time being 'Heat Embossing'. I must say its one of my most favourite techniques and I'm still in awe while watching the embossing powder melt, its so magical! I definitely need more embossing powders and must make sure I get some glitter ones for next Christmas but in the meantime I hope you enjoy what I created!

shona_week4_image002

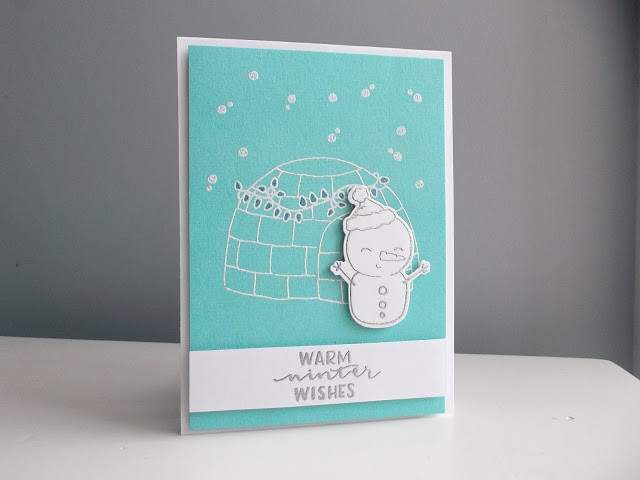
For this first card, I decided to take a leaf out of Jennifer McGuire's book and create the same card but in different colours, so I made this three more times with bright pink, mint green and light blue card stock. Was such a great idea and made them all at once.

I started by cutting the panel of coloured card stock slightly smaller than my card base and heat embossing the igloo (from Season's Tweetings with Evelin T. Designs) and snow (from Framed with Evelin T. Designs) in white. It was then popped up on foam tape. To add a little sparkle I coloured the christmas lights using a blue glitter gel pen from Kaisercraft.

I stamped and heat embossed the snowman and sentiment (also from Season's Tweetings) in silver on white card stock and used the matching die (from Season's Tweetings with Evelin T. Designs Cutaways) to cut out the snowman. He was put on foam tape, as well as the sentiment in a strip. Such a cutie!!

shona_week4_image003

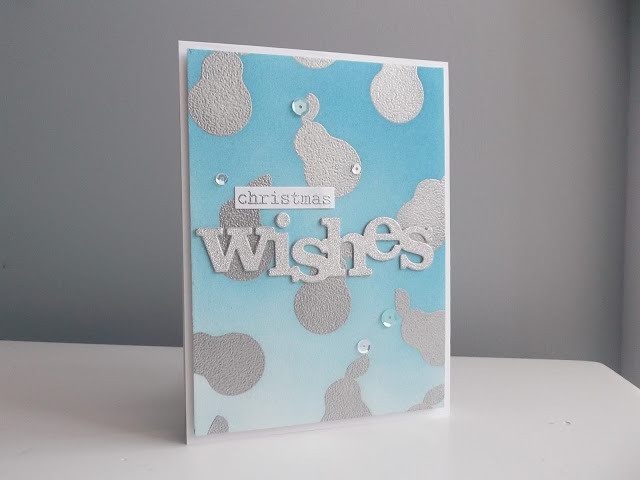
For this second card, I decided some blending was called for. I cut a panel of white card stock slightly smaller than the card front and randomly heat embossed the pear (from In Bloom: Frenchy's Festive Florals with Angelica Suarez) in silver. I then used a mini-blending tool and Distress Ink 'Salty Ocean' to create this ombre effect before popping it up on foam tape.

To finish off I die-cut the In a word: Wishes Cutaway from silver glitter card stock and twice more from white card stock. These were all glued together and then to the card. To finish off I heat embossed the 'christmas' (from The Big, the Bold and Greetings) and adhered to the card along with aqua and clear sequins from Pretty Pink Posh.

shona_week4_image004

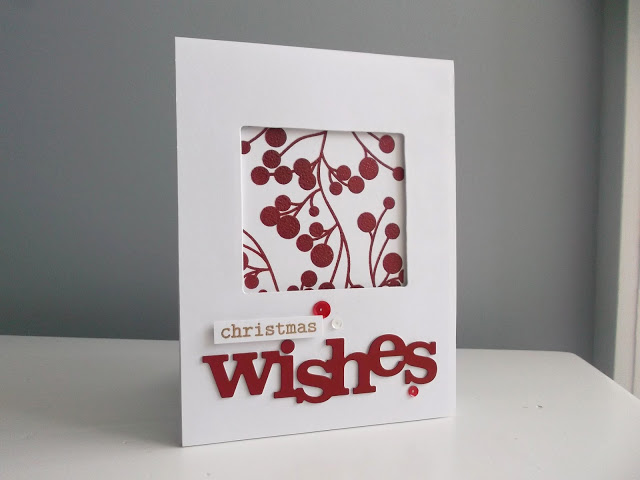
For my third and final card, I thought I better break out of my 'blue and white' colour combo and go for something more bold! On a piece of white CS I used my MISTI and stamped the Mini Scenery: Merry Berry twice with red ink and then with Versamark Ink so I could then heat emboss with clear embossing powder. This was then adhered to the front of the card.

I cut a panel of white CS the same size as the card base and used a square die from Framed with Evelin T. Designs Cutaways. The panel was then put on foam tape as a window. I used the In a word: Wishes Cutaway to die-cut a red paint chip and put it on foam tape. I then heat embossed the 'christmas' (from The Big, the Bold and Greetings) in gold and put on foam tape, as well as adhering some red and white sequins from Neat and Tangled.

I really hope you enjoyed these cards and maybe found a few ideas you could try with your own designs. Don't forget to leave a comment on my Leading Lady blog post on my blog Twine Around for a chance to win a $30 gift voucher from Winnie and Walter!!


w&w_30giftcard


Right, back to your Christmas preparations. I hope you all have a wonderful Christmas celebrations with your family and friends, that your day is filled with laughter, good food and hopefully good weather! I'll see you all here next weekend for my fifth and final Leading Lady post.

Take care
Shona


w&w-supplies

Saturday, December 17, 2016

December Leading Lady Shona Chambers | Take Three

Our December Leading Lady, Shona Chambers, is back for her triumphant third performance!  If you missed her smashing debut you must see it CLICK HERE or her sensational second performance focusing upon beautiful backgrounds CLICK HERE.  Today Shona has added some shimmer and shine to her stunning holiday cards!

Without further ado, Shona....

I'm back!! Yes its me again with my 3rd post as the Winnie and Walter - December Leading Lady!!

Shona_Chambers_december2016


I'm still in 'Christmas card' mode and have actually only just posted my cards. Hopefully they will make around the world before next year but its the thought that counts....I hope.....

For this post I wanted to concentrate on 'Metallic' designs. I LOVE using gold, rose gold and silver on my cards at any time of the year but it just seems to go with Christmas so perfectly. 

shona_week3_image002

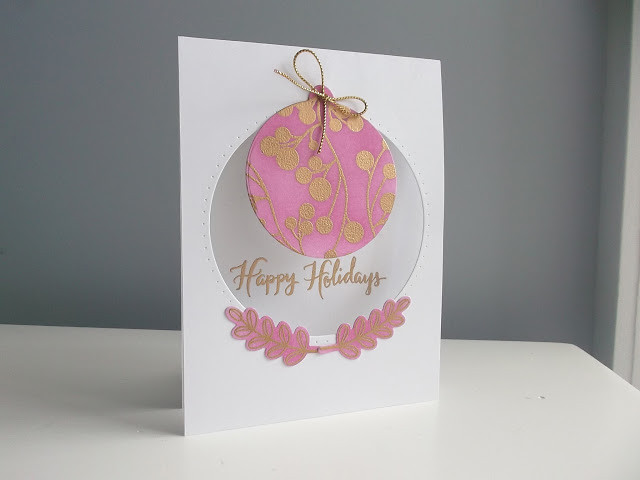
For this first card, I actually came up with the design while decorating the Christmas tree with baubles. I thought it would be great to have one hanging in a card and it could be used on their tree. I started off by die-cutting the hole in the card front using Essentials: Carly Cutaways. On a piece of white card stock I heat embossed the Mini Scenery: Merry Berry and the leaves from Framed with Evelin T. Designs with Ranger 'Queens Gold' embossing powder. I like this because its more of a rose gold than yellow gold.

Over the embossed images I used a blending tool and Distress Ink 'Picked Raspberry'. I die-cut the leaves with their matching 'Cutaways' and the gold berries with the tag die from Essentials: Carly Cutaways. I used a hole punch above the large circle and tied on the tag with gold twine. The leaves were glued on and I heat embossed the sentiment from Merry and Bright with Evelin T. Designs on the inside of the card.

shona_week3_image003

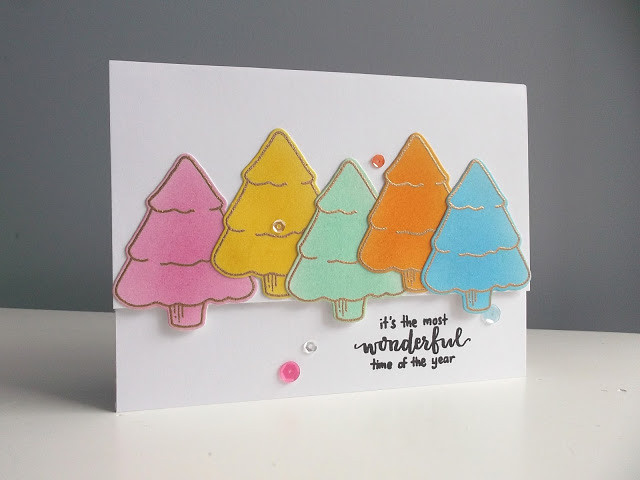
For my second card I wanted rainbow colours with gold. I heat embossed the tree from Season's Tweetings with Evelin T. Designs 5x on white card stock. I then blended Distress Inks 'Picked Raspberry', 'Mustard Seed', 'Cracked Pistachio', 'Spiced Marmalade' and 'Salty Ocean' over each one. I used the matching Cutaway to cut them out. I then cut a strip of white card stock and put it on foam tape on the card front. The tree's were adhered in place so some of them hung over the edge. The sentiment from the same stamp set was simply stamped in black ink and I added some co-ordinating sequins from Pretty Pink Posh. Nothing like a rainbow Christmas!!

shona_week3_image004

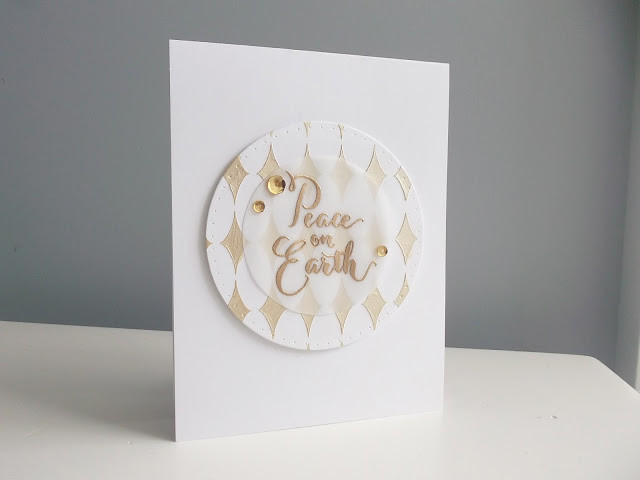
For this design I decided to use my Nuvo Mousse 'Mother of Pearl' with the Scenery: Harleen Creative Screening on some white card stock. Once it had dried I used one of the circle dies from Essentials: Carly Cutaways. This was popped up using foam tape on the card front. The sentiment from Merry and Bright with Evelin T. Designs was heat embossed with Ranger 'Queens Gold' on a piece of vellum. I used the small tag die from Essentials: Carly Cutaways to cut it out and simply cut off the tag hole part to make it a circle. This was glued over the mousse along with some gold sequins from Pretty Pink Posh.

shona_week3_image005

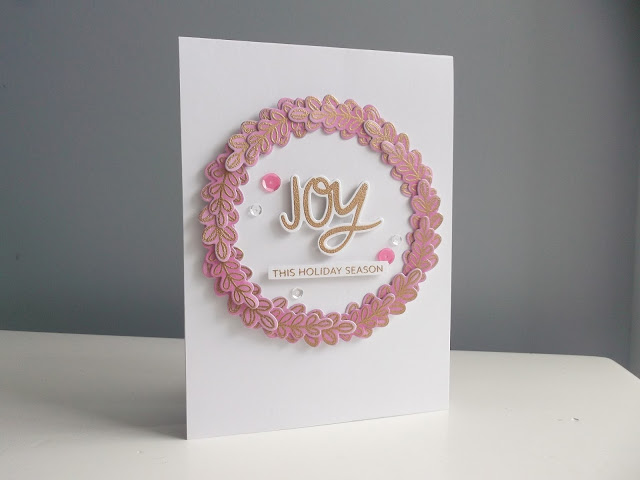
This card is one of my favourites!! I stamped and heat embossed lots of small and large leaves (from Framed with Evelin T. Designs) in Ranger 'Queens Gold'. I gently blended Distress Ink 'Picked Raspberry' over them all and then used the matching Cutaways to cut them all out. I also cut a circle from white card stock using a die from Essentials: Carly Cutaways to serve as a base to the wreath. 

I glued down all the large leaves first and then tucked in the smaller ones. Once finished the circle was put on foam tape over the card front. I stamped and heat embossed the 'Joy' and the rest of the sentiment from In Bloom: Frenchy's Festive Florals with Angelica Suarez. The matching Cutaway was used to cut it out and it was put on foam tape with the rest of the sentiment strip. And of course I had to add some pink and clear sequins from Pretty Pink Posh.

I'm sorry this is such a long post but I had so many ideas and wanted to make sure you knew how to put the cards together if you wanted to make them for yourself. Hopefully I've inspired you to try something new!

Don't forget to leave a comment on the Leading Lady posts on my blog Twine Around for a chance to win yourself a $30 Gift Card to Winnie and Walter. You might be able to get your hands on some of the new products I used!


w&w_30giftcard


Thanks so much for the visit and I hope you can pop in next Saturday to see what ideas I have for you!

Take care
Shona


w&w-supplies

Saturday, December 10, 2016

December Leading Lady Shona Chambers | Take Two

Our December Leading Lady, Shona Chambers, is back for her sensational second performance!  If you missed her smashing debut you must see it...CLICK HERE.  Shona takes on the holidays focusing upon one of my favorites with awesome results!

Ladies and gentlemen, Shona....

Hi everyone!! Thanks for coming back to visit with me again on the Winnie and Walter blog!! 

Shona_Chambers_december2016


I hope you enjoyed last Saturdays 'Clean and Simple' Christmas card theme and it gave you some ideas. For today's post I decided to concentrate on something I don't usually think about much - Backgrounds!!

As you can see from last weeks post I'm very much addicted to my white card bases and tend not to cover them up too much. However, every now and then I like to go crazy with a few stamps and dies and see what I come up with!!

shona_week2_image002

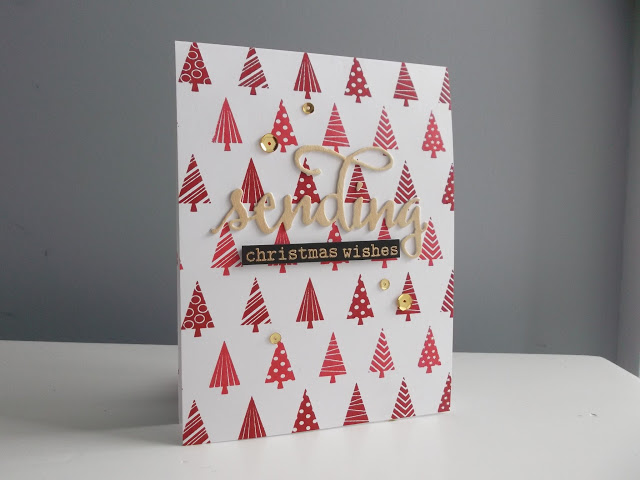
For this first card I used my MISTI and one of the new release stamp sets ''Scenery: Holiday Trimmings'.  Trying to line things up is not one of my best skills, so the MISTI was a great help to make sure the tree's were straight and spaced correctly. I simply stamped them in row's across my card front, using two different shades of red dye ink. I didn't want to cover them up, so I die-cut the sentiment from 'The Big, the Bold and Greetings Cutaways' from some wood veneer card stock, glued it to another few layers and then adhered to the card. The rest of the sentiment (from 'The Big, the Bold and Greetings') was heat embossed on black card stock, popped up on foam tape and some gold sequins added from Pretty Pink Posh.

shona_week2_image003

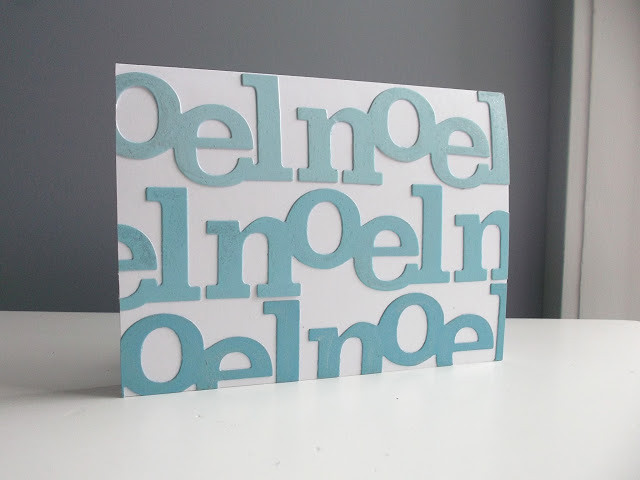
For my second card I decided that I could use some die-cuts to create a background. I chose some paint chips in slightly different blue shades (to create an ombre effect) and die-cut the 'In a Word: Noel Cutaway' from them all. I then simply adhered them in lines across the card front, cutting off the overhang. I then covered them in lashings of Wink of Stella for a bit of sparkle!!

shona_week2_image004

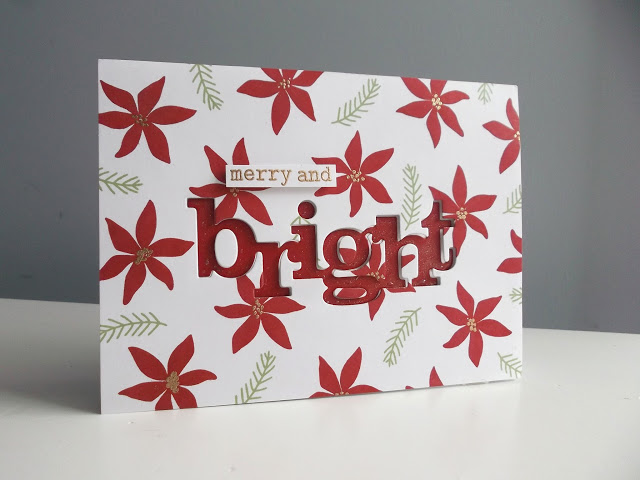
For my last card I combined both stamping and die-cutting. I cut a panel of white card stock the same size as the card front. The poinsettia and sprig (both from 'In Bloom: Frenchy's Festive Florals with Angelica Suarez) were stamped randomly across it. For a bit of shine I added dots to the middle of each flower with an embossing pen and heat embossed with gold. 

I die-cut the 'In a Word: Bright Cutaway' from the stamped panel and also from a red paint chip. The panel was popped up over the card front with foam tape and the red die-cut 'bright' was glued inset into it. I heat embossed the rest of the sentiment (from 'The Big, the Bold and the Merry') in gold and put on foam tape as well. I then put Wink of Stella on the red 'bright' for a bit of shine too.

I really hope you liked these cards and they have maybe given you a few ideas for your Christmas cards or any other cards you need to create. 

Don't forget to pop over to my blog to leave me a comment on this post and all my other Leading Lady posts to have a chance to win a Winnie and Walter $30 gift card.  Have fun crafting and see you all next Saturday!!

Take care
Shona


w&w-supplies