Monday, June 30, 2014

Share the Love Week Featuring Distress Inks | Day 1

share-the-love-graphic-distress-inks-ranger

Hello, hello, hello!  Welcome to the first day of our Share the Love Week featuring Tim Holtz Distress Ink by Ranger!  This is a week-long love fest where we focus on a company or product we adore and show how smitten we are by using our featured love with w&w products!

Tim Holtz Distress Ink are a fabulous product line brought to you by Ranger and the incomparable Tim Holtz.  They have unique properties which make them a terrific tool for creating fantastic projects.  We will be showing you a few ways to play with your Distress Inks this week, but by no means are they all of the wonders possible.  We recommend, if you haven't already, stalking following Tim Holtz's site and Ranger's site for more information and inspiration.

This time around we want you...yes, you...to participate with us for a chance to win some awesome prizes.

Our first day kicks off with what will surely be a very popular challenge: Watercolor/Watercolour!

Before we get to how you can participate to win, let's see what Julie, Shay and The Talent have made.

Julie

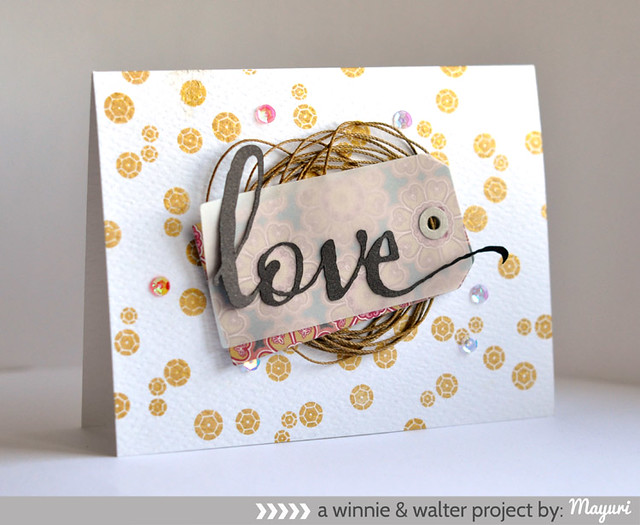
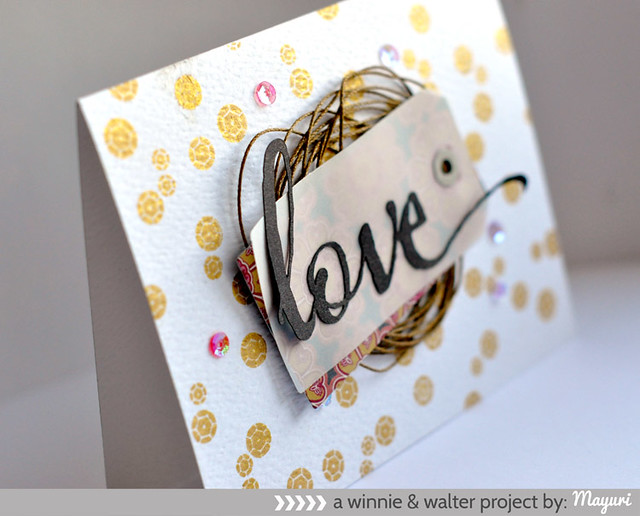
It's Share the LOVE week {insert huge smiley face here}!  Are you ready to get inky???  I love to get inky, especially with Distress Inks!  Today I am sharing a really fun way to get a water-colored background using Distress Inks and lots and lots of water! If you haven't tried this, you are in for a treat!

jmog_sharelove_distressWC-OLW2

These are cards for my One Little Word project (a la Ali Edwards) and I wanted to hand write short statements on a cute and subtle background.  Distress Inks to the rescue!  I took several of my favorite w&w stamps and inked them with Versamark Ink and embossed them with clear EP on watercolor paper. (This technique does not require watercolor paper, but I knew I would be adding a lot of water, and I wanted my project to hold up to all of the spritzing that was about to happen.)

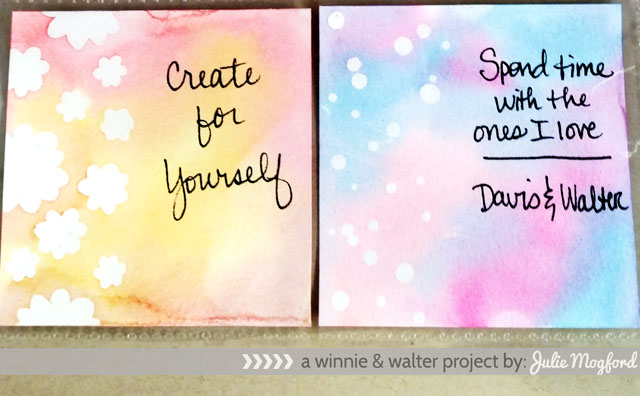
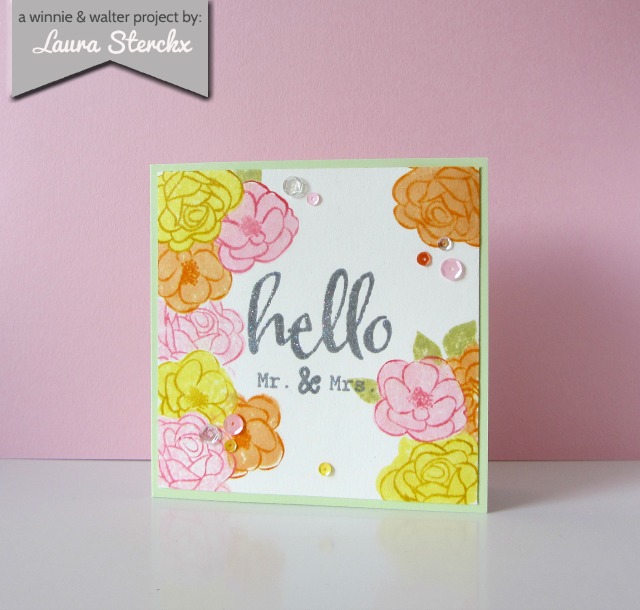
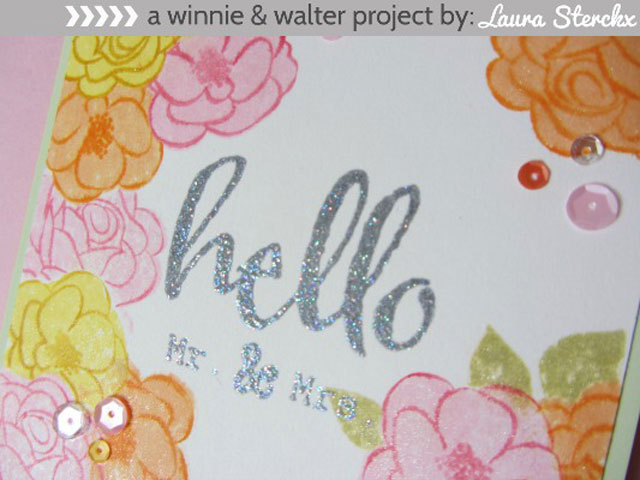
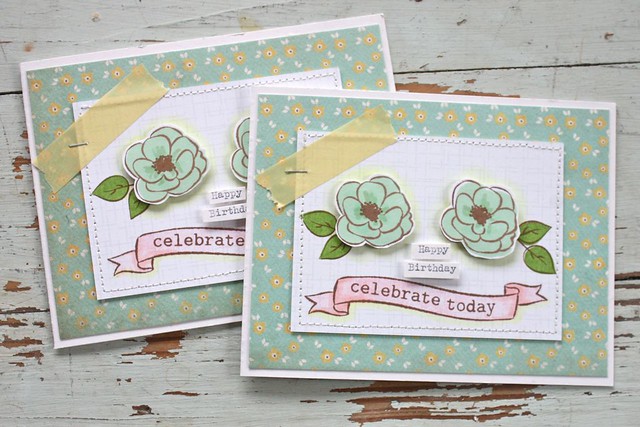
Cards 1 & 2 - flowers from The Write Stuff:  Leave it to Mom and confetti dots from Scenery: Big Bang Confetti

jmog_sharelove_distressWC-OLW

Cards 3 through 6 -  more Scenery: Big Bang Confetti (stars, circles and sci fi stars) and hearts from The Write Stuff: Love Story and You've Got Love Mail.

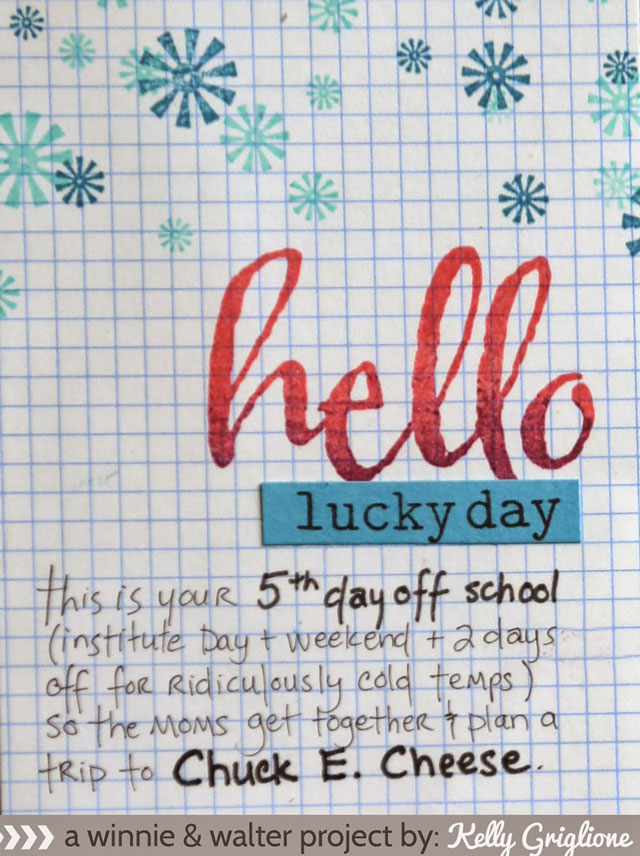
Once the embossed areas were cool, I inked up my my craft sheet with distress inks, just tapping the colors on the sheet randomly in an area just slightly larger than my paper.  I sprayed water over the ink until the water look like medium sized beads.  I then put my paper down on the watery ink and pressed and "smooshed" (you know it is a technical term) until I felt the card was sufficiently covered.  I turned it over and dried it with my heat tool.  If one area looked muddy, I used a paper towel to dab the excess. If an area needed more color, I either put the dried paper back into the ink again, or used a brush to add ink from the mat to the areas of the card that needed more color, and then dried again with the heat tool.  I love the look of the pooled ink inside the shapes.  It there wasn't enough color there, I definitely added more.

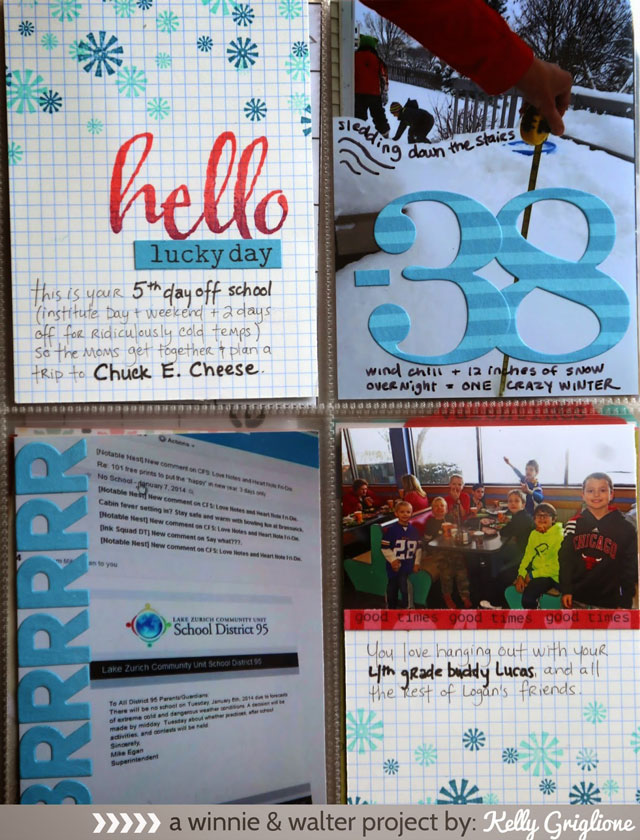
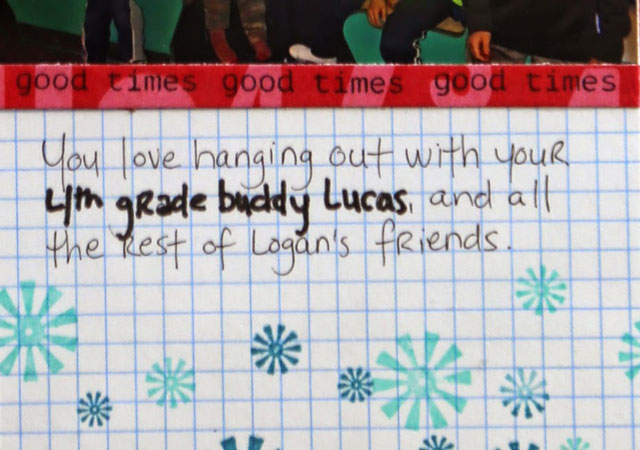
The soft blended backgrounds and the cute border accents on these cards are perfect for my personal journaling.  I think I will make more of these for my other albums too, and maybe try it on some Bristol paper as well.  It can definitely handle the excess water.  This technique is quick and easy, and yields some fantastic results.  I hope you liked this one and decide to get inky with us!!!

Shay

shay_watercolor1

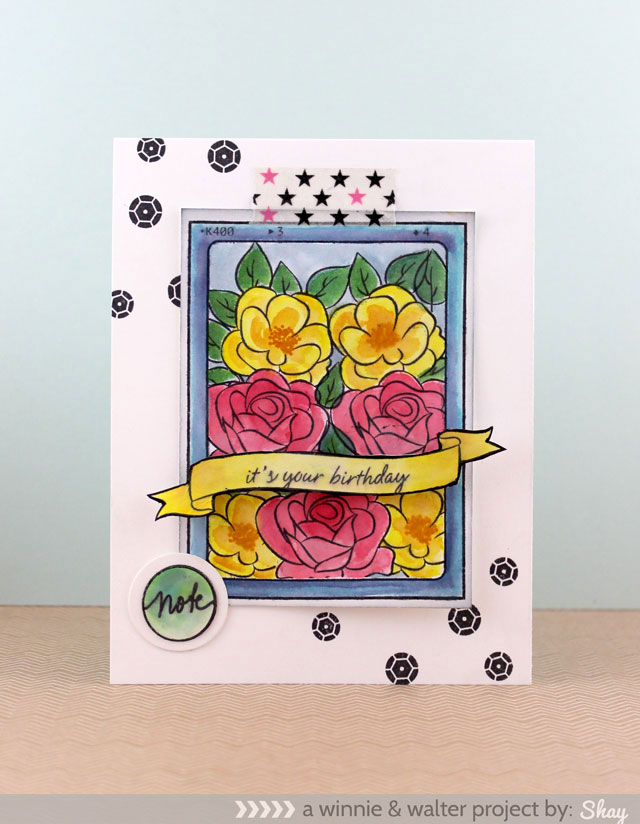
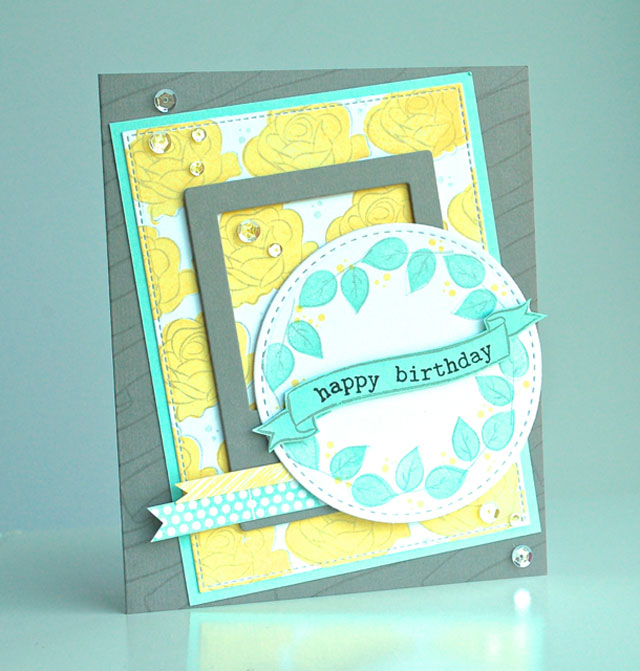
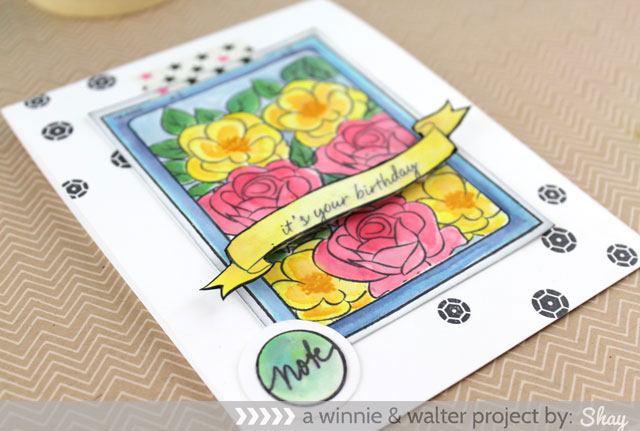
I began by stamping the frame from The Write Stuff: Leave it to Dad in black ink on a journaling card by Studio Calico.  I made a mask of the frame and then filled the inside in with the flowers and leaves from The Big, the Bold and Extras.  I made a mask of each the flower so I could have some depth in how the flowers stamped.  I then painted in the flowers with a water brush and Distress Ink that I smeared upon my non-stick craft sheet by Ranger.  Distress Inks are wonderful for watercoloring and blend wonderfully.  In the yellow family I used squeezed lemonade, mustard seed and wild honey.  In the pink family I used spun sugar, worn lipstick and festive berries.  In the green family I used iced spruce, evergreen bough and mowed lawn.  The blue inside the frame is stormy sky.  The frame is painted in with tumbled glass, broken china and chipped sapphire.

The outline banner from The Big, the Bold and Extras is painted in with the yellows listed above.  The sentiment is from Bubble Talk.  After cutting out the banner I edged it with a black Sharpie.  I attached the banner using dimensional foam adhesive.

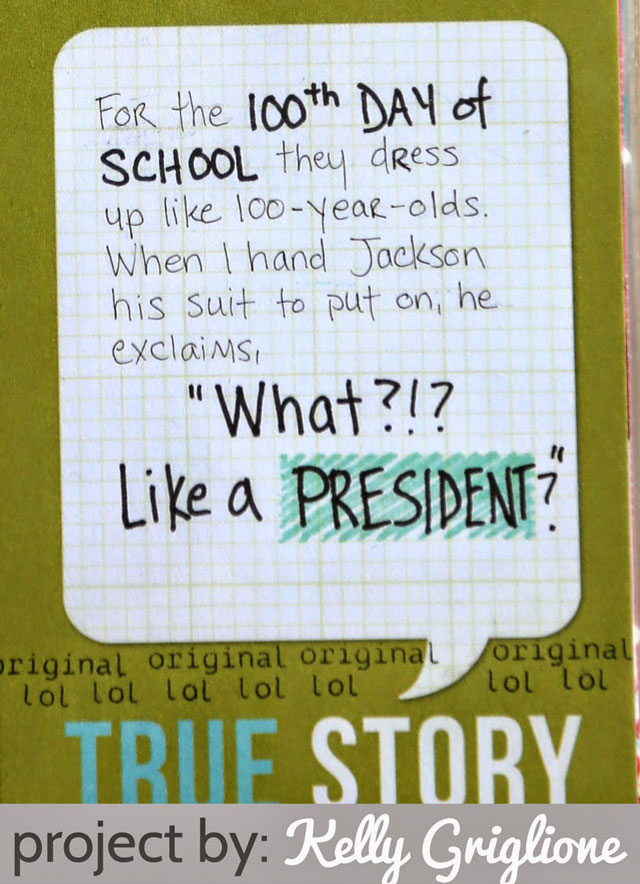
The note is from The Write Stuff: Love Story and is colored in with evergreen bough and mowed lawn.

On the white card base I stamped the large and medium solid faceted sequins from Scenery: Big Bang Bling.  I attached the journaling card with washi.  And there you have the card.

shay_watercolor3

Now that you have seen what Julie and I have created, wait until you see the glory that The Talent has made today!  We hope you take the challenge and play along.  Keep on reading to see how you can join in and win!

The Talent

Gayatri_Mr.-&-Mrs.-card 
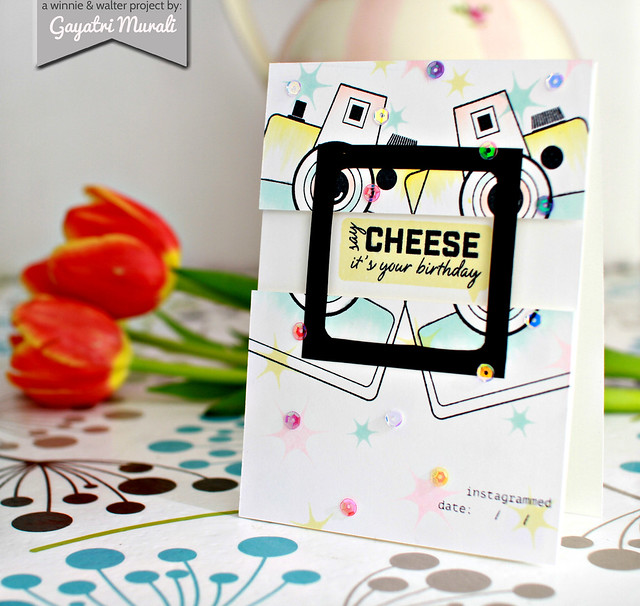
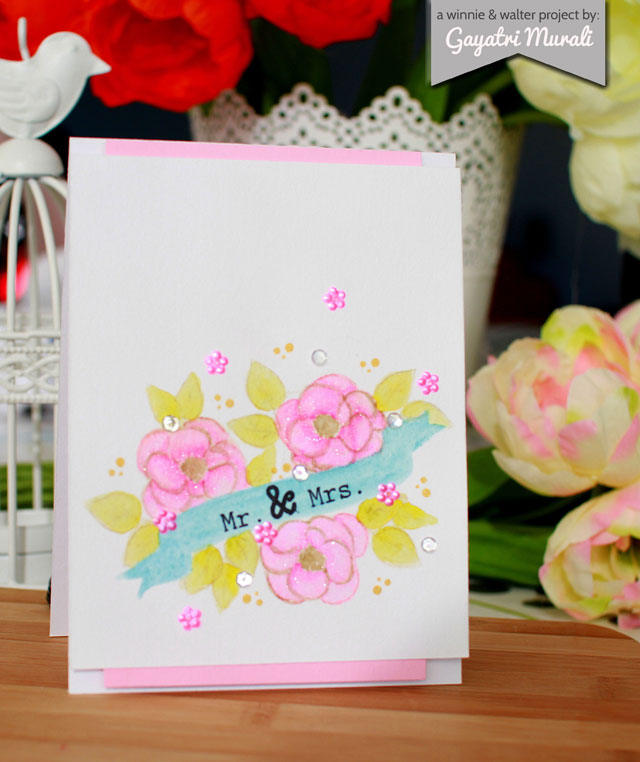
CLICK HERE to see more about Gayatri's project.

Laura_IMG_3924 
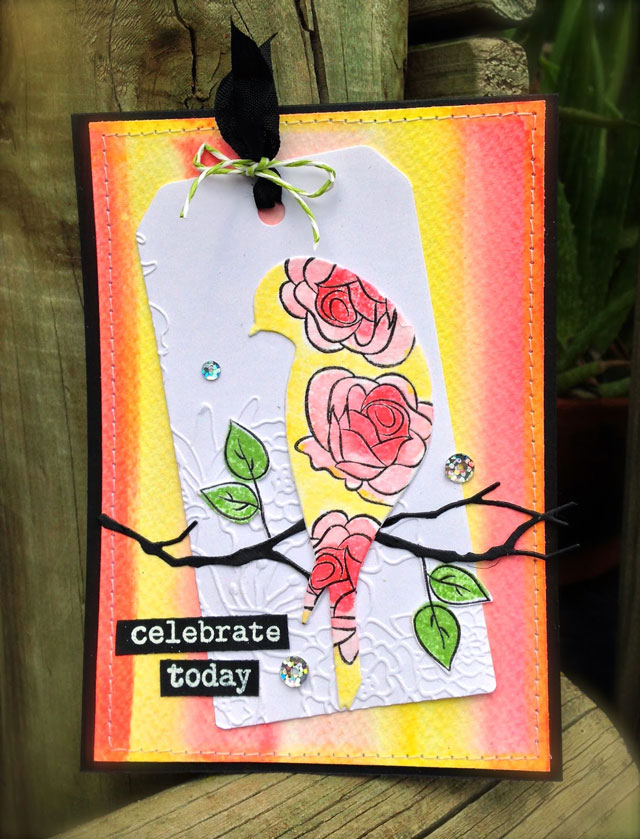
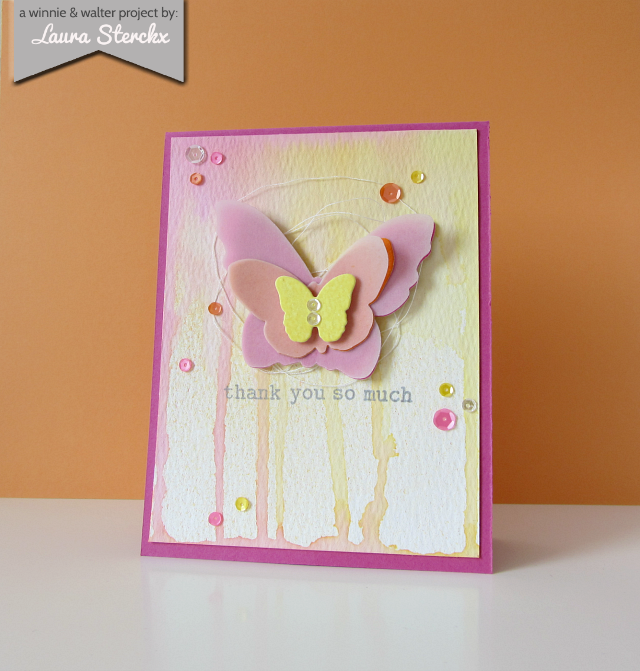
CLICK HERE to see more about Laura's project.

Mayuri_WWSTL_DIST_WATER 
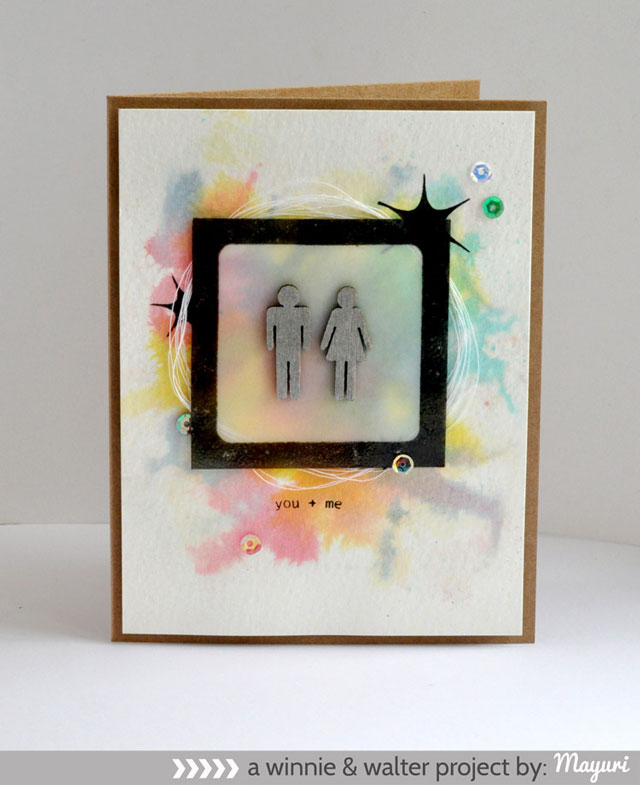
CLICK HERE to see more about Mayuri's project.

Vanessa_watercolorwedding 
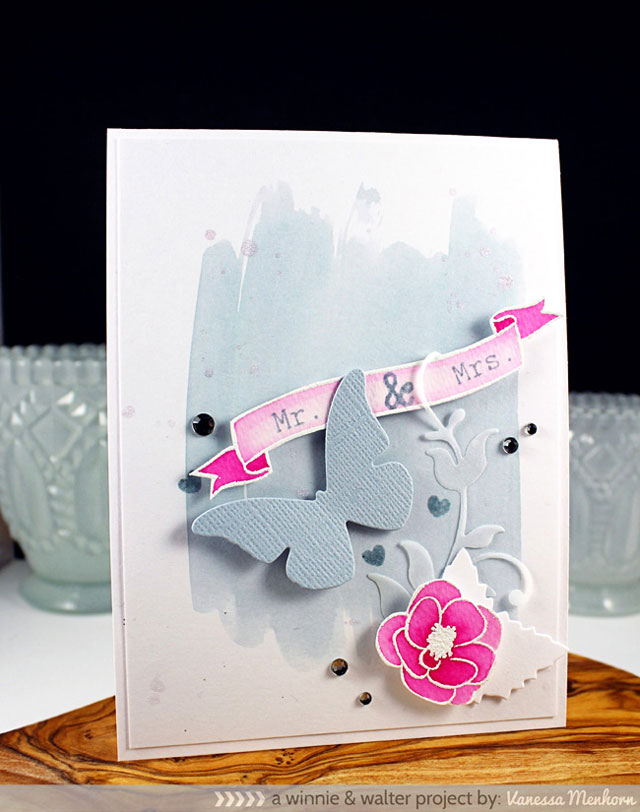
CLICK HERE to see more about Vanessa's project.

>>>THE CHALLENGE<<<

Want to win a care package by Ranger?  Ranger has generously donated a prize of a mini ink blending tool, replacement foam and two (2) sets of Distress Ink minis.  Wow, that is awesome!

You have two (2) ways you can win:
  1. You can comment once on this post; and/or
  2. You can create a new watercolor/watercolour project using Distress Inks + at least one (1) w&w product (this can include stamps, cut files, digital products and/or one of our freebies found on our website or for our Facebook fans) and add it to the Link-up tool found below. You may enter as many times as you wish while the challenge remains open.
We will randomly pick a winner from the comments and challenge entries that are entered by Sunday, July 13, 2014 at 11:55 p.m. CST.


w&w supplies:

Friday, June 27, 2014

Happy Holidays with Joni

Hello Everyone, Joni here! For today’s card project I created a Holiday card using the past and the recent release stamp sets. The Big, the Bold, and Extras (Banner), Parentville Extras (star), The Write Stuff: Leave it to Mom (wreath), and The Big, the Bold, and the Happy (sentiment “happy holiday).

1. To begin my card I first stamped and fussy cut the images. The star and the banner are gold embossed before fussy cutting.

2. Before stamping to create my wreath I first drew a circle with a pencil and stamped the image, I then erased the pencil mark after drawing. I did this two times; I stamped the wreath on the panel the other after stamping I then fussy cut around it and die-cut the center on both.

Joni-H-Holiday-3-ww

3. This is how I assembled the card with the images.  I put the fussy cut wreath on top of the panel, adhere the stars, and the banner with foam dots for dimensions.

4. The stitched scallop borders you see on both sides of the card are from Pretty Pink Posh – Stitched Border Dies1 as well as the gold 4mm sequins.

Joni-H-Holiday-2-ww

Here’s the full view of the card.

Joni-H-Holiday-ww

I hope you enjoyed!

Thank you so much for visiting.

Have a Gorgeous Day :)

Wednesday, June 25, 2014

Laura's First w&w Post!

Hey everyone! It's Laura here and today is my very first blog post as a Winnie & Walter Design Team Member. I am SO honored and happy to be part of this team. 

w&w_laura_sterckx_full_image_mr&mrs

Flowers make me oh-so happy. That's why I decided to use the awesome The Big, the Bold and the Extras stamp set. This stamp set has some really pretty flowers and great sentiments in it. There are endless possibilities using these flowers, but I decided to ink them up with Distress Inks and then mist the inked stamp using some water. You get a really nice and soft image by doing that. 

w&w_laura_close_up

After stamping the flowers, it was time for a greeting. I combined stamps from The Big, the Bold and the Happy stamp set and The Big, the Bold and the Extras. This greeting is perfect for newly-weds. Isn't that sparkle on the greeting beautiful? I first stamped it using Silver Hero Arts ink and then I heat embossed it using Wow! Neutral Ultra Shimmer Embossing Powder. 

Lately, I just can't seem to finish off a card before adding some sparkle. I added lots of glitter using the Clear Wink of Stella Brush Pen. Don't you just love sequins? This time I used the 4mm Lemon Drop, 4mm and 6mm Pink Blush, 4mm Tangerine and the 4mm and 6mm Sparkling Clear sequins by Pretty Pink Posh. :) 

Thanks so much for stopping by. 
XO

Laura

w&w supplies:


Tuesday, June 24, 2014

Playdate No. 2 Winners Announced

Yes, you read it right we are choosing 2 winners of the Playdate No. 2 challenge!  We faced a momentous challenge of our own to pick from the superb array of projects.  We want to congratulate every single person who entered and made our decision so darn tough...we spent quite a bit of time discussing our choice!  Thank you so very much for so generously sharing your talents and efforts with us!  

We finally paired it down to 2 because of their clever use of stamps.  Here are our winners:

dianejaquay.playdate2

Diane Jaquay of Peaceful Lane

Diane created 4 beautiful cards that showed an excellent out-of-the-box creativity that had us smitten.  This particular card works The Big, the Bold and Extras to within an inch of its life!  She simply went for it.  Then there is the great use of the pattern rectangles from Scenery: Rectangled & Triangled.

jennymartin.playdate2

Jenny Martin of My Paper Epiphany

Jenny also created several lovely cards, but it was the one in which she so wonderfully paired The Big, the Bold and Extras with dies to create this charming bird perched on a branch.

Diane and Jenny, please contact us at info {at} winniewalter {dot} com!

We can't wait for our next Playdate. :-)

Winnie, Walter, Julie & Shay


Monday, June 23, 2014

Scrapbooking | Kindergarden Life with Kelly

Hi everyone!! I'm so pleased to share two Project Life layouts with you today. I really need to stay motivated to finish my 6 year-old's Kindergarten book before summer ends and he's in 1st grade, right? One way to make it easier on myself is to use the smaller 6x8 books with only 4 pockets to fill. Much easier and quicker than the traditional 12x12 pages with 8 pockets!

KellyKindergartenPL1

For Project Life or scrapbooking, I love using arrows to point out the important things. The Write Stuff: Love Story has two arrows that I use quite often, like the ones pointing to the "100" on Jackson's math worksheet.

KellyKindergartenPL2

Another way to make life easier on myself is to start with pre-made journaling cards and then embellish them as needed. The sketchy rectangle in Scenery: Rectangled & Triangled works out wonderfully for highlighting key words. To finish it up, I stamped "original" and "lol" from The Write Stuff: Picture Perfect between the bubble and the caption.

KellyKindergartenPL3

In addition to documenting all the big days of school like the First Day, Halloween, Valentine's Day, etc. I like to document the NON days of school ... like when they have it off.

KellyKindergartenPL4

The asterisks in Scenery: Big Bang Bling are perfect for a snow day. Use a few different colors for depth and you're done in a minute. Before stamping "hello" from The Big, the Bold & the Happy I touched a darker ink pad to the bottom of the letters. I originally stamped "lucky day" (The Big, the Bold & Extras) directly on the journaling card, but it got lost in all the other black journaling so I stamped it on a colored cardstock for some contrast.

KellyKindergartenPL5

Here's an easy border from cutting a thin piece of patterned paper and then stamping "good times" repeatedly from The Write Stuff: Picture Perfect.

Thanks so much for looking!
-Kelly

Friday, June 20, 2014

Mayuri's First w&w Post!

Hey everyone!

Welcome to my first post for Winnie & Walter - woot, woot! Their stamp sets are amazing, and I'll be honest, I was like a kid in a candy store when I saw just how many different stamp sets are available! Ever since Shay and Julie invited me to join the Design Team, my.mind.has.not.stopped.racing!!! Here's the card I'm sharing over at the Winnie & Walter blog:

WW_MAYURI_JUNE2014_RGB_0157a

I began by stamping the sequin images from the Scenery: Big Bang Bling set in Delicata Golden Glitz ink all over the front of my textured card base. I set this aside so I could work on the sentiment, which was die-cut on my Silhouette out of some brown cardstock. You can find the cut file here.

I die-cut out a couple of tags from some patterned paper and some vellum, adhering them together slightly offset. The vellum mutes the pattern paper down a little, which is perfect for the sentiment to sit on and was adhered using little dots of Glossy Accents - I didn't want the whole thing to be stuck straight down and like the way that it lifts away from the tag a little ;-)

WW_MAYURI_JUNE2014_RGB_0163a

I dyed some white thread with Tarnished Brass Distress Strain and heat set before wrapping it round and round and adhering to the card base with some glue dots and foam pads. I stuck the tag on top, sprinkled a few sequins around and voilà!

Thanks for stopping by ;-)
Mayuri

Thursday, June 19, 2014

Special Guest Star Michelle Wooderson Take Two

goldgueststar_michellewoode
We have the truly wonderful Michelle Wooderson with us again today and we could not be happier!

michelle_wooderson2

This project features a set of handmade cards that I created by stamping and hand cutting the flowers.  I combined stamping with some Copic marker shading to add some depth to the images.  Stitching, stapling and Washi tape finish off the cards.

Michelle pieces together some lovely birthday cards featuring The Big, the Bold and Extras!  We love how she's colored in and cut out the flowers...they look like stickers with their coloring and the slight white outline!  These cards are prairie chic!

To see more about Michelle's project CLICK HERE.

We were so fortunate to be graced with Michelle's awesomeness this week. We feel truly blessed and thank Michelle from the bottom of our hearts!

Make sure to leave Michelle some love here and on her blog! In case you missed it, Michelle's first Special Guest Star post is HERE.

w&w supplies:


Wednesday, June 18, 2014

Gayatri's First w&w Post!

Hey everybody, Gayatri here today. This is my first post as Winnie & Walter talent. I have a card share for you using the new release stamp sets – Bubble Talk, The Write Stuff: Picture Perfect.

Gayatri_Say Cheese it is your birthday

I have also used the cut files from The Write Stuff: Picture Perfect. I have made a card base which is 4’ x 5 1/2’ in size. Trimmed a white cardstock to the size of the card front which is 4’ x 5 1/2’.

I have stamped the camera twice slightly overlapping and at an angle using Memento Black Ink. Then coloured using Copics markers by adding brush strokes leaving a lot of white space and not colouring the entire camera with colours. I stamped the flash stamps in the same colour I used on the camera. Tiny sentiments from The Write Stuff: Picture Perfect stamp set are stamped towards the bottom right. Now I trimmed the card panel right through the stamped camera. I know! It is shocking, right? It took me a while before I decided to trim. Lol! I placed the trimmed panel on the card front to leave a gap in the middle so I can stamp the speech bubble and sentiment. I trimmed off the excess from the panel. I placed the panels back on the card front and drew an outline for the gap using the pencil. Then stamped the speech bubble and sentiment on top of the speech bubble. Erased the pencil lines. I then adhered the camera panels using foam adhesives.

Using Silhouette machine I die cut the frame and adhered it to the card front such that it frame the sentiment. Finally used sequins that Shay sent me to accent my card. I love the colours with a lot of white space. Hope I have inspired you to make a card today.

 Have a wonderful day and fun crafting.

Gayatri Murali
scrapawayg3@gmail.com

w&w supplies:


Tuesday, June 17, 2014

Special Guest Star Michelle Wooderson Take One

goldgueststar_michellewoode

We are so honored to introduce our June Special Guest Star, Michelle Wooderson!  We have been long time fans of Michelle's charming and heartfelt style which should be called heart-made!   She incorporates warmth, humor and down home prettiness in all she does.   We love to see what she has crafted whether it be a quilt, cards or her awesome Project Life spreads!

>>>ABOUT MICHELLE<<<

michelle_wooderson

I was born + raised in a small Kansas town. I’m your typical farmer’s daughter and although I lived in a big city for 10 years, I found my way back home to the country where I now reside. My family now consists of my high school sweetheart husband Eric and my two teenage daughters. The “reds” I call them, Josey and Jordan. My crafting ventures consists of scrapbooking (mainly Project Life), card making and creating gifts and fun packaging for family and friends. I also like to incorporate some of my other hobbies into my crafting which include vegetable gardening with lots of canned veggies and jams, sewing and quilting, and junking adventures to search for just the right vintage find. I like my projects to have a homespun feel to them with lots of little added embellishments. I believe that handmade is always best.

>>>MICHELLE'S PROJECT<<<

michelle_wooderson1

This first project features a countdown calendar for a Colorado vacation we're taking with 4 other families.  We're having a trip planning party beforehand to plan our road trip, daily activities and meal planning.  I thought the families would have fun counting down the days to our trip with this little calendar which features a photo of our cabin we'll be staying in.  

We love that Michelle inked up The Big, the Bold and Fun and went all out to create these personalized calendars that will not only make the time before her family's vacation even more memorable, but will be a wonderful keepsake after the vacation!  Michelle shows how awesome The Big, the Bold and Fun is in celebrating trips whether they are in the summer or any time of year!

To see more about Michelle's project CLICK HERE.

Make sure to leave Michelle some love here and on her blog!

Come back Thursday for another day with Michelle!

w&w supplies: