We are proud to bring you our next Spotlight On...Cris G! Cris instantly caught our attention with her thoughtful and delightful deftness with design and composition. For instance THIS CARD she created for The Gossip Column which is just gorgeous.
Hello creative and talented crafters!
My name is
Cristina and I live and love with my husband in the sunny and peaceful
Portugal. For the ones who already know me Cris G. is my usual signature, and
for those who don’t have a clue of who I am, you can find my work in this
Flickr gallery - https://www.flickr.com/photos/95118517@N03/. I would love if you stop by when
you have some time, though I understand if you don’t, we all have busy periods
in life... sometimes it is difficult for me to stop by my own Flickr home :).
I’ve been a
crafty girl and an avid learner in different areas, mostly related to arts and
crafts, for all my life. I started my paper crafting adventure two and a half
years ago, after watching hundreds an undefined number of videos and
tutorials. When I felt prepared I made my first card, and then many others...
and hated all of them :). Now I feel more comfortable with my work, but I’m
still not so pleased with some of my projects.
It was with
surprise and a whole lot of happiness that I received the invitation from Shay
and Julie, to be in the Spotlight for the month of October. Thank you so much
for the privilege!
THE PROJECTS
October is
the month of black and white at W&W, and so I went all b&w with little
pops of color. Just a few spots of color will enhance the neutrals, causing a
higher visual impact.
I chose the
stretch your stash topic because I believe we can get so much more from our
supplies than we usually do, myself included... and it can be so much fun as
you discover new uses.
I found
this quote the other day: “think outside the quadrilateral parallelogram” :). That’s
it!
IN HALVES
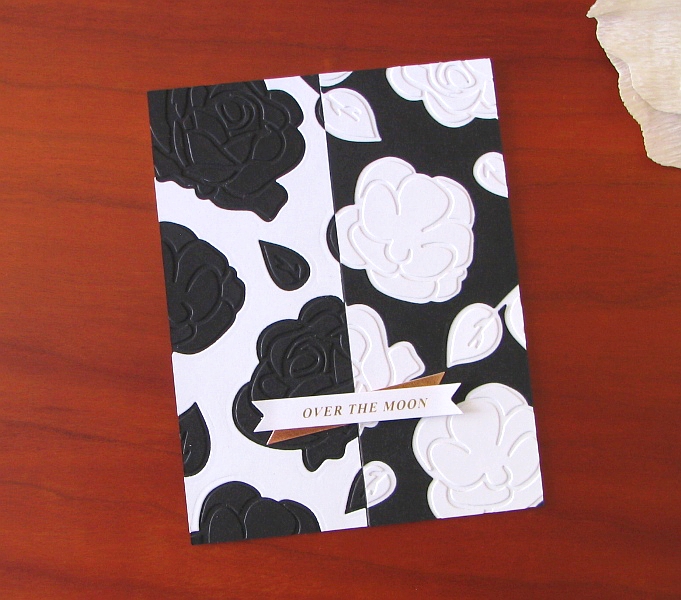
- I started by drawing a sketch with the die cut flower shapes from Winnie & Walter In Bloom: Maggie’s Roses Cutaways into some scrap paper, for a coherent composition.
- With two pieces of cardstock, black and white, slightly bigger than the usual 4.25” x 5.50”, die cut flowers using the solid flower dies and the previous sketch as a guide.*
- Cut both panels in half and inlay the black positive solid flowers in the white cardstock and vice versa, with the help of a thin piece of paper (like photocopy paper) glued to the back of both pieces. Trim off excess of flowers hanging in the centre of both panels.
- Align both pieces of cardstock and adhere to a regular 4.25” x 5.50” white card base. Trim off the excess around.
- Pick the detailed Maggie’s Roses Cutaways dies, and use the outline flowers dies (positive) as a guide to adhere the negative pieces of each flower and leaf.
- Adhere two pre-made die cut labels.
* TIP - I could have done those inlaid pieces in a
much easier way. Since only the centre where the two colors meet together had
to be aligned, I could have aligned the two half pieces first and die cut just
the centre and then all the other flowers separately. The truth is, usually,
when I start a card, I have a blur image of the finished design... I adjust
things all the way through the end.
For this
card I started with two pieces of cardstock a little bigger than the size of a
card so I could decide what to do after die cutting the flowers in both pieces
in the exact same place. What I did was temporarily adhere the white and black
cardstock together and run it through my Big Shot, embossing with the flowers
dies. I ended up with an indentation that allowed me to know exactly where to
die cut each piece afterwards, since the result of cutting through two pieces
of heavy weight cardstock is never satisfactory. I hope my explanation won't be
too confusing... If you have any questions, I will happily try to help.
ODE TO WINTER WOODLAND
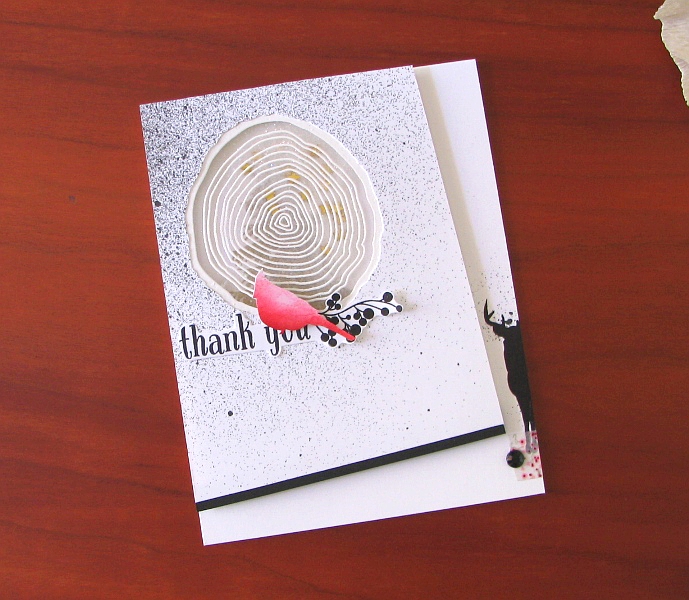
- First spritz black marble Dylusions ink spray, concentrating in the top left corner of a white piece of cardstock. Then cut the piece at an angle and adhere a thin strip of black cardstock at the bottom.
- Using the wood growth rings stamp from Winnie & Walter Winter Woodland stamp set, stamp it in a piece of scrap paper and cut out. Do the same with the bird, this time using a craft knife, because you will need the negative image. Use it as a stencil to blend colors in, then cut out the finished bird. Save for later.
- Stamp a partial image of the deer in black, from the same stamp set, near the bottom right corner of card base. Using a thin brush and an acrylic block, do just a few controlled spatters around the deer. Add a little piece of washi tape and a black gem.
- With a craft knife and the previously stamped image as a guide, cut out the wood shape from the spritzed panel. Draw a fine line on the card base with a pencil through that open area, and stamp the top portion of the tree from Winter Woodland with VersaMark ink. Heat emboss with enchanted gold powder. Using foam adhesive, create a zone for a shaker around that area and fill it with dry stickles and tiny gold stars.
- Stamp the wood growth rings with VersaMark ink onto a piece of heat resistant acetate and heat emboss with white powder. Adhere the acetate to the back of top panel and mount on card base with more foam tape.
- Stamp the sentiment and berries and fussy cut. Glue sentiment to top piece and adhere the bird from step 2 with foam tape.
TIP - Mix goodies and what they are intended to
be; for example, use solid stamps as stencils to get a blended ombre effect.
Heat
embossing on acetate is so much fun and gives so many possibilities... and it
is very easy. You just have to be sure your acetate is good for photocopy or
printing, and let your heat tool reach a high temperature first.
SMALLER, PLEASE
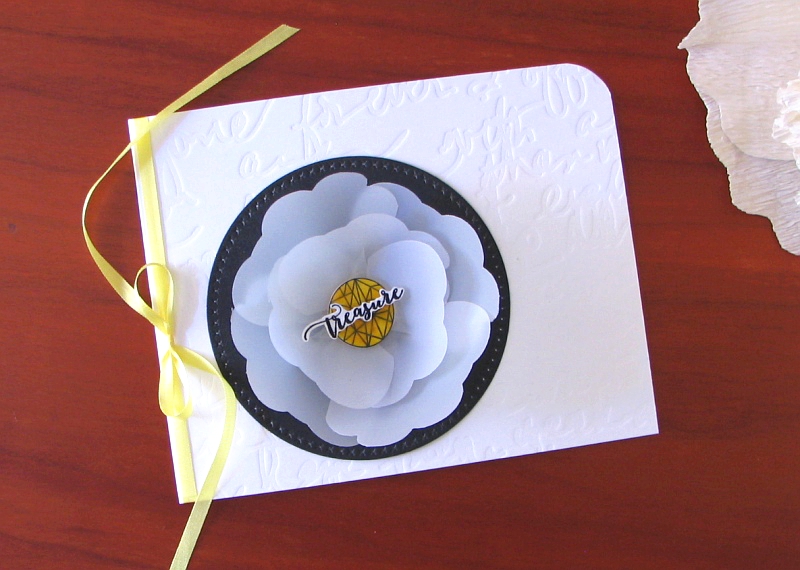
- Cut a white card base and dry emboss the front using Winnie & Walter Scenery:Persuasion Script Creative Screenings. Glue a circle of black cardstock.
- Using a solid die flower from Winnie & Walter In Bloom: Maggie’s Roses Cutaways, die cut the bigger flower 7 times from vellum. Give the shape of petals to each die cut flower, making two layers: one with 4 petals and another one with 3. Adhere the resulting 3D flower to a small circle of white cardstock, and this one to the black circle.
- Stamp the faceted circle from Winnie & Walter True stamp set in a piece of white shrink plastic, using Archival ink or StazOn ink. Allow the ink to dry and then trim around or die cut. Repeat the procedure with the word Treasure. Now this is the fun part!!! I used my heat tool and the results are quite good, but if you prefer you can use your oven.
- After the two pieces are completely cool, color the circle with nail polish for some transparency, let dry and add a second coat with Glossy Accents. Leave the word Treasure as is. As an alternative, paint with other coloring medium of your preference, then coat with VersaMark ink and heat emboss with clear embossing powder (this option wasn’t experimented yet).
- To finish off the card, tie a bow in a piece of silk ribbon around the card front and crop the upper right corner.
TIP - Use your not-intended-for-3D-flowers dies to
create beautiful 3D flowers.
Use shrink
plastic to make unique personalized embellishments.
Explore the
versatility of your supplies (I have to remember this one more often!) :).
Most of all
have FUN!!!
This is all
from me for now.
It was a
pleasure working with these fantastic Winnie & Walter products!
See you
soon!


Cris!! I love all your cards, instructions are clear, and helpful tips are so helpful! But! you totally captured my heart with the Winter Wonderland card! Anyone who knows me would be I'd have chosen the vellum flower! Congrats on that Spotlight - so deserved!
ReplyDelete=] Michele
Gorgeous cards Cris! You've some brilliant ideas! Congrats on the spotlight spot! x
ReplyDeleteWhat stunning works of art. You are so lucky, W&W, to be able to have Cris as a guest designer.
ReplyDeleteAbsolutely amazing work Cris ...All your cards are just stunning in design ...thank you so much for the inspiration ♥️♥️
ReplyDeleteFabulous and such clever and inventive projects great job Cris :)
ReplyDeleteKate xx
Breathtaking cards, Cris ... they're all gorgeous ... the one that stole my heart is the chic, stylish and oh so elegant black and white one ... it's a stunner! Congratulations on being in the Spotlight at W&W ... looking forward to seeing more! Anita :)
ReplyDeleteThree Cris G cards in one post. What a treat! One of the most engineering card makers out there. Her creations are always gasp-worthy.
ReplyDeleteWhat lovely cards! Your directions were clear and concise. Thank you!!
ReplyDeleteOh WOW.. those cards are so fabulous!
ReplyDeleteCongrats on your spotlight, Cris! You've made a trio of beautiful cards and I love them all, but if I had to pick a favourite...it would be the one created with the Winter Woodland set!
ReplyDeleteWOW, these are brilliant!! LOVE them all, but my favorite is the first card, WOW!!!!
ReplyDeleteGasp! Cris, my friend, you have made the most extraordinary card art trio!! I'm so thrilled that you are being featured!! Hugs, Darnell
ReplyDeleteWow! Your cards are stunning and inspirational!
ReplyDeleteTalk about stunning and eye-catching cards!!!! Cris, these are gorgeous and I will definitely be revisiting this post to reread your explanations abs give these techniques a try.
ReplyDeleteBoth of the cards are absolutely stunning!! :)
ReplyDeleteSuchi xx
Yay for CRIS!!!!!!!!!!!
ReplyDeleteHer designs are always amazing....these are simply fabulous! Such a fan of her work!
CONGRATULATIONS on being in the Spotlight Cris - I can see why Julie & Shay chose you - LOVE your STYLE!!!
ReplyDeleteALL three of your cards are DELIGHTFUL - LOVE the designs and techniques in each one - WOW - SO MUCH for me to try!!!
THANK YOU for sharing your CREATIVE INSPIRATION, recipes for AWESOMENESS and Top Tips too :)