Wednesday, September 23, 2015

Metallic | You Make Life Sparkle with Lydia Evans

Hi there and happy Wednesday! It's Lydia here with you today and I have a little surprise ..... a video.

This month's theme is 'Metallic' so I decided to do and bit of foiling. I love foil it adds such a beautiful and expensive look to cards, and foiling a stamped image is easy ... I will show you how.
The video takes you step-by-step how I created this card....

  DSC06152
I have used lots of the 'Sparkle' set on this card and for a little set it packs a big punch! There are lots of different occasions this set would work for too.

I have used Essentials: Audrey Cutaways for the card layer, I love this die-set as it's just so versatile, I mean that scalloped edge is just a perfect touch!

DSC06156

Here's the video I do hope you enjoy it!   


To see the video on YouTube:
https://www.youtube.com/watch?v=2F0X7XnlHgs&feature=youtu.be  

See you again real soon!

Hugs Lydia x

w&wDT_lydiaevans_blog-sig


w&w-supplies


Monday, September 21, 2015

Metallic | Wishing You Happy Holidays with Gayatri Murali

Hello everyone, Gayatri here today with a holiday card for this month’s metallics theme. This is my card:

gayatri_Wishing you happy holidays2


This is a quick and easy card which can be mass produced. I started with making a landscape card base using white cardstock. I preferred the thicker 110 pound cardstock from Neenah as I am going to stamp on the card front. I placed the holiday die from The Big, the Bold and Merry Cutaways set in the middle of the card front and temporarily secured it. Then I stamped the shining star image from Scenery: Big Bang Flurries stamp set using Tsukineko Gold Delicata pigment ink around the die, then filled in the gaps with Tsukineko Silver Delicata pigment ink using the same stamps. I love the gold and silver combination on white base. I then removed the die, and die cut one gold and two white die cuts using the Holiday die. I stacked and glued them with the gold die cut on the top. I adhered this dimensional die cut to the centre of the card front. The smaller sentiments are from The Big, the Bold and Merry stamp set which I stamped on a strip of white cardstock, trimmed at an angle and adhered using foam adhesives. Finally adhered silver stars and gold sequins from Pretty Pink Posh to bring the colours together. Here is closeup photo of the card.

gayatri_wishing you happy holidays closeup


You can change the colours and add some traditional red and green or blue stars in between to vary the card a bit. Similarly, use different die cut from The Big, the Bold and Merry cutaway set and different smaller sentiment to get entirely different card but keeping the design the same. Hope I have inspired you to start your Christmas card collection.

Thanks for stopping by today!

w&wDT_gayatrimurali_blog-sig


w&w-supplies


Saturday, September 19, 2015

September Leading Lady Lindsay Amrhein | Take Three

Our September Leading Lady, Lindsay Amrhein is back for her triumphant third performance!  If you missed her smashing debut you must see it...CLICK HERE or her second performance which showcases her wonderful watercoloring CLICK HERE.  Lindsay's proves her skill with an duet of inktastic projects today!

Without further ado, Lindsay....

Hello Winnie & Walter fans!
It is 
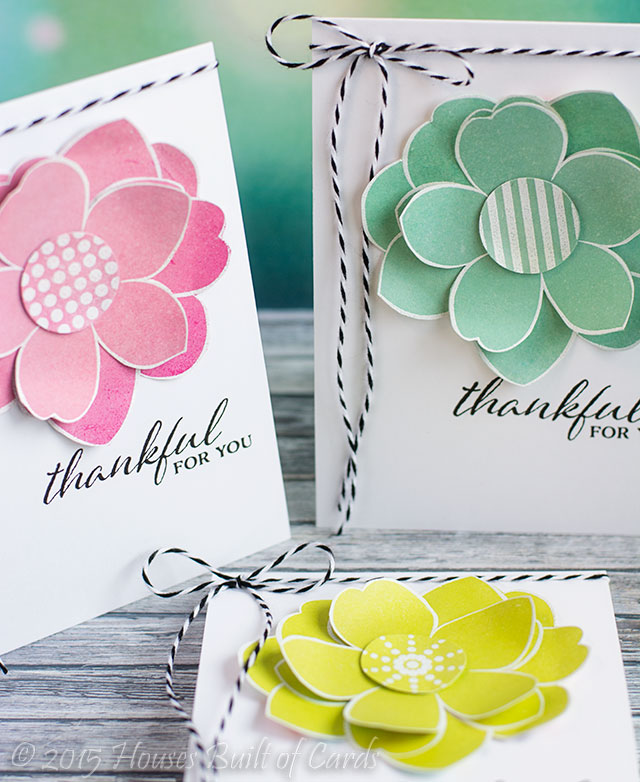
Lindsay back again with you today, to share my third performance with you! It is hard to believe that we are well into the month of September already! For today, I am bringing you cards using ink blending. This technique is so versatile, and fun! You can add color to just about anything with an ink pad, and a foam applicator.
For my first card, I die cut the Essentials: Audrey Cutaways out of white cardstock, and using a round foam applicator, applied Tumbled Glass Distress Ink to just the bottom. I then moved on to my flowers. Taking the In Bloom: Maggie's Roses dies, I die cut two of them, and applied a heavy layer of ink to each. I also did that to the leaves. To complete them, I added the line layer, and adhered them to the panel with both foam, and regular adhesive.
I stamped the sentiment from The Big, the Bold and Comfort in Onyx Black ink, and adhered the panel to a white cardbase, finishing it off with a few sequins.
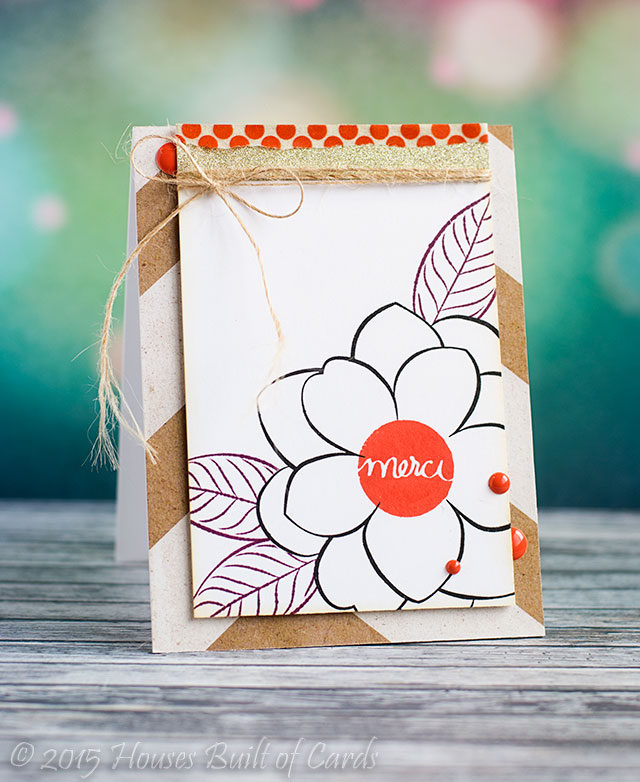
For this card, I wanted to blend in a rainbow of colors, over top of an embossed image. So, to begin, I repeatedly stamped the border image from the True stamp set in Onyx Black ink, and applied clear embossing powder over it. Once I heat set it, I applied my Distress Inks in rainbow order, making sure to overlap the colors.
After I trimmed the panel down, and adhered it to a white card base with foam I began working on my sentiment. I die cut the In a Word: Hello Cutaway multiple times from black cardstock, and adhered them together. I then adhered that to my card, along with the word "friend," which I stamped from the True stamp set. To finish it off, I adhered a few white enamel dots. Thank you so much for visiting today! I hope you were inspired to try a bit of ink blending on your next project! Have a great day!


w&w-supplies


Friday, September 18, 2015

Cutaways + Creative Screenings Back in Stock!

backinstockcutaways092015

backinstockcreativescreenin

Hello!  Just wanted to notify one and all that all of our cutaways and creative screenings have been restocked so get them while they are hot. :-)

Also check your email boxes if you are a newsletter subscriber. ;-)


Metallic | Strength with Kelly Griglione

Hi all! Are you excited about all the metallic inspiration this month at Winnie & Walter? Want to get your metallic on, but don't have any metallic sheets? No problem! Look no further than your recycling bin. I'm happy to share a new-to-me technique of die cutting pop cans (soda cans, Coke cans, you know what you call them in your area of the world!) I know this has been tried before, but I never took the time to experiment until w&w's metallic theme got me going. Let's take a look!


All you really need is a pop can and scissors. I have heavy-duty wire-cutting scissors here, but you can also use ordinary kitchen shears. I'd just avoid using your good paper cutting scissors : )


Cut through the drink hole and start cutting around the can. It's much easier to cut a straight line if you cut counter-clockwise (with the long end of the can on your right, if you're right-handed).
 
 
 Cut down the seam of the can.
 

Cut the bottom off. Again, keep the long end of the can on the right if you're right-handed.


Now you're all set to die cut as usual. For cans with patterns and writing on them you'll want to think about what sections to cut for each cutaway. In this case I wanted the base of the flower to be blue, the outline silver, and the center red.


Don't forget you can use the inside of the can too, which is how I got the silver outline. Here you can see my not-so-glamorous die-cutting plate with a crack running through it. Nice, Kelly. 


And here it is! The flower is from In Bloom: Maggie's Roses Cutaways. The red center I used a hole punch for. The aluminum is a little tricky to adhere together, especially since I can't find my glossy accents from our move this summer (ugh). So I used a Tiny Attacher in two places along the metal outline. It's hidden pretty well I think. The leaves I cut so "Pepsi-Cola" and "150 calories" would be visible. After all that work you want the recipient to know what it is!


Surprisingly, you can also heat emboss on aluminum. I chose the "strength" sentiment from The Big, The Bold and Comfort. Not sure if you noticed, but the two waves on the base of the card also mimic the Pepsi logo. I love details! 

Thanks so much for looking!
- Kelly

w&wDT_kellygriglione_blog-sig


w&w-supplies


Tuesday, September 15, 2015

{Heidi's} Big Bloom: a w&w STAMPtember® exclusive!

exclusiveheros_winnieandwalter

Hello there loverlies!  We are so delighted to be sharing the news that we have an exclusive and limited STAMPtember® stamp set, Big Bloom (which we unofficially call Heidi's Big Bloom) and coordinating die set to celebrate this joyous month-long stamp event at Simon Says Stamp!  As you may well know we have a great deal of love and admiration for Simon Says Stamp and the people behind such an extraordinary brand like founder Heidi Klausing Crowl who makes it all possible.  We feel incredibly blessed to have this opportunity to join in.

We designed a beautiful big flower in the style of In Bloom: Addie's Garden that is perfect for coloring, layering and/or paper piecing.

SRWW15

We hope you love it as much as we do. :-)

We wanted to share our joy for Big Bloom and we and our ever stellar Talent have lots of gorgeous inspiration for you!

Julie


Hello everyone!  I’m so happy to be sharing my project using the brand new EXCLUSIVE stamp set Big Bloom that we designed for Simon Says Stamp’s HUGE STAMPtember® event. We are so honored to be part of the party this year and I just want to say a big Thank You to Heidi and the whole team from Simon Says Stamp for inviting us. This flower has endless possibilities with the variety of centers, but the centers themselves can be used with other cards or to create fun backgrounds.

jmog_w&w_stamptember_bigbloom-card


For my project, I stamped the Big Bloom flower twice on Neenah Solar White cardstock and inked one in shades of pink distress ink (spun sugar, worn lipstick, picked raspberry) and the other in shades of yellow and orange distress ink ( dried marigold, wild honey) and just a hint of pink (more spun sugar and worn lipstick). I cut these by hand and stamped the polka dot center on the yellow flower, embossed in gold, and popped this layer up with foam adhesive.

jmog_w&w_stamptember_bigbloom-closeup

The background is an aqua / teal paper from Studio Calico and I sectioned it off so I could add a faint gold spritzed diagonal created using the Scenery: Classic Diagonal Creative Screening and Heidi Swapp Color Shine in Gold. I have added gold glitter tape to the top, dividing the background, and used the same gold tape for the cut out of the hello sentiment from The Big, the Bold and the Happy Cutaways.  Love this color combo with the gold. And yes, as I am writing this post, I am realizing I'm just one color away from using all of the w&w logo colors on this project. Happy accident!!!

Winnie & Walter fans, we hope you love this set as much as we do!


Shay

I am a big admirer of large stamps that can be the star of a project and Big Bloom is just that!  I love paper piecing as a way of coloring an outline image and then when you can cut up the image and create layers of patterned paper layers...oh my!  This was one of my visions for this stamp set when Julie and I were working up the idea and design of it.  I love how Julie brought it to life and used the same style as she has for In Bloom: Addie's Garden (and some future sets being released in October wink, wink).


shay.stamptember1a

I picked out 3 pink patterned papers with different tones and one green patterned paper from the Crate Paper Poolside 6x6 paper pad and Crate Paper Oh Darling 6x6 paper pad.  I stamped the flower in Versamark on each of the 3 pink patterned papers and heat embossed each with gold embossing powder.  I stamped the leaves twice in Versamark on the green paper and embossed it with gold embossing powder as well.  I then decided on the lighter paper being the base with each layer being slightly deeper in tone.  I cut 3 leaves off the middle flower layer.  For the top layer I cut out the center 5 petal flower which we designed to be able to be cut out easily.  On the center 5 petal flower I stamped the ray center in Versamark and heat embossed gold embossing powder.  


shay.stamptember1c

Before putting the flower together I used Copic markers to color in the petals under each level for depth along with the center of the flower and the leaves.   I adhered the flower together with foam dimensional adhesive.

I embossed a white cardstock panel with a Cricut embossing folder and then cut the cardstock with the larger panel from Essentials: Audrey Cutaways.  I then dropped some gold mist from Heidi Swapp and then adhered the flower and leaves onto the embossed panel.

I stamped and gold embossed the sentiment circle and punched it out (all the circles are 1" for easy punching or die cutting but of course the coordinating die set also has a circle die).

Last I adhered the white panel to a card base which has a patterned paper from the Crate Paper Oh Darling 6x6 paper pad.


shay.stamptember1b

You haven't seen anything yet!    Wait until you see what The Talent has created.  Wow!

The Talent

gayatri_Merci card
CLICK HERE to see more from Gayatri 

heather_p_091615
CLICK HERE to see more from Heather P. 

joni_ww-merci
CLICK HERE to see more from Joni.

kelly_Simon Says Stamp Big Bloom 3D Flower Card
kelly_Simon Says Stamp Big Bloom Flower Card
CLICK HERE to see more from Kelly.

WW_STAMPtember2015_MAYURI_RGB_1084
 CLICK HERE to see more from Mayuri.

vanessa_sssexclusive3 Kopie
vanessa_sssexclusive2 Kopie
vanessa_sssexclusive1 Kopie
CLICK HERE to see more from Vanessa.

lydia_DSC06169
CLICK HERE to see more from Lydia.

laura_DSC00657
CLICK HERE to see more from Laura.

heather_hoffman_Cards-9-5-15-100
heather_hoffman_Cards-9-5-15-094
CLICK HERE to see more from Heather Hoffman.

Breathtaking, right?  

Don't forget to check out Simon Says Stamp to purchase your very own Big Bloom before they are gone!